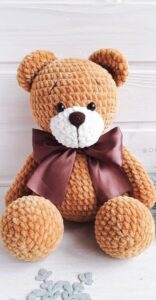
Amigurumi has gained widespread popularity in recent years, and for good reason. The Japanese art of crocheting small, stuffed animals has captured the hearts of crafters worldwide. One of the most beloved designs in the world of amigurumi is the Bear Amigurumi Pattern.
This charming crochet project allows you to create a cute and cuddly bear, perfect for gifting or adding to your collection. In this article, we will walk you through the step-by-step process of creating your very own bear, providing you with detailed instructions, tips, and everything you need to know to succeed.
Whether you’re a seasoned crocheter or a beginner looking to dive into the world of crochet patterns, this guide will provide you with clear and easy-to-follow steps. We will also discuss the necessary materials, key crochet techniques, and how to personalize your bear to make it truly special. So, grab your yarn and crochet hook, and let’s get started on creating your very own Bear Amigurumi!
Before we begin the step-by-step instructions, it’s essential to gather all the materials you’ll need for the project. You’ll need yarn, a crochet hook, a yarn needle, stuffing, safety eyes, and some basic crochet knowledge to get started.
THE BEST CROCHET PATTERNS
As with any crochet pattern, the key to success lies in using the right materials and following the instructions carefully. Now, let’s dive into the first step of making your own adorable bear.
Materials for Bear Amigurumi
When preparing to make your Bear Amigurumi, the first thing you need to do is gather all the necessary materials. Having everything ready beforehand will ensure a smoother and more enjoyable crafting experience. Here are the materials you’ll need:
- Yarn: Choose a soft yarn that is suitable for amigurumi projects. Acrylic or cotton yarn works well for this project. Opt for a yarn that is medium weight (category 4) for the best results. For the bear, you may want to select a warm brown, beige, or cream color, but feel free to get creative with your color choices.
- Crochet Hook: A 3.5mm to 4mm hook is ideal for working with medium-weight yarn. Make sure the hook size matches the yarn you choose to avoid gaps in your stitches.
- Stuffing: Use fiberfill or polyester stuffing to fill the bear and give it a soft, squishy texture. Be sure to stuff the bear firmly to ensure it holds its shape.
- Safety Eyes: If you’re making a bear with eyes, safety eyes are a great option. They are secure and prevent any small parts from coming loose.
- Yarn Needle: You’ll need a yarn needle to sew the parts of the bear together and weave in loose ends.
- Scissors: A pair of sharp scissors will come in handy for cutting your yarn.
With all your materials prepared, you’re ready to begin your Bear Amigurumi project. Let’s move on to the first step!
Step-by-Step Instructions for Bear Amigurumi Pattern
Now that you have your materials ready, it’s time to start crocheting! Follow the detailed instructions below to create your bear.
Head
To begin your Bear Amigurumi, start by crocheting the head. This will serve as the foundation of your bear, so it’s important to get the shape right.
- Magic Circle: Start by creating a magic circle with your yarn. This is the foundation for your bear’s head. If you’re unsure how to make a magic circle, there are plenty of tutorials available online.
- Round 1: Into the magic circle, crochet six single crochet (sc) stitches. Tighten the circle and join the first and last stitches with a slip stitch.
- Rounds 2-6: Increase evenly around each round. In Round 2, make two single crochet stitches in each stitch around, for a total of 12 stitches. In Round 3, crochet 1 single crochet, then 2 single crochet in the next stitch, repeating this pattern until the end of the round. Continue increasing until your head is the desired size.
- Shaping the Head: Once you’ve reached the appropriate size for the head, continue crocheting without increasing until you’ve completed a few more rounds.
- Stuffing: Before closing up the head, add a small amount of stuffing to give it shape and firmness. Make sure the head is evenly stuffed.
- Finish Off: Once you’ve finished crocheting the head, fasten off your yarn and leave a long tail to sew the head onto the body later.
Body
The body of your bear is the next part you’ll need to crochet. The process is similar to creating the head but slightly larger to accommodate the bear’s proportions.
- Magic Circle: Start with a magic circle and crochet six single crochet stitches into the circle. Tighten the circle and join the first and last stitches with a slip stitch.
- Rounds 1-7: Increase evenly in each round, just like you did for the head. Continue increasing until the body reaches the desired size. After reaching the correct width, stop increasing and continue crocheting in straight rounds for a few more rounds.
- Stuffing: Before finishing the body, stuff it lightly to give it shape. Make sure to stuff the body evenly to maintain a smooth shape.
- Finish Off: When you’re happy with the body’s size, fasten off the yarn and leave a long tail to attach it to the head later.
Arms and Legs
The arms and legs are the next components to crochet. These are smaller parts but still essential for the bear’s overall appearance.
- Arms: Start with a magic circle and crochet six single crochet stitches. Continue increasing until the arm reaches the desired length. Then, continue crocheting in straight rounds until the arm is complete. Repeat for the second arm.
- Legs: Crochet the legs similarly, but make them slightly larger than the arms. Start with a magic circle and crochet six single crochet stitches. Continue increasing and then work in straight rounds until the leg is the desired length and thickness. Repeat for the second leg.
- Stuffing: Lightly stuff the arms and legs with fiberfill. Be sure to leave the bottom open for sewing them onto the body later.
Ears
The bear’s ears are a small but important detail that adds to its cuteness. You’ll crochet two ears for the bear.
- Start with a Magic Circle: Crochet six single crochet stitches into a magic circle and tighten it.
- Increase in Rounds: Work a few rounds, gradually increasing to make the ear slightly rounded.
- Shape the Ear: Continue crocheting the ear without increasing until it’s the right size.
- Finish Off: Once you’ve completed both ears, fasten off and leave a tail for sewing them onto the head.
Assembling the Bear
THE BEST CROCHET PATTERNS
Once you have all the components ready, it’s time to assemble your bear.
- Attach the Head: Sew the head onto the top of the body using the long tail from the head. Be sure to securely attach it to prevent any gaps.
- Attach the Arms and Legs: Sew the arms and legs onto the body. Position the arms on each side of the body and the legs at the bottom.
- Attach the Ears: Sew the ears onto the top of the head. Position them carefully to ensure they are even.
- Add Safety Eyes: If you’re using safety eyes, insert them into the head at the appropriate position.
- Finishing Touches: Weave in any loose yarn ends and trim excess yarn.
Now your Bear Amigurumi is complete! You’ve created a charming, cuddly bear that’s sure to bring joy. Personalize it by adding a cute scarf, bow, or other accessories.
Customizing Your Bear Amigurumi
One of the most fun aspects of crocheting amigurumi is the ability to personalize your creations. Here are a few ways you can customize your Bear Amigurumi:
- Add Colorful Accessories: Crochet a little scarf or sweater for your bear using different colored yarn.
- Change the Face: You can use embroidery floss to stitch a simple mouth and nose instead of using safety eyes for a more classic look.
- Make It Bigger or Smaller: Adjust the pattern by using thicker or thinner yarn, or by altering the number of stitches to change the size of the bear.
- Create Variations: Experiment with different colors or add stripes or patterns to the bear’s body to create unique designs.
No matter how you customize your Bear Amigurumi, it’s sure to be a delightful and special creation that you can cherish or gift to someone special.
Creating your own Bear Amigurumi Pattern is a rewarding and enjoyable process. With just a few materials and some crochet skills, you can craft an adorable bear that will bring joy to anyone who sees it.
PATTERN HERE
Whether you’re new to crochet patterns or a seasoned pro, this step-by-step guide provides all the information you need to get started. Remember to take your time, experiment with colors and accessories, and most importantly, have fun with the process. Happy crocheting!


