Easy Cathedral Window Quilt Tutorial: Step-by-Step Guide for Beginners
Advertising
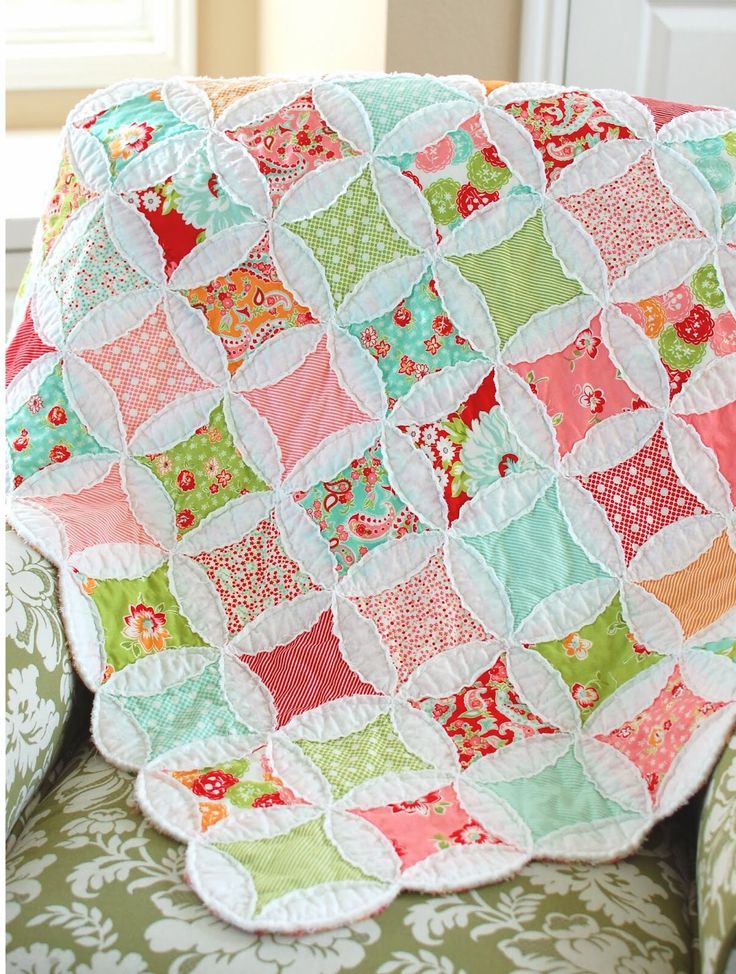
Creating a Cathedral Window Quilt is a beautiful and rewarding quilting technique that results in a stunning, intricate design. This Easy Cathedral Window Quilt Tutorial will guide you through each step, ensuring you can master this pattern effortlessly. Whether you are a beginner or an experienced quilter, this step-by-step guide will help you create a timeless quilt with a unique three-dimensional look.
The Cathedral Window quilt pattern is known for its folded fabric technique, which mimics the look of stained glass windows. Unlike traditional quilt patterns, this method does not require batting, making it a lighter yet visually striking piece. This guide includes detailed instructions on fabric selection, measurements, and sewing techniques to achieve a flawless result.
Advertising
By following this quilt tutorial, you will learn how to cut and fold fabric to create the signature curved frames that define the Cathedral Window quilt. Let’s dive into the materials needed and begin crafting this elegant and eye-catching quilt.
Image From Google
## Materials and Fabric Cutting Requirements
Choosing the right fabric is crucial to achieving the desired look for your quilt. A combination of solid and patterned fabrics enhances the stained-glass effect. Follow these measurements for precise cutting.
Fabric Selection: Choose a solid fabric for the window frames and a vibrant patterned fabric for the windowpanes. Cotton fabric works best for this quilt pattern due to its durability and ease of handling.
Base Fabric Cutting: Cut 10-inch squares from your solid fabric. These squares will serve as the foundation for your quilt, creating the folded window effect.
Windowpane Fabric Cutting: Cut 5-inch squares from your patterned fabric. These will be placed within the folded sections to form the colorful window effect.
Backing Fabric: While the traditional Cathedral Window quilt does not require batting, you may add a lightweight backing for additional support.
Ironing and Preparation: Press all fabric pieces thoroughly before beginning assembly. Well-pressed fabric ensures accuracy in folding and stitching.
Additional Supplies: Have matching thread, fabric scissors, a rotary cutter, and a sewing machine ready for precise and clean stitching.
## Folding and Preparing the Quilt Base
The unique structure of the Cathedral Window quilt pattern is achieved through precise folding techniques. Follow these steps to prepare the quilt base.
Advertising
Fold and Press: Take each 10-inch square and fold it in half, pressing with an iron to create a strong crease. Then fold again to form a smaller square.
Sewing the Edges: Stitch around the edges of the folded square using a ¼-inch seam allowance, leaving a small opening to turn it inside out.
Turn and Press: Turn the square right side out, ensuring crisp corners. Press flat to remove any wrinkles and maintain a smooth base.
Creating the Window Frames: Fold the four edges of the square toward the center and press again. This forms the signature curved frame of the Cathedral Window quilt.
Basting the Folds: Use a basting stitch to hold the folds in place. This will help keep the structure intact as you begin assembling the quilt.
Arranging the Blocks: Lay out your folded squares to determine the quilt’s final layout before attaching them together.
## Assembling the Cathedral Window Quilt
Now that your quilt blocks are prepared, it’s time to assemble them into a full quilt pattern. Follow these steps carefully for a seamless result.
Joining the Blocks: Place two folded squares together with edges aligned. Stitch along the edges using a small whipstitch or machine stitch for a secure hold.
Expanding the Quilt: Continue attaching squares in rows, ensuring uniform spacing and alignment throughout the quilt.
Adding the Windowpanes: Place the 5-inch fabric squares within each folded section. These will create the windowpane effect in the quilt.
Securing the Windowpanes: Fold the curved edges over the patterned fabric and sew down using a blind stitch or decorative topstitch.
Pressing Each Section: Regularly press the quilt as you work to keep it flat and structured.
Checking for Consistency: Ensure each windowpane is evenly aligned for a symmetrical and polished final look.
The final steps bring together all the hard work you have done in creating your Cathedral Window quilt. Attention to detail in this stage ensures a professional-quality finish.
Adding Borders: If desired, sew a solid border around the quilt to frame the quilt pattern and add extra visual appeal.
Securing Loose Threads: Trim any loose threads and reinforce any weak stitches to enhance durability.
Final Pressing: Give the quilt a final press to smooth out any wrinkles and create a polished appearance.
Backing Fabric (Optional): If you prefer a traditional quilt backing, sew a lightweight fabric to the back for added stability.
Displaying Your Quilt: Whether you use it as a decorative throw, wall hanging, or gift, your Cathedral Window quilt is ready to be displayed with pride.
Caring for Your Quilt: Wash gently in cold water and air dry to maintain the fabric’s integrity and colors.
By following this Easy Cathedral Window Quilt Tutorial, you have learned how to create a timeless and elegant quilt using a unique folding technique. This method, unlike traditional quilt patterns, results in a lightweight yet visually captivating design. Keep practicing, experiment with different color combinations, and enjoy the art of quilting!


