
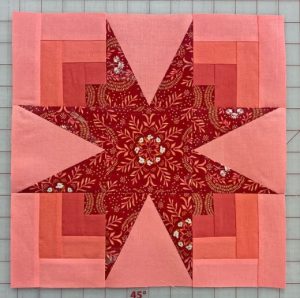
Spiral Sunburst Quilt Pattern
The Circle of Friends – Free Pattern is a beautiful and symbolic design that every quilting enthusiast should try at least once.
What makes the Circle of Friends – Free Pattern stand out is the symmetry and movement created by its circular motif. Each block represents a connection, making this quilt a heartfelt gift or heirloom project. With its clean lines and vibrant layout, it’s both timeless and modern.
Many crafters are always on the lookout for high-quality quilt patterns that are not only visually stunning but also free. Fortunately, this guide brings you exactly that — a free pattern complete with measurements and fabric cuts. You’ll walk away not only inspired but ready to start stitching.

This pattern works well with a wide range of color palettes. You can go for bright rainbow colors for a playful feel, or opt for muted tones to create a calming vibe. Either way, it will make a statement in any room.
Before diving into the instructions, be sure to read the full article so you can gather all the materials you need. This guide is optimized for clarity, keeping your experience smooth and enjoyable.
Let’s explore each step in depth so you can confidently create the Circle of Friends – Free Pattern. By the end of this post, you’ll have a beautiful, finished quilt ready to be admired.
To begin the Circle of Friends – Free Pattern, you’ll need to gather specific materials. Having all your supplies ready before starting will make the quilting process easier and more enjoyable. Accuracy in cutting and measurements is essential for success with circular quilt patterns like this one.
Start with the fabrics. You’ll need at least 5 different prints or solids for this pattern. Choose coordinating fabrics in light, medium, and dark tones to create depth in your quilt. Here’s the breakdown for a 60″ x 60″ finished quilt:
Now let’s get into cutting the pieces. From the background fabric, cut:
From each print fabric, cut:
Use freezer paper or a plastic circle template to cut uniform circles. Precision here will impact the symmetry of your final quilt design. It’s important to press all fabrics before cutting to maintain straight lines and reduce distortion.
Label each fabric piece with sticky notes or reusable tags so you can stay organized. When working with curved elements like circles, organization saves time and prevents errors.
Once everything is cut and labeled, lay out your fabric on a design wall or floor. This will help you visualize the placement and make color adjustments if needed. You’re now ready to begin piecing your quilt pattern.
Let’s dive into assembling the blocks for your Circle of Friends – Free Pattern. Each block features a circle centered within a square, bordered by strips that form a radiating effect. The look is both geometric and flowing — a hallmark of well-designed quilt patterns.
Begin by appliquéing the circles onto the 8 ½” background squares. Center each circle and secure it using your preferred method — raw edge, turned edge, or fusible web. Stitch around the edge using a straight or zigzag stitch, depending on your desired look.
Once your circles are in place, it’s time to create the border strips. Sew one 2 ½” x 8 ½” rectangle to each side of the circle blocks. Press the seams outward to prevent bulk at the center. These borders help frame the circles and add structure to the quilt.
Now, take two 2 ½” x 4 ½” rectangles from your print fabrics and sew them together to form a mini strip set. Add a 2 ½” square to the end of each strip. You’ll be making two units like this for each block, which will be sewn to the top and bottom of the bordered circle square.
Align and pin the strip sets to the top and bottom of each block, then sew with a ¼” seam allowance. Press well. Your blocks should now measure approximately 12 ½” square. Repeat this process for all 20 blocks to complete the core of your Circle of Friends quilt.
Lay out your blocks in a 4×5 grid, alternating the fabric prints to create visual balance. Pay attention to color distribution so that similar tones don’t end up clustered together.
Sew the blocks into rows first, then join the rows to complete the top. Press all seams flat. At this stage, your quilt top is almost ready to be finished and admired.
Now that your quilt top is assembled, it’s time to finish your Circle of Friends – Free Pattern with quilting and binding. These final steps bring the design together and ensure durability for years to come. The quilting phase also gives you a chance to add texture and movement to your quilt patterns.
Begin by making your quilt sandwich — layer the quilt top, batting, and backing. Use basting spray or safety pins to hold the layers together. Make sure the backing is at least 4 inches larger on each side than the quilt top.
Choose a quilting design that complements the circular shapes. Echo quilting around the circles, free-motion swirls, or a simple grid pattern are all great options. Use a walking foot or free-motion quilting foot depending on your design choice.
Once the quilting is complete, trim the edges to square the quilt. This ensures clean lines and even binding. Prepare your binding strips — cut 2 ½” wide strips from your binding fabric, join them end to end, and press in half lengthwise.
Attach the binding to the front of the quilt using a ¼” seam, then fold it over to the back and secure it by hand or machine. Take your time with the corners to get crisp, mitered folds. The binding adds a beautiful frame to your finished quilt.
Finally, label your quilt with the title, your name, and the date. This personal touch adds sentimental value and records your work. Your Circle of Friends quilt pattern is now complete — ready to gift, display, or cuddle up with.
Celebrate your accomplishment and consider sharing your project with the quilting community online. It’s a great way to inspire others and keep the spirit of quilting alive.


