If you’re looking for a cute and functional crochet project, the Crochet Granny Square Pouch Pattern is the perfect choice. This mini pouch is not only adorable but also incredibly useful for storing coins, keys, earbuds, or small accessories. Whether you’re new to crochet or already an experienced crafter, this guide will walk you through creating your very own pouch from start to finish.
The Crochet Granny Square Pouch Pattern is built using timeless granny squares, making it ideal for using leftover yarns or showcasing your favorite color combinations. These classic squares are beginner-friendly and can be assembled in various ways to create stunning designs.
This article will guide you step-by-step on how to crochet a mini pouch, using the popular Crochet Granny Square Pouch Pattern. We’ll cover everything from materials to finishing touches, including exact measurements and helpful tips.
In each section, you’ll find essential techniques, tips for achieving clean finishes, and best practices to ensure your pouch looks professional. We’ll keep the instructions clear and straightforward for easy understanding.
By the end of this guide, you’ll have a beautiful handmade pouch that not only adds charm to your accessories collection but also makes a thoughtful gift. So grab your hook, and let’s dive into this creative crochet journey!
Let’s begin by gathering our materials and understanding the basic tools and yarns you’ll need for this Crochet Granny Square Pouch Pattern.
Materials and Tools for the Crochet Granny Square Pouch Pattern
Before starting the Crochet Granny Square Pouch Pattern, you’ll need to gather the right materials. Using quality tools and the correct type of yarn will ensure a durable and attractive pouch.
For yarn, choose a worsted weight cotton yarn. Cotton provides structure and durability, making it perfect for small pouches. You’ll need approximately 50g of the main color and 20g of two contrasting colors.
You’ll also need a 4.0 mm (G-6) crochet hook, which is the ideal size for this yarn weight and gives a tight enough stitch to hold contents securely without gaps. A yarn needle will be necessary for sewing and weaving in ends.
Optional but recommended items include a zipper (around 5–6 inches) or button for closure, and a small piece of lining fabric (measuring 7 x 5 inches) if you want to give the inside a neat finish.
Other accessories include stitch markers, scissors, and a measuring tape. These tools help ensure even stitches and accurate joining when assembling the pouch.
Be sure to choose colors that contrast well if you’re going for a decorative look. The Crochet Granny Square Pouch Pattern really pops with vibrant or pastel combinations, depending on your style.
Step-by-Step: How to Make the Crochet Granny Square Pouch Pattern
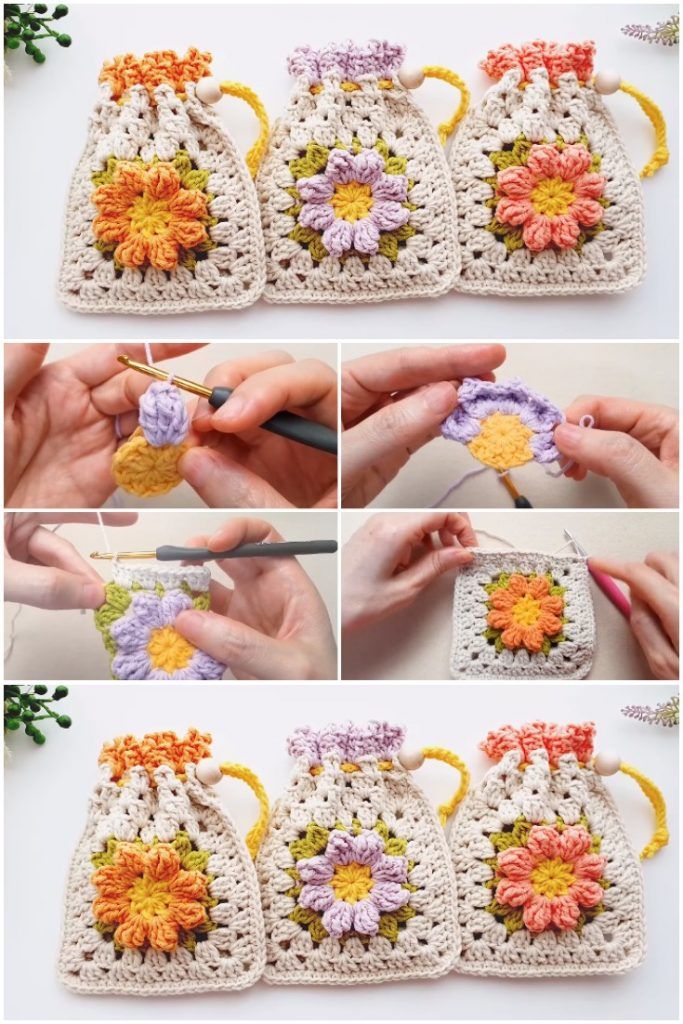
The main feature of the Crochet Granny Square Pouch Pattern is the classic granny square. You’ll need to crochet at least two squares (front and back), but you can use up to six for more complex designs or 3D shapes.
Step 1: Making the Granny Squares
Start with a magic ring. Round 1: Ch 3 (counts as dc), make 2 dc into the ring, ch 2, 3 dc, ch 2 repeat 3 times, sl st into top of initial ch-3 to join. You should have four 3-dc clusters separated by ch-2 spaces.
Round 2: Sl st to corner space, ch 3 (counts as dc), 2 dc, ch 2, 3 dc in same space, ch 1, (3 dc, ch 2, 3 dc) in next corner, ch 1 repeat around, sl st to join. Cut yarn and weave in ends.
Repeat until you have two granny squares measuring approximately 4 x 4 inches each. Make sure your stitches are consistent and tight enough to form a sturdy square.
Step 2: Blocking (Optional but Recommended)
Wet block the squares by misting with water and pinning them to a foam board. This ensures the squares lie flat and are the same size, making them easier to assemble.
Step 3: Assembly
Place the squares together, right sides facing out. Use single crochet or whip stitch to seam three sides together. If desired, you can crochet a gusset strip (1.5 x 10 inches) and attach it between the squares to add depth.
Once assembled, turn the pouch inside out if you want a clean seam on the outside. Alternatively, leave seams exposed for a rustic, handmade look. Both styles work beautifully with the Crochet Granny Square Pouch Pattern.
Adding a Lining and Zipper to Your Mini Pouch
To elevate the look and usability of your Crochet Granny Square Pouch Pattern, consider adding a fabric lining and zipper. This gives your pouch a professional finish and protects the yarn from wear.
Choose a lightweight cotton fabric for the lining. Cut one piece measuring 7 x 5 inches. Fold over the edges by 1/4 inch and press with an iron for clean seams. This step helps the lining sit neatly inside the pouch.
Sew the zipper to the top edge of the pouch first. Use a needle and thread to hand stitch the zipper to the inner edge of the crochet fabric. Be careful not to stretch the crochet work while sewing.
Once the zipper is attached, place the lining inside the pouch. Use straight pins or clips to secure it in place. Make sure it sits just below the zipper teeth for smooth opening and closing.
Sew the lining to the crochet fabric using small, even stitches. Be sure to catch only the inner layer of the crochet stitches to keep the seam invisible from the outside.
Adding a lining not only improves the aesthetic but also prevents small items from poking through the crochet holes. This step is optional but highly recommended for durability.
For a simpler closure option, you can sew on a button and crochet a small loop to fasten it. This works well for those who prefer not to use zippers in their crochet projects.
Customizing Your Crochet Granny Square Pouch Pattern
The beauty of the Crochet Granny Square Pouch Pattern lies in its versatility. Once you master the basic pattern, there are endless ways to personalize and enhance your pouch design.
Try experimenting with different color schemes. Create rainbow pouches, pastel shades for spring, or deep earthy tones for autumn. Changing the yarn color in each round adds a beautiful contrast.
You can also play with different granny square patterns—some include floral centers, sunburst motifs, or even textured stitches like popcorn or bobbles. This adds uniqueness to each pouch.
Another idea is to add appliqués or embroidery to the finished squares before assembly. This can include hearts, stars, initials, or even tiny crocheted flowers.
Make a wrist strap or crossbody version by crocheting a long chain and attaching it to the corners. This makes your pouch functional for travel or as a fashion accessory.
You could also scale up the Crochet Granny Square Pouch Pattern to make larger bags or even clutches. By adjusting the square size and adding lining and hardware, you can create stylish and trendy accessories.
Handmade pouches also make excellent gifts. Personalize them by using the recipient’s favorite colors or initials. It’s a meaningful and practical gift that’s easy to make in just a few hours.
FAQ – Crochet Granny Square Pouch Pattern
Q1: How many granny squares do I need for one pouch?
A1: Typically, two squares are enough for a flat pouch. For 3D versions, use four to six squares depending on the design.
Q2: What is the best yarn for this pouch?
A2: Worsted weight cotton yarn is ideal. It’s sturdy, holds shape well, and is easy to work with for beginners.
Q3: Can I wash my crochet pouch?
A3: Yes, but handwashing is recommended. Use mild soap and lay flat to dry, especially if it has a zipper or lining.
Q4: Is lining necessary for this pattern?
A4: No, but it adds strength and prevents items from falling through gaps. It’s especially useful if you’re storing small objects.
Q5: Can I use a button instead of a zipper?
A5: Absolutely! A crocheted loop and button closure is a great alternative and adds a charming, rustic feel.
Q6: How long does it take to complete one pouch?
A6: Depending on your experience, it can take between 2 to 4 hours, including finishing and assembly.
Creating your own Crochet Granny Square Pouch Pattern is a fun and fulfilling project that blends creativity with practicality. With just a bit of yarn and your crochet hook, you can produce a beautiful and functional piece in just a few hours.
This pouch is the perfect project for using scrap yarn, testing new color combos, or practicing your granny square technique. It’s also a thoughtful handmade gift for friends and family.
From the basic granny square construction to the optional lining and zipper, this guide provides everything you need to complete your own pouch with confidence and flair.
Remember to enjoy the process—crochet is not just about the finished product but also the calming rhythm of stitching and creating something by hand.
So go ahead, gather your supplies, and start working on your very own Crochet Granny Square Pouch Pattern today. You’ll love the result!
Have you tried this pattern already? Share your results, photos, and suggestions in the comments—we’d love to hear your creative ideas!
