
Crochet Cat Hair Ties Pattern
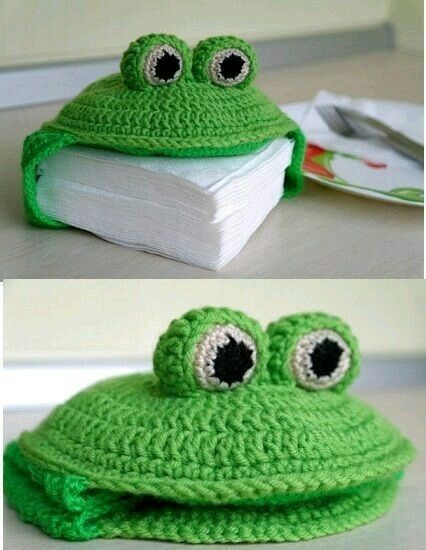
If you are looking for a fun and functional crochet project, this Crochet frog tissue holder free pattern is the perfect idea. This adorable frog design not only adds charm to your home but also serves a practical purpose by keeping tissues easily accessible. Whether you’re an experienced crocheter or a beginner, this project is simple, enjoyable, and rewarding.
The Crochet frog tissue holder free pattern is designed to hold small packs of tissues or travel-sized tissue boxes. It’s a great handmade gift for friends, family, or even for yourself. Plus, with its cute frog appearance, it can brighten up your bathroom, car, office, or any corner of your home.
In this blog post, you’ll find a detailed Crochet frog tissue holder free pattern, complete with step-by-step instructions, stitch explanations, and exact fabric cuts with measurements. Follow along to create your own frog tissue holder with ease!
To get started with this Crochet frog tissue holder free pattern, you’ll need to gather a few essential materials. Make sure you have everything on hand before beginning to ensure a smooth crochet experience.
For the main body, use worsted-weight cotton yarn in green. Cotton yarn is durable, washable, and holds its shape well, which is perfect for a tissue holder. You’ll also need small amounts of white and black yarn for the frog’s eyes and pink yarn for the mouth.
Choose a crochet hook size of 4.0 mm (G-6) to keep your stitches tight and neat. This size works perfectly with worsted-weight yarn and helps maintain the structure of the tissue holder.
Additionally, you’ll need a tapestry needle for sewing the parts together and weaving in ends. A pair of sharp scissors is essential for trimming the yarn neatly once your project is complete.
For added sturdiness, consider cutting a piece of felt or lightweight fabric to line the inside. Cut the fabric to 7 inches by 5 inches (18 cm x 13 cm) to fit perfectly inside the frog’s body.
Lastly, prepare a small pack of tissues or a travel tissue box to ensure your finished holder fits perfectly. This Crochet frog tissue holder free pattern is designed to fit standard travel tissue packs.
Now let’s dive into the step-by-step guide for this Crochet frog tissue holder free pattern. This pattern is beginner-friendly and works up quickly with simple stitches.
Start by creating the main body. Chain 26 stitches with the green yarn. This will form the length of the tissue holder. Work single crochet (SC) into the second chain from the hook and continue across. You should have 25 SC at the end of each row.
Continue to crochet 20 rows of SC to form a rectangle. This rectangle will become the pouch for holding tissues. The finished piece should measure approximately 7 inches by 5 inches (18 cm x 13 cm).
To form the tissue opening, fold the rectangle so that the short edges meet in the center, slightly overlapping. Pin in place and SC along the sides to close, leaving the middle open for tissues.
For the frog’s eyes, use white yarn to make two circles. Start with a magic ring and work 6 SC into the ring. Increase to 12 SC in the second round. Switch to black yarn and work one round of SC to form the pupils.
Attach the eyes to the top of the pouch using a tapestry needle. Place them evenly apart to create a friendly frog face. Use pink yarn to embroider a smiling mouth below the eyes, adding charm and personality.
Precise measurements are essential for making this Crochet frog tissue holder free pattern fit perfectly. Here’s a breakdown of the sizes you’ll need for both yarn and optional fabric lining.
The main body rectangle should be crocheted to approximately 7 inches wide and 5 inches tall (18 cm x 13 cm). This size fits most travel tissue packs snugly without stretching the fabric too much.
If you choose to add a fabric lining, cut a piece of felt or cotton fabric to the same size: 7 inches by 5 inches. This will add durability and help the holder keep its shape over time.
For the eyes, the white circles should measure about 1.5 inches (4 cm) in diameter. The black pupils should be around 0.5 inches (1.2 cm) to ensure they look proportionate and adorable.
Cut two small pieces of black felt (optional) if you prefer felt eyes instead of crocheting. These should match the size of the pupils for easy sewing or gluing onto the white crochet circles.
If adding a button closure or a small Velcro strip to secure the tissues, cut the Velcro to about 1 inch (2.5 cm) long. Position it discreetly under the front flap for a neat appearance.
Prepare your yarn lengths in advance to avoid tangles. For the mouth embroidery, cut about 12 inches (30 cm) of pink yarn. This length is sufficient to create a simple, curved smile.
Once you have all the pieces ready, it’s time to assemble your Crochet frog tissue holder free pattern. Proper assembly ensures a polished and durable final product.
Begin by folding the main rectangle into the correct pouch shape. Make sure the short ends overlap slightly in the center, creating the slit where tissues will be pulled out.
Secure the sides using single crochet stitches. Work evenly along the sides to ensure a clean and sturdy seam. This step is crucial for maintaining the pouch’s structure.
Position the eyes on the top front of the pouch. Pin them in place to check symmetry before sewing them on permanently with a tapestry needle and matching yarn.
Embroider the frog’s mouth just below the eyes using pink yarn. A simple curved line or a small “V” shape gives the frog a cheerful expression that adds character to the piece.
If desired, add embellishments such as small crocheted flowers, tiny bows, or decorative buttons to personalize your frog tissue holder even further.
Finally, insert the tissue pack into the holder through the center opening. Adjust the fit and enjoy your finished project! Your adorable frog is now ready to brighten any space.
What yarn is best for the Crochet frog tissue holder free pattern?
Worsted-weight cotton yarn is highly recommended because it’s durable, holds shape well, and is easy to clean.
Can I make this pattern larger?
Yes, simply increase the starting chain and the number of rows proportionally to fit larger tissue packs.
Is this Crochet frog tissue holder free pattern beginner-friendly?
Absolutely! This project uses basic stitches like single crochet and simple increases, perfect for beginners.
Can I use felt instead of crocheting the eyes?
Yes, felt circles are a great alternative if you prefer not to crochet small details.
How do I keep the tissue holder sturdy?
Adding a fabric or felt lining cut to 7 inches by 5 inches helps maintain the holder’s shape over time.
Is this a good gift idea?
Definitely! The Crochet frog tissue holder free pattern makes a charming handmade gift for friends, family, or coworkers.
Creating this Crochet frog tissue holder free pattern is a delightful and satisfying project that combines practicality with cuteness. With simple stitches, clear measurements, and easy assembly, anyone can make this adorable tissue holder. Whether you’re crafting for yourself or preparing a thoughtful handmade gift, this crochet frog is sure to bring smiles.
I hope you enjoyed this tutorial and found it helpful. Have you tried this pattern? Share your experience, feedback, or suggestions in the comments below. Let’s keep the creativity flowing together!

