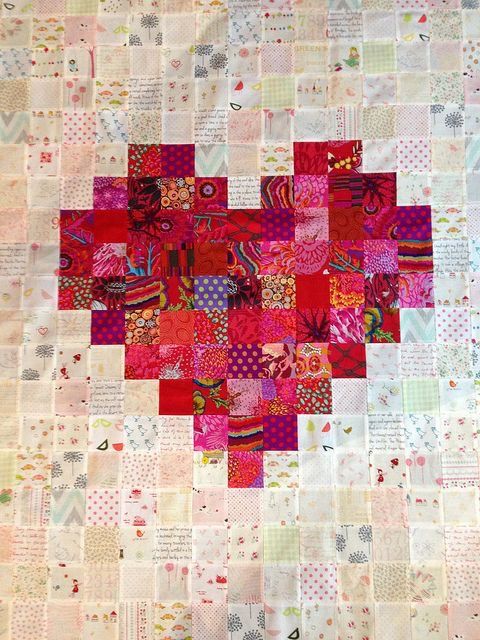
Pixelated Heart Quilt Pattern
The Moonlight Roar baby quilt is a delightful and heartwarming project perfect for anyone who loves sewing, quilting, and creating handmade gifts. This quilt pattern combines charming lion motifs with soothing moonlight tones, making it an ideal keepsake for a little one. Whether you are a beginner or an experienced quilter, the Moonlight Roar baby quilt offers the perfect balance of creativity and craftsmanship.
This quilt is not only visually stunning but also meaningful. The combination of stars, moons, and a roaring lion represents strength, courage, and protection for the baby who receives it. It’s an excellent choice for baby showers, nursery décor, or a thoughtful handmade present for new parents.
In this step-by-step guide, you will learn how to create the Moonlight Roar baby quilt from start to finish. We will cover all fabric cuts, exact measurements, materials needed, and detailed sewing instructions. Follow along to craft a beautiful quilt that will be cherished for years.

To start your Moonlight Roar baby quilt, it’s essential to gather all the materials before diving into the sewing process. Having everything prepared will make your quilting experience smooth and enjoyable.
First, you will need fabric for the quilt top. Choose soft cotton fabrics in moonlight tones like grey, soft blue, pale yellow, and ivory. A lion-themed fabric panel or printed lion motif will be the centerpiece of the Moonlight Roar baby quilt.
You’ll also need coordinating fabrics for the stars, borders, and backing. Select fabrics that match the color palette but add contrast to make the quilt pop. Think about mixing solids with gentle prints like tiny stars, clouds, or stripes.
For the batting, choose 100% cotton or cotton blend batting. It should be lightweight and cozy, perfect for a baby quilt that provides comfort without being too heavy.
Thread is also crucial. Use high-quality cotton thread in colors that blend with your fabrics. Neutral colors like white, grey, or soft blue work well for most of the quilt.
Don’t forget basic quilting tools such as rotary cutter, cutting mat, quilting ruler, pins, fabric scissors, and an iron. These tools will make your cutting and piecing precise and efficient.
Lastly, prepare your sewing machine with a quilting foot and ensure it is cleaned, oiled, and ready to handle multiple fabric layers.
Accurate cutting is key to achieving a beautiful Moonlight Roar baby quilt. Below are the detailed fabric cuts and measurements for this quilt pattern, designed for a finished size of approximately 40” x 50”.
Begin with the lion panel or focal fabric. Cut one central panel measuring 18” x 22”. This will be the highlight of the Moonlight Roar baby quilt, showcasing the adorable lion design.
Next, cut fabric for the star blocks that surround the center. You will need 8 squares of 6” x 6” for the star centers and 32 squares of 3” x 3” for the star points. Choose fabrics that complement the central panel.
For the sashing (the strips between the blocks), cut 6 strips measuring 2.5” x 22” horizontally and 8 strips measuring 2.5” x 18” vertically. These help frame the central panel and star blocks.
The border fabric adds an extra touch. Cut 4 border strips measuring 4” x 40” for the sides and 2 strips measuring 4” x 50” for the top and bottom.
For the quilt backing, you’ll need a piece measuring 45” x 55”, which allows extra fabric for quilting and trimming. Batting should be slightly larger than the quilt top, approximately 42” x 52”.
Finally, for the binding, cut 5 strips measuring 2.5” x the width of the fabric (WOF). This will finish the edges of the Moonlight Roar baby quilt neatly.
The process of creating the Moonlight Roar baby quilt is both rewarding and enjoyable. Follow these steps closely to bring your quilt to life with precision and love.
Start by assembling the star blocks. Take one 6” x 6” square for the center and place four 3” x 3” squares on each corner, right sides together. Draw a diagonal line on the small squares, sew on the line, then trim and press open to form the star points.
Repeat this process to make 8 complete star blocks. Each star will frame the central lion panel beautifully, adding both dimension and charm to the quilt design.
Next, sew the horizontal sashing strips (2.5” x 22”) between the star blocks to create rows. This step gives the quilt a clean and structured look, helping to align the star blocks perfectly.
Attach the vertical sashing strips (2.5” x 18”) between the rows of star blocks and around the central lion panel. This frames the entire quilt and ties the elements together seamlessly.
Once the center and sashing are complete, add the borders. Sew the 4” x 40” strips to the left and right sides first. Then, sew the 4” x 50” strips to the top and bottom. This frames the quilt, making the Moonlight Roar baby quilt look finished and professional.
Finally, layer the quilt sandwich: lay the backing fabric (right side down), then the batting, and then the quilt top (right side up). Baste the layers together using pins or basting spray, preparing it for quilting.
Quilting the Moonlight Roar baby quilt is where your project truly comes to life. This is your chance to add texture, detail, and durability to the quilt.
Begin by stitching in the ditch, sewing along the sashing seams. This secures the quilt layers together and defines the quilt’s structure. Use matching thread to keep the lines subtle and neat.
For the star blocks, consider quilting around each star shape to make them pop. You can also quilt small stars or cloud patterns inside the background areas for extra charm.
In the central lion panel, outline the lion motif or add gentle swirls to mimic a nighttime sky. This enhances the theme of the Moonlight Roar baby quilt and adds softness to the design.
If you prefer, free-motion quilting can be applied to the borders with loops, stars, or waves, adding a playful and whimsical feel perfect for a baby quilt.
Once quilting is complete, trim the excess batting and backing to match the quilt top’s edges. This prepares the quilt for binding.
Attach the binding by sewing the 2.5” strips together into one long strip. Fold it in half lengthwise, press, and sew it to the front of the quilt with a ¼” seam allowance. Fold it over to the back and hand-stitch or machine-stitch it down for a clean finish.
Taking care of the Moonlight Roar baby quilt ensures it remains soft, vibrant, and beautiful for years to come. Handmade quilts are treasures, especially when made for little ones.
To wash, use a gentle cycle with cold water and mild detergent. Avoid bleach or harsh chemicals that can damage the fabrics and batting. A delicate tumble dry or air drying is recommended to preserve the quilt’s softness.
This quilt makes a perfect baby shower gift. Consider personalizing the Moonlight Roar baby quilt by adding embroidered initials, a special date, or a heartfelt message stitched onto the backing or border.
For the nursery, the quilt can be used as a crib blanket, wall hanging, or even a cozy playmat. The lion motif and moonlit design fit beautifully into woodland, safari, or celestial-themed baby rooms.
You can also adapt this pattern for different sizes. By adding more star blocks or increasing the borders, the Moonlight Roar baby quilt can become a toddler quilt or even a lap quilt for storytelling time.
Another creative idea is to use flannel or minky fabrics for extra softness, making the quilt extra cuddly for chilly nights or stroller rides.
Finally, document your quilting journey by taking photos of each stage. Not only is it a wonderful keepsake for the family, but it also helps inspire others to create their own Moonlight Roar baby quilt.
What size is the finished Moonlight Roar baby quilt?
The finished size is approximately 40” x 50”, perfect for a crib, stroller, or playmat.
Is this quilt pattern suitable for beginners?
Yes, the Moonlight Roar baby quilt is beginner-friendly with simple piecing and clear steps.
Can I use different fabrics for this pattern?
Absolutely. You can choose any fabrics that match your style while maintaining the moonlight and lion theme.
How long does it take to complete this quilt?
On average, it takes about 2-3 days for intermediate quilters, or a weekend for beginners taking their time.
Can this pattern be resized?
Yes, by adding more star blocks or wider borders, you can make it larger to fit a toddler bed or as a lap quilt.
Do I need a quilting machine to make this?
No, a regular sewing machine with a walking foot is sufficient for piecing and quilting the Moonlight Roar baby quilt.
The Moonlight Roar baby quilt is more than just a sewing project—it’s a meaningful gift filled with love, creativity, and comfort. Whether you’re making it for your own little one or gifting it to someone special, this quilt will become a treasured keepsake. Follow this guide, enjoy the process, and create a quilt that shines as brightly as the moon and roars with joy. What do you think of this pattern? Share your thoughts, suggestions, or questions in the comments below—I’d love to hear from you!


