Pixelated Heart Quilt Pattern
The Garden Fence Quilt Block is a classic and versatile quilting pattern that offers both beauty and simplicity. It’s a favorite among quilters of all skill levels because it’s beginner-friendly yet visually striking. Whether you’re looking to create a full quilt, a table runner, or a decorative wall hanging, this pattern is the perfect choice.
In this guide, you’ll learn exactly how to make a Garden Fence Quilt Block from start to finish. We’ll walk you through the fabric cuts, the assembly process, and helpful tips to ensure your quilt block looks flawless. This pattern is not only fun to make but also allows for endless creativity with color combinations and fabric choices.
If you’ve been searching for an easy-to-follow tutorial on how to make a Garden Fence Quilt Block, you’re in the right place. Let’s dive into this beautiful quilting journey together.

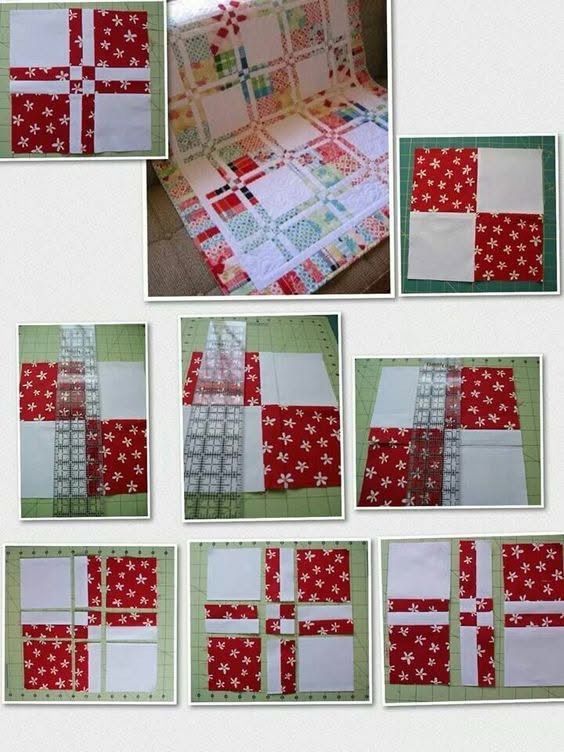
The Garden Fence Quilt Block is a traditional quilt block design that features a central square framed by narrow strips, giving it the look of a garden fence. This block is ideal for showcasing favorite fabrics and adds depth and texture to any quilt project.
One of the best things about the Garden Fence Quilt Block is its simplicity. It consists mainly of squares and rectangles, making it a great choice for beginners. Yet, the final look is elegant and timeless.
This quilt block is highly customizable. You can play with different fabric patterns, colors, and sizes to create unique results every time. Whether you prefer a modern, bright look or something more classic, the Garden Fence Quilt Block works beautifully.
Many quilters love using this block because it offers a great way to use fabric scraps. The central square can be a focal print, while the strips around it can be solids or complementary prints.
Additionally, the Garden Fence Quilt Block can be scaled easily. You can make small blocks for intricate designs or larger ones for a quick quilting project. This versatility makes it a must-know pattern for any quilter.
It’s also an excellent pattern to practice precision cutting and sewing straight seams, two fundamental skills in quilting. Let’s move on to what you’ll need for this project.
To create one Garden Fence Quilt Block, you’ll need just a few different fabrics. Below are the measurements for a 12-inch finished block (12.5-inch unfinished).
Start by selecting fabrics that contrast well. The center should pop, while the frame fabrics provide a defined edge, just like a garden fence.
Cut your fabrics accurately using a rotary cutter, quilting ruler, and self-healing mat. Precision is key to making your Garden Fence Quilt Block come together perfectly.
Double-check your measurements before sewing. Even slight inaccuracies can throw off the alignment, especially with frames involved.
Press your fabrics before cutting to remove any wrinkles, ensuring clean and accurate cuts. This step improves the overall finish of your Garden Fence Quilt Block.
Keep your pieces organized by grouping them by type—center, frame, and background. This method speeds up assembly and reduces errors.
Now that you’ve prepared your fabric pieces, let’s start assembling your Garden Fence Quilt Block step by step.
Begin by sewing the 2-inch x 6.5-inch vertical frame strips to the left and right sides of your 6.5-inch center square. Use a 1/4-inch seam allowance.
Press the seams outward toward the frame strips to help the block lay flat and maintain shape.
Check that the piece now measures 9.5 inches wide with the vertical strips attached.
Ensure your stitching lines are straight and accurate. Consistency helps maintain the clean lines of the Garden Fence Quilt Block.
Finger-press before using the iron to avoid stretching the fabric while pressing.
Set this assembled piece aside for the next step.
Sew the 2-inch x 9.5-inch horizontal frame strips to the top and bottom of the unit you created.
Again, press seams outward toward the strips for better structure.
The block at this point should measure 9.5 inches square—check for accuracy.
Smooth out any puckering as you press. This ensures your Garden Fence Quilt Block stays neat.
If the edges are slightly off, use your ruler to square them now.
This completes the framed center of your GardenFenceQuiltBlock.
Take your 2-inch x 9.5-inch side background rectangles. Sew a 2-inch x 2-inch corner square to each end.
Press the seams toward the corner squares to create clean, crisp corners.
Repeat this step for both side background strips. These will become the side extensions of the block.
Make sure the seams align perfectly when you attach these to the block.
These pieces form the outer frame that gives the Garden Fence Quilt Block its signature look.
Set them aside briefly while moving to the next step.
Sew the prepared side background units (with corner squares) to the left and right sides of the framed center block.
Align the corner squares with the block’s top and bottom edges to ensure symmetry.
Press the seams toward the background fabric for a flatter finish.
Check that the block width now measures 12.5 inches before adding the final pieces.
Take a moment to square up the edges if needed.
This step enhances the block’s structure and frames the center beautifully.
Sew the 2-inch x 12.5-inch top and bottom background rectangles to the block.
Align them carefully with the edges, ensuring the seams from the corner squares line up.
Press the seams toward the background fabric to keep the block flat and balanced.
This completes the outer frame of your Garden Fence Quilt Block.
Double-check the final measurements: the block should be 12.5 inches square, ready to join with others.
Trim any excess threads or uneven edges for a clean finish.
Give your finished GardenFenceQuiltBlock a thorough final press.
Check for accuracy in size and shape. It should be square and measure 12.5 inches on all sides.
Make sure the seams are flat and edges are straight before using the block in a quilt layout.
If anything looks slightly off, you can make minor adjustments now.
Admire your work! This block is versatile and can be used in many quilting projects.
You’re now ready to make multiple GardenFenceQuiltBlock units for a larger quilt.
The beauty of the Garden Fence Quilt Block lies in its adaptability. Let’s explore creative ways to use it.
Try a monochromatic theme for a sophisticated look, or use bold contrasts for a modern design.
The center square can feature novelty prints, florals, or themed fabrics depending on the quilt’s purpose.
Using bright colors for the frame and soft tones for the background creates a dynamic effect.
Pastels give the Garden Fence Quilt Block a delicate, vintage appearance, perfect for baby quilts.
Scrappy frames from leftover fabrics can add a charming, eclectic vibe.
Switching the background fabric to dark colors like navy or charcoal creates striking negative space.
Change the size of the block easily by adjusting the center and strip measurements proportionally.
For mini quilts, try reducing the center square to 4.5 inches and strips to 1.5 inches wide.
Large-scale versions, like 18-inch blocks, make quick quilt tops with fewer units.
Mix different block sizes within the same quilt for a fun, modern twist.
Scaling up works great for statement wall hangings or oversized throw quilts.
Check your math carefully when resizing to keep proportions accurate.

Pair the GardenFenceQuiltBlock with simple blocks like Nine Patch or Four Patch for variety.
Use alternating solid squares between GardenFenceQuiltBlock units to create negative space.
A checkerboard layout adds balance and interest to your quilt design.
Sashing between blocks can help each Garden Fence Quilt Block stand out more.
Mixing it with star blocks or pinwheels creates dynamic visual movement.
Experiment with asymmetrical layouts for a fresh, contemporary look.
Set the GardenFenceQuiltBlock on point (diagonally) for a different visual impact.
Rotate blocks randomly for a playful, scrappy design.
Group blocks by color families to create a gradient or ombre effect.
Use the block to form secondary patterns by adjusting frame colors.
A barn-raising layout with blocks radiating from the center can be very striking.
Try borderless layouts where the block frames naturally meet to form new shapes.
The GardenFenceQuiltBlock isn’t just for quilts; it’s great for mini projects too.
Make quilted pillow covers using a single block as the front.
Use the block in table runners by aligning 3–5 units in a row.
It’s perfect for wall hangings with seasonal or holiday-themed fabrics.
Create placemats by adjusting the block size slightly.
Tote bags look fantastic with a quilt block as the main panel.
Even potholders and mug rugs can feature this charming block design.
Experiment with linen, denim, or flannel for texture-rich versions of the Garden Fence Quilt Block.
Use batiks for a vibrant, hand-dyed look.
Soft cottons are the most common and easiest to work with for crisp seams.
Mix solids and prints for visual interest.
Recycled fabrics like old shirts or jeans give the block a sustainable, rustic charm.
Velvet or corduroy (with caution) can add luxurious texture for special projects.
The Garden Fence Quilt Block is a timeless, beginner-friendly pattern that offers endless creative possibilities. Whether you’re a seasoned quilter or a newcomer, this block is simple to make yet provides stunning results.
With precise fabric cuts, careful assembly, and a little creativity, you can turn the Garden Fence Quilt Block into anything from a cozy bed quilt to a vibrant table runner or stylish wall hanging. The key is in selecting fabrics that speak to your style and following the step-by-step guide.
Did you enjoy this guide? Leave your thoughts in the comments below and let me know if you’d like more quilting tutorials like this. Happy quilting!


