
Spiral Sunburst Quilt Pattern
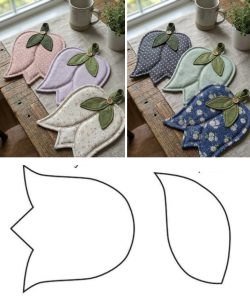
The Spring Daffodil Mug Rug is the perfect seasonal project to bring color and warmth to your kitchen or coffee table. Combining vibrant fabrics and the cheerful beauty of daffodils, this mug rug is both a functional and decorative piece. Whether you’re an experienced quilter or a beginner, this delightful design will brighten up your space and lift your spirits.
Using yellow and green tones that symbolize new beginnings and the return of spring, the Spring Daffodil Mug Rug captures the essence of nature’s renewal. Daffodils are often seen as the first flowers of the season, making them a symbol of hope and cheer. By turning this flower into a quilting pattern, you’ll create something timeless and unique for yourself or as a heartfelt gift.
In this article, you’ll learn how to create your own Spring Daffodil Mug Rug step by step. We’ll cover everything from fabric cutting to final stitching, all optimized for simplicity, creativity, and style. Follow along with the detailed instructions, and you’ll end up with a mug rug that’s not only beautiful but also practical and perfect for spring.

To begin your Spring Daffodil Mug Rug, the first step is gathering the right materials and fabrics. Choosing bright and contrasting springtime fabrics is essential to make the daffodil motif pop. Go for yellow tones for the petals, green for the leaves, and a light background that resembles the freshness of spring skies.
You’ll need three main fabrics: a yellow fabric for the flower, a green fabric for the leaves and stem, and a light neutral or pastel background fabric to make the daffodil stand out. Choose 100% cotton quilting fabric for the best texture and durability. High-quality batting and a backing fabric of your choice will also be necessary.
Here are the fabric cuts you’ll need:
Don’t forget coordinating thread for quilting and binding. A light green or yellow thread blends well and adds to the springtime aesthetic. Having everything prepared ahead will make the construction process more enjoyable and organized.
For tools, you’ll need a rotary cutter, cutting mat, quilting ruler, iron, pins or clips, sewing machine, and optionally an embroidery needle for any finishing touches. Setting up your workspace with everything within reach helps keep your creative flow uninterrupted.
When selecting fabrics, consider incorporating floral prints, solids, or subtle patterns that evoke springtime. Avoid overly dark or busy patterns that might overshadow the daffodil shape. Simple prints with soft textures are ideal for enhancing the floral design without overwhelming it.
Now it’s time to create the daffodil itself — the star of your Spring Daffodil Mug Rug. We’ll start by assembling the flower, stem, and leaves using the fabric pieces you’ve cut earlier. This section involves both simple piecing and a touch of creative appliqué.
Start by constructing the daffodil petals using the (4) 2” x 2” yellow squares. Arrange them in a diamond formation to create the impression of overlapping petals. Sew them together in pairs first, then join the pairs to complete the flower shape. Press seams open as you go for a smooth finish.
Next, add the 2” x 3” yellow rectangle to the center of the flower. This will represent the trumpet of the daffodil. Appliqué this piece by folding the edges under and stitching it down using a small zigzag or blanket stitch for a clean, secure look.
Attach the green stem by sewing one of the 1” x 3” rectangles vertically under the flower. Then position and sew the two green triangles on either side of the base to represent the leaves. If needed, trim the edges for symmetry. Use pins or fabric glue to hold pieces in place before stitching.
Lay the background fabric rectangles on each side of your daffodil motif to form a horizontal composition. Sew these pieces to each side and press the seams outward. You now have the completed mug rug top ready for layering.
Take time to inspect your seams and make sure everything is flat and aligned. This is especially important before quilting, as it prevents puckering and ensures a polished final result.
This daffodil motif can also be modified in size if you’d like to create matching coasters or a mini wall hanging. Just adjust the fabric measurements proportionally and follow the same piecing technique.
With your daffodil motif completed, you’re ready to quilt your Spring Daffodil Mug Rug. Layer the quilt sandwich by placing the backing fabric right side down, the batting in the middle, and your pieced top right side up. Smooth each layer to remove wrinkles.
Secure the sandwich with quilting pins or safety pins. Begin quilting by stitching in the ditch along the seams of the daffodil petals, stem, and background. This helps emphasize the flower shape and adds dimension. Use a walking foot on your sewing machine for best results.
To add a personal touch, consider echo quilting around the daffodil or adding free-motion stitches to mimic leaves or spring breezes. This gives your Spring Daffodil Mug Rug extra texture and artistic flair. Keep the stitching light and playful to match the spring theme.
Trim the edges of your mug rug so they are straight and square. Make sure to cut through all layers evenly. This step prepares your project for binding and helps keep everything tidy.
Next, bind the mug rug with a coordinating fabric strip. Cut 2” wide strips on the bias or straight grain depending on your preference. Fold the strip in half and stitch it to the front of the mug rug, then fold it over to the back and secure it by hand or machine.
Once your binding is complete, give the entire mug rug a final press with a warm iron. Check all edges and seams to ensure everything is secure and flat. Your Spring Daffodil Mug Rug is now finished and ready to be used or gifted!
The beauty of the Spring Daffodil Mug Rug pattern is its flexibility. While this tutorial outlines a traditional yellow daffodil, you can experiment with color variations like white daffodils with orange centers, or even playful pastels for an Easter-inspired version.
Add embroidered details to the center of the daffodil to give it more texture and character. Simple hand stitches or French knots can represent the flower’s interior and add a lovely handmade touch. This is also a fun way to personalize your mug rug for someone special.
Want to create a larger project? Combine several Spring Daffodil Mug Rugs to make a cheerful table runner or placemat set. Simply repeat the pattern and adjust the background fabric to connect the blocks seamlessly.
If you enjoy hand sewing, consider turning this into an English paper piecing (EPP) project by using templates for the petals and leaves. This slower method can be meditative and allows for more precision and travel-friendly sewing.
Include this mug rug in a seasonal gift basket along with tea bags, cookies, or a small handmade napkin. The Spring Daffodil Mug Rug makes an excellent spring or Mother’s Day gift when paired with thoughtful extras.
Finally, keep a photo journal of your process to share on social media or quilting forums. Many quilters love seeing fabric choices and progress shots. Use hashtags like #SpringDaffodilMugRug or #SpringQuiltingProjects to connect with others and find inspiration.
What size is the finished Spring Daffodil Mug Rug?
The finished mug rug measures approximately 6.5” x 4.5”, making it perfect for mugs and small plates.
Can I machine wash the Spring Daffodil Mug Rug?
Yes, as long as you’ve used pre-washed cotton fabrics and cotton batting. Wash gently with cold water and air dry.
Do I have to use yellow for the daffodil?
No! You can use any color scheme you like, but yellow helps the daffodil motif stay recognizable and vibrant.
Is this pattern suitable for beginners?
Absolutely. The Spring Daffodil Mug Rug is a great beginner-friendly project with simple piecing and minimal quilting required.
Can I sell items made from this pattern?
Yes, if the design is your own handmade work, you can sell your finished mug rugs. Always credit inspiration where applicable.
How can I make the flower stand out more?
Use a lighter background and bold thread or stitching around the flower edges to highlight the shape.g truly eye-catching.
The Spring Daffodil Mug Rug is more than just a sewing project—it’s a celebration of color, creativity, and the joy of handmade art. With its cheerful design and practical size, this mug rug brings a little springtime into your home every time you sit down with a cup of tea or coffee.
From choosing the right fabrics to stitching the final binding, this tutorial guides you through every step of the process in a clear, humanized way. Whether you’re sewing for yourself or creating gifts, this pattern adds a refreshing and joyful vibe to your table.
Have you tried making your own Spring Daffodil Mug Rug? Share your experience, tips, or variations in the comments below! Let your creativity bloom and inspire others this season.


