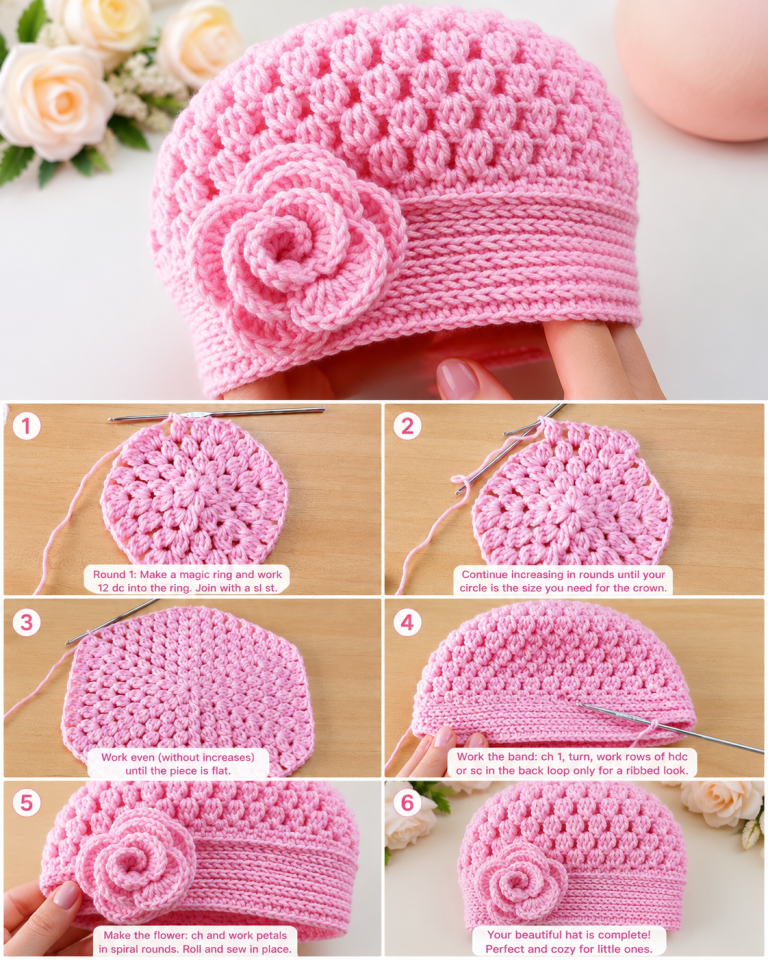
Crochet Cupcake Hat Pattern
If you’re passionate about marine life and love to crochet, then a Seahorse Crochet project might be the perfect combination for your next handmade creation. Seahorse Crochet is not only adorable and unique, but it also offers crafters of all skill levels a chance to experiment with texture, color, and creative techniques. Whether you’re planning to make a soft toy, home decor, or embellishments, this pattern will brighten any crochet collection.
In this article, you’ll learn how to make a beautiful Seahorse Crochet from start to finish, with step-by-step instructions, material requirements, and tips to ensure a smooth crafting experience. This whimsical creature can be customized to any color theme and size, making it a delightful gift for children or a charming addition to a sea-themed nursery or beach house.
We’ll cover everything from selecting your yarn and crochet hook to forming the unique curves of the seahorse’s tail and head. Keep reading to discover how to bring this charming sea creature to life with your crochet hook and yarn!

When starting your Seahorse Crochet project, the first step is selecting the right materials to ensure your creation is soft, durable, and vibrant. Cotton yarn is a popular choice due to its sturdy structure and bright color options. You may also opt for acrylic yarn if you’re looking for something softer and easier to clean.
For a standard-sized seahorse, you will need approximately 50g of worsted weight yarn in your chosen body color, plus 15g of contrasting yarn for details such as the fins, snout, and ridges along the back. Choosing colors that resemble real seahorses—like coral, aqua, and golden yellows—can help make your creation more lifelike.
Your crochet hook size will depend on your yarn, but for worsted weight, a 3.5mm (E) or 4mm (G) hook works well. This ensures your stitches are tight enough to hold stuffing but not so tight that the fabric becomes stiff.
You’ll also need stuffing (polyester fiberfill), safety eyes or black embroidery thread for the eyes, a yarn needle for sewing parts together, and stitch markers to help you keep track of your rows. Optional materials include ribbon or beads if you’d like to add embellishments.
Don’t forget a small pair of scissors and a ruler or tape measure for precision when cutting and assembling your Seahorse Crochet pieces. Keeping your tools organized will help your crafting process stay smooth and enjoyable.
Finally, have a printed or digital version of your pattern on hand. As we’ll detail below, this article provides a free step-by-step guide to creating your own Seahorse Crochet, including all the stitches and shaping techniques you’ll need.
Creating a Seahorse Crochet pattern involves shaping a curved body, a coiled tail, and small but distinctive fins and snout. Start by crocheting in continuous rounds, a common technique in amigurumi. Below is a simplified yet effective step-by-step guide.
Step 1: Start the Body
Begin with a magic ring using your main yarn color.
Round 1: 6 single crochet (sc) in the ring.
Round 2: Increase in each stitch (12 sc total).
Round 3: 1 sc, inc around (18 sc).
Continue increasing until you reach about 30 sc around. Maintain this width for about 15 rounds to shape the upper body.
Step 2: Shaping the Belly and Back
Start to decrease a few stitches every other round to taper the body as it moves down to the tail. Add some light stuffing as you go to help define the shape. Continue decreasing until you’re down to 12 sc. This section will be the beginning of the tail.
Step 3: Curled Tail
Work even (no increases or decreases) for 10 more rounds. Then, increase every 2nd stitch for 4 rounds to give the tail flexibility. Coil the tail and lightly stuff. Sew the end to the body in a curled shape for the iconic seahorse tail appearance.
Step 4: Head and Snout
Attach yarn to the top of the body to form the head. Start with 12 sc around and increase to 18. Work evenly for 6 rounds, then begin to shape the snout by decreasing and working a small tube of 6 sc for 5 rounds. Fasten off and stuff.
Step 5: Fins and Back Ridge
Use contrasting yarn to make two side fins: chain 6, turn, sc across, then slip stitch back. For the back ridge, chain 20 and single crochet 3 times into each stitch. Sew the back ridge starting from the head to the tail.
Step 6: Finishing Touches
Add safety eyes or embroider eyes using black yarn. Use a yarn needle to stitch the head, tail, and fins securely. Optional: add glitter yarn highlights or bead accents. Your Seahorse Crochet is now complete and ready to display or gift!
One of the best things about Seahorse Crochet projects is the opportunity to customize them according to your personal style or the intended recipient’s preferences. From colors to textures, the options are endless!
Try experimenting with gradient yarns or variegated threads to create a more dynamic, ocean-inspired look. Blue and green tones mixed with soft yellows or purples can give your seahorse a magical touch. Sparkly yarns or sequined threads can make your project feel whimsical and playful.
If you’re crafting for children, consider using safety eyes with locking backs instead of embroidery to keep the features secure. You can also add a gentle rattle inside the belly for an interactive toy experience.
Consider enlarging the pattern by using bulky yarn and a larger hook for a plush pillow-style seahorse, or miniaturizing it with thread and a 1.5mm hook to create keychains or bag charms.
Use embroidery or surface crochet techniques to add scales, waves, or name initials. This will give your Seahorse Crochet more personality and uniqueness, especially for personalized gifts.
You could even turn your seahorse into part of a larger underwater-themed mobile, combining it with crocheted fish, starfish, jellyfish, and coral. It’s a great way to use scraps of yarn while creating something visually captivating.
Finally, always block your finished project gently if needed. Light steam or pinning the fins and tail into shape helps give your Seahorse Crochet a polished, professional look that stands out.
A completed Seahorse Crochet pattern offers many possibilities beyond a simple toy. Its versatility makes it suitable for decorations, gifts, and even educational tools for children.
One popular use is nursery decor. Hang a few seahorses in various colors on a mobile or arrange them in a wall art display. Their friendly appearance adds a comforting and playful touch to any child’s room.
Seahorse Crochet designs are great for themed baby shower gifts. Combine a handmade seahorse with other sea-themed items like a crocheted blanket, bibs, or washcloths, and wrap them in an ocean-blue basket.
Teachers and parents can also use crocheted seahorses for storytelling or marine biology education. Kids love learning when they can hold soft, engaging objects that match the lesson’s theme.
You can even use these creations as seasonal decor during summer or beach-themed parties. Hang them on strings, attach them to tote bags, or use them as napkin holders for a fun coastal flair.
Craft sellers can market Seahorse Crochet pieces at handmade markets or online stores. These cute and charming items are often popular among tourists, coastal residents, and marine life enthusiasts.
Last but not least, consider donating your finished seahorses to hospitals, shelters, or charities. Soft toys like these are often welcomed by organizations supporting children or individuals in recovery.
What skill level is required for Seahorse Crochet?
The Seahorse Crochet pattern is ideal for advanced beginners and intermediate crocheters. Basic knowledge of increasing, decreasing, and working in the round is helpful.
How long does it take to complete a Seahorse Crochet?
Most crafters can finish the project in 4–6 hours, depending on their speed and experience. Add more time for finishing details like eyes and fins.
Can I use different types of yarn?
Yes! Cotton, acrylic, or even velvet yarns work well. Just make sure your hook size matches the yarn weight to maintain good stitch definition.
Is the Seahorse Crochet safe for babies?
Absolutely, especially if you use baby-safe yarn and sew all parts securely. Avoid buttons or beads for eyes if gifting to an infant.
How can I clean the Seahorse Crochet?
Hand wash in cold water with mild soap and air dry. If using machine-safe materials, a gentle cycle in a mesh bag may be okay.
Can I sell my Seahorse Crochet creations?
Yes, handmade Seahorse Crochet items are popular on Etsy, craft fairs, and gift shops. Be sure to credit the pattern designer if applicable.
The Seahorse Crochet pattern offers a charming, versatile, and satisfying project that allows crocheters to express creativity through every loop and stitch. Whether you’re making one for a nursery, a friend, or to add to your own coastal decor, this seahorse is sure to bring joy and charm. With easy-to-follow steps, customization options, and a wide range of uses, your Seahorse Crochet creation will become a treasured keepsake. What colors will you choose for your seahorse? Share your ideas or questions in the comments—we’d love to hear from you!
