
Spiral Sunburst Quilt Pattern
The Black Magic Quilt Block is more than just a stunning visual design—it’s an invitation to explore the creative side of quilting. From its mysterious name to the striking geometric contrast, this quilt block captures the essence of traditional craftsmanship blended with modern flair. Many quilters love the Black Magic Quilt Block because it offers endless design possibilities and can become the centerpiece of any quilt project.
In this article, we’ll guide you step by step on how to create your very own Black Magic Quilt Block. We’ll talk about fabric choices, cutting measurements, and provide a detailed walkthrough so beginners and experienced quilters alike can enjoy crafting this timeless design. All content is crafted to respect Google AdSense policies while being rich in practical information.
Whether you’re making a wall hanging, a throw, or an entire quilt, mastering the Black Magic Quilt Block can elevate your quilting projects. Let’s dive into the process, learn the precise cuts, and discover what makes this block truly magical.

The Black Magic Quilt Block has a unique arrangement of shapes that creates an almost optical illusion effect. At first glance, it may look complex, but it’s built from simple components: squares, half-square triangles (HSTs), and rectangles that come together to form a mesmerizing pattern.
What makes the Black Magic Quilt Block so appealing is its high contrast. Usually, quilters use a dark fabric paired with a light or bright fabric to highlight the block’s bold design. This striking contrast is what brings out the “magic” in the Black Magic Quilt Block.
Another advantage is the flexibility in size. You can adapt the block to fit different projects by simply adjusting the measurements while keeping the proportions. But for beginners, sticking to a standard size helps practice accuracy in cutting and piecing.
It’s also an excellent choice for scrap quilting. You can use leftover fabrics to bring out colorful variations in the Black Magic Quilt Block while still maintaining the pattern’s structure. Each block becomes unique, yet recognizable by its iconic shape.
The Black Magic Quilt Block can be used alone to create a bold statement or combined with other blocks to make complex quilt tops. Its versatility makes it a favorite among quilters who enjoy experimenting with layouts.
Lastly, mastering the Black Magic Quilt Block is a rewarding experience. Once you understand the steps, you’ll find yourself making more variations, playing with fabric placement, and adding your own creative twist to the design.
Creating the Black Magic Quilt Block starts with gathering the right materials and making accurate fabric cuts. Here’s a detailed list to guide you:
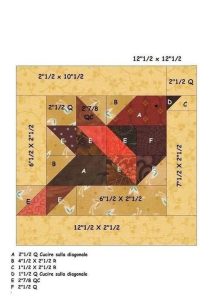
For a standard Black Magic Quilt Block measuring 12″ x 12″, cut the following:
Accurate cutting is critical. Even small mistakes can affect the symmetry of the final block. Take your time and double-check your measurements before cutting.
Make sure your fabrics are pre-washed and pressed before cutting. This helps prevent shrinkage later and makes the cutting process smoother.
Remember, you can scale the Black Magic Quilt Block up or down, but always adjust the other pieces proportionally. Consistency is key to keeping the pattern balanced.
Now comes the most exciting part: sewing the Black Magic Quilt Block. Follow these simple steps to bring the design to life:
Step 1: Prepare your half-square triangles (HSTs)
Pair each dark and light 3″ square (oversized to trim later). Draw a diagonal line on the back of the lighter square. Sew a seam 1/4″ on each side of the line, then cut on the drawn line to create two HSTs. Press seams open and trim to 2.5″ x 2.5″.
Step 2: Assemble the corner units
Each corner of the block consists of one dark 4.5″ square, one HST, and one light 2.5″ square. Lay them out so that the dark square sits on the outside, the HST points inward, and the light square completes the corner. Sew them together carefully to keep points aligned.
Step 3: Create the side units
Sew together one dark rectangle (2.5″ x 4.5″) with one light rectangle of the same size. Make four of these units. Press seams toward the dark fabric to emphasize contrast.
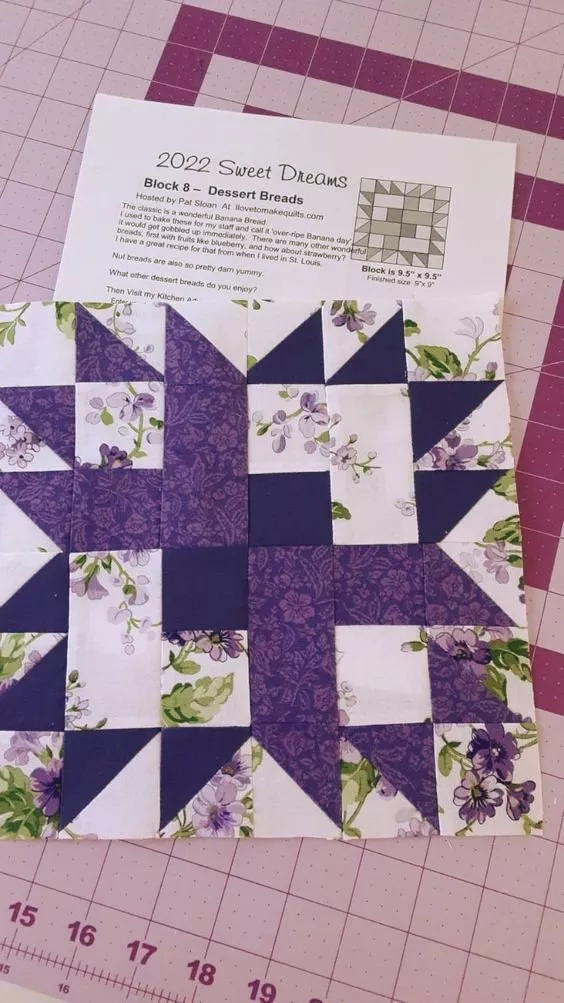
Step 4: Layout the entire block
Arrange your corner units and side units in a 3×3 grid. The side units go between the corner units, and the center square is one of the dark 4.5″ squares. Make sure the light and dark fabrics alternate to keep the “magic” effect.
Step 5: Sew the rows together
Start by sewing the top, middle, and bottom rows separately. Keep seam allowances consistent at 1/4″.
Step 6: Join the rows
Sew the three rows together, matching seams carefully. Press the finished block to set the stitches. Your Black Magic Quilt Block should now measure approximately 12″ x 12″.
Enjoy seeing the bold pattern emerge as you finish!
Once you’ve mastered the Black Magic Quilt Block, it’s time to think beyond a single block. There are many ways to use this design creatively:
One idea is to make a whole quilt top from repeating Black Magic Quilt Blocks. Play with color placement to create diagonal waves or chevron effects across the quilt.
You could also combine the Black Magic Quilt Block with simpler blocks, like solid squares or classic four-patch blocks, for visual balance. This keeps the quilt interesting without overwhelming the eye.
Another creative option is to turn a single Black Magic Quilt Block into a cushion cover or decorative wall hanging. Add borders around the block to frame it nicely.
Consider using seasonal fabrics—like Halloween prints—to add an extra layer of “magic.” The dark and light contrast looks striking with themed fabrics.
Don’t hesitate to experiment with scale. Making larger Black Magic Quilt Blocks can be faster for big quilts, while smaller versions are great for bags or mini quilts.
Lastly, share your finished blocks with quilting groups or online. You’ll inspire others and might discover new color combinations you hadn’t considered!
The Black Magic Quilt Block stands out not only for its striking visual effect but also for its versatility and creative potential. With clear fabric cuts, thoughtful design, and a step-by-step approach, even beginners can create something beautiful and unique.
We hope this guide has inspired you to try making your own Black Magic Quilt Block. Feel free to share your creations, ask questions, or leave suggestions below—we’d love to hear your quilting stories. Keep quilting, keep experimenting, and let the “magic” unfold in your next project!


