
Crochet Cat Hair Ties Pattern
The Lise 12″ granny square crochet is a beautiful, classic pattern that brings elegance and charm to any crochet project. Whether you’re designing an afghan, pillow cover, or a unique wall hanging, this versatile Lise 12″ granny square adds texture and character that never goes out of style. In today’s blog post, we’ll explore everything you need to know to create this stunning square, from step-by-step instructions to practical tips.
If you love traditional crochet combined with modern style, the Lise 12″ granny square crochet is the perfect choice. The large size of this granny square makes it ideal for statement pieces, and its detailed pattern allows for creative color combinations and yarn textures. Even beginners who are ready for a new challenge can enjoy the process and the final result.
By following this guide, you’ll learn how to create the Lise 12″ granny square crochet from start to finish, discover the best yarn choices, and understand the cuts and measurements needed. Let’s dive into this elegant and rewarding crochet journey together.

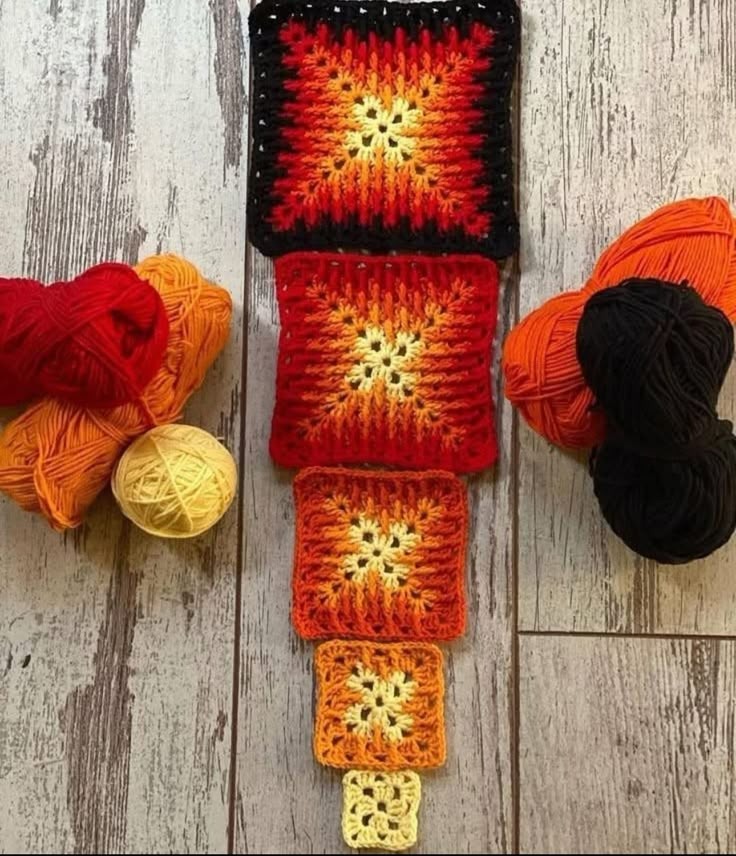
The Lise 12″ granny square crochet is known for its balanced design, which combines traditional granny square structure with decorative stitches that create a textured look. Its final size—approximately 12 inches (30 cm)—makes it perfect for larger projects, and the square shape makes it easy to join with other blocks.
To start your Lise 12″ granny square crochet, you’ll need a few basic materials: a medium-weight (worsted) yarn, a 5 mm crochet hook, scissors, and a tapestry needle for weaving in ends. For a single square, prepare around 80–100 grams of yarn, depending on your tension and stitch tightness.
This pattern uses classic stitches like chains, double crochets (US terms), and clusters. It may also include decorative stitches like popcorn or puff stitches, which add volume and beauty. The best part of the Lise 12″ granny square crochet is its versatility—you can use multiple colors or a single shade for a timeless, monochrome effect.
The cuts and measurements in crochet refer to how you divide your yarn colors and the number of stitches in each round. For a balanced look, prepare four colors and allocate about 25 grams per color if you want to alternate rounds. If you choose one color, ensure you have enough yarn for the full square.
Make sure your tension stays even throughout the project. If your Lise 12″ granny square crochet looks wavy or tight, adjust your hook size slightly—using a larger hook will loosen your stitches, while a smaller one will tighten them. This is key to achieving the perfect 12-inch square.
Finally, remember to block your square after finishing. Blocking means dampening your square and gently shaping it to the correct size. This helps highlight the pattern and ensures your squares join neatly in your final project.
Let’s create the Lise 12″ granny square crochet together, step by step. Each step will help you build the square from the center outwards, using basic and decorative stitches.
Step 1: Create the Center
Start with a magic ring or chain 4 and slip stitch to form a ring. Chain 3 (counts as first double crochet), then work 11 more double crochets into the ring. Join with a slip stitch to the top of the starting chain. You’ll have 12 double crochets forming your center.
Step 2: Build the Foundation Round
Chain 3 (counts as first double crochet), double crochet in the same stitch. Chain 2, then make 2 double crochets in the next stitch. Repeat around: 2 double crochets, chain 2 in each stitch. At the end, join with a slip stitch. You now have 12 pairs of double crochets separated by chain-2 spaces.
Step 3: Form the Corners
To create the square shape, crochet 3 double crochets, chain 2, 3 double crochets in the same chain-2 space to form a corner. Then chain 1, and work 3 double crochets in the next chain-2 space. Continue around: corners in every third space, sides with 3 double crochets. Join with a slip stitch.
Step 4: Expand the Square
For each new round, repeat the corners as before (3 double crochets, chain 2, 3 double crochets) and work 3 double crochets in each chain-1 space along the sides. Chain 1 between groups. Continue adding rounds until your square measures about 12 inches.
Step 5: Add Decorative Stitches
To give your Lise 12″ granny square crochet extra texture, add puff stitches, popcorns, or clusters in place of some 3-double-crochet groups. For example, alternate a round of puff stitches with a round of regular double crochets.
Step 6: Finish and Block
When your square reaches 12 inches, finish with a round of single crochets to give it a neat edge. Fasten off and weave in the ends with a tapestry needle. Block your square by dampening it, pinning it to 12 inches square, and letting it dry completely.
Choosing the right yarn and colors for your Lise 12″ granny square crochet can completely transform your project. Think about the style you want—vibrant and modern, classic and neutral, or pastel and soft.
For a modern look, choose contrasting bold colors, like teal, coral, and cream. Use these to alternate your rounds in the Lise 12″ granny square crochet, creating a dynamic design that catches the eye.
If you prefer a vintage feel, try muted shades: dusty rose, sage green, beige, and soft ivory. These colors highlight the texture of the stitches without overwhelming the overall design.
Consider yarn texture, too. Smooth cotton yarn creates crisp stitch definition, while a wool blend offers warmth and softness. Each choice changes how your Lise 12″ granny square crochet feels and looks.
Always test your color choices by crocheting a small sample or the center of the square first. Sometimes colors look different together than you might expect. Adjust as needed to create the perfect harmony.
Don’t forget about durability, especially if your Lise 12″ granny square crochet is part of a blanket or pillow cover. Choose washable yarns to keep your project practical and long-lasting.
Finally, remember that your creativity is what makes each square unique. Even if you follow the same pattern, your color choices and yarn textures will create a one-of-a-kind masterpiece.
Once you’ve mastered the Lise 12″ granny square crochet, there are countless ways to use it in your projects. This versatile block can be combined, repeated, or used alone to create something special.
Make a throw blanket by crocheting 12–20 squares and joining them together. Use a simple whipstitch or slip stitch seam. Finish with a border of single crochets or shells for a polished edge.
Turn a few squares into pillow covers. Crochet two squares for each pillow, seam them together on three sides, insert a pillow form, and close the last side. This adds a handmade charm to your living room or bedroom.
You can also make a stunning wall hanging by joining a few Lise 12″ granny square crochet blocks vertically or in a diamond shape. Add tassels to the bottom for a boho style.
If you have leftover yarn, create a matching table runner. Combine squares in a single row or two rows, depending on the width you want. It’s a great way to use your creativity and avoid waste.
For smaller projects, use part of the Lise 12″ granny square crochet pattern to make coasters or pot holders. Just stop after a few rounds instead of completing the full 12-inch square.
And finally, why not design a unique bag? Crochet four squares for the sides and bottom, then add a strap. It’s practical, stylish, and shows off your crochet skills.
The Lise 12″ granny square crochet is more than just a pattern—it’s a creative canvas. With every stitch, you bring texture, color, and personality to your project. Whether you’re crafting a large afghan, a simple pillow, or an elegant wall hanging, this square offers endless possibilities.
We hope this guide inspires you to pick up your hook and try the Lise 12″ granny square crochet today. Enjoy the process, experiment with colors, and share your creations with the crochet community.
Do you have your own tips, favorite color combinations, or project ideas? Share them below! Let’s celebrate the beauty of crochet together.

