Lace Shawl with Bear Applique Pattern
Creating a Santa Ornament Made from a Log Cabin Block is a charming and festive way to blend traditional quilting techniques with holiday cheer. This adorable Christmas project transforms the beloved Log Cabin quilt block into a whimsical Santa face, perfect for decorating your tree, gifting to loved ones, or even adding to holiday garlands and wreaths. The pattern is easy enough for beginners and a delightful diversion for experienced quilters looking to use up fabric scraps.
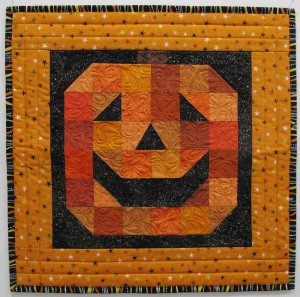
The Santa Ornament Made from a Log Cabin Block is not only a celebration of patchwork creativity but also a clever play on shapes and colors to evoke the essence of Santa Claus. This ornament features classic holiday tones—deep reds, snowy whites, and flesh-toned beiges—to recreate Santa’s hat, beard, and rosy cheeks using fabric strips. It’s a small but powerful reminder of the warmth and creativity the season brings.
This guide will walk you step-by-step through making your own Santa Ornament Made from a Log Cabin Block, including exact fabric cuts and construction tips. With just a few basic materials and a bit of time, you’ll be able to create a unique, handmade ornament that’s bound to bring smiles and holiday spirit wherever it hangs.

When preparing to make a Santa Ornament Made from a Log Cabin Block, the first step is selecting the right fabrics. To capture the classic Santa look, you’ll need red for the hat, white for the beard, beige or peach for the face, and black for the eyes. For added texture and charm, consider mixing solids with festive prints.
For each Santa Ornament Made from a Log Cabin Block, you’ll need small fabric strips. Start with one square measuring 1.5″ x 1.5″ in a light peach tone for the center (Santa’s nose). Next, cut the following:
All strips should be 1.5″ wide for a cohesive Log Cabin appearance. Use high-quality quilting cotton for a crisp finish and easy handling.
Accurate cutting is crucial for the Santa Ornament Made from a Log Cabin Block, especially when working with small pieces. A rotary cutter and ruler will help ensure precision. Stack and cut your strips carefully, and label each to avoid confusion during piecing.
Once your pieces are cut, lay them out in order so you can visualize the Santa face coming together. This will also help you spot any needed color adjustments before sewing. A design board or even a simple felt sheet can help with layout.
Organizing your pieces in advance not only speeds up the sewing process but also prevents mistakes—especially important in such a small, detailed project. It’s a good idea to prepare multiple sets at once if you plan to make a series of ornaments.
Begin assembling the Santa Ornament Made from a Log Cabin Block by placing the center square on your work surface. This light peach piece represents Santa’s nose and is the starting point of your Log Cabin build. Every round of fabric strips will build outward from this center.
Sew the first white 1.5″ square to the right side of the center square using a 1/4″ seam allowance. Press the seam away from the center. Add the next white 1.5″ square to the bottom of the previous unit, press again. These pieces begin to form the beard base.
Next, attach the two 2.5″ peach strips—one to the left and one to the top. These strips create Santa’s cheeks and add warmth to the face. Be sure to press carefully to keep the block flat and square as you build it.
Now move to the next beard layer: sew the 3.5″ white strip to the right and then the second 3.5″ white strip to the bottom. These pieces continue to define Santa’s long white beard. Press each seam flat and square up the block as needed.
It’s time for the red hat: sew the 4.5″ red strip to the left and the second 4.5″ red strip to the top. This will frame the top and left side of Santa’s face with his festive red hat. Again, press each seam with care.
Finally, sew the 5.5″ red strip to the right, followed by the 5.5″ red strip to the bottom. Add the 6.5″ white strip to the very top to create the hat trim. Press the block well and square it to about 6.5″ if necessary. The Santa Ornament Made from a Log Cabin Block should now clearly show Santa’s features.
Now that the main block is sewn, it’s time to add those magical finishing touches that transform it into a Santa Ornament Made from a Log Cabin Block. Begin with Santa’s eyes: cut two small black circles or ovals from felt or fabric, approximately 1/4″ in diameter.
Using fabric glue or hand-stitching, attach the eyes to the peach section near the top center of the face. Place them symmetrically to give Santa a sweet and kind expression. You can also use small black buttons or even embroidery for extra charm.
To enhance the beard texture, consider hand-quilting or stitching wavy lines in the white sections. This adds dimension and brings the Santa Ornament Made from a Log Cabin Block to life. You can also outline the hat with decorative stitches or trim.
Another fun addition is a mini white pom-pom sewn or glued to the top right corner of the red hat to mimic Santa’s hat fluff. Tiny bells, sequins, or even a bit of glitter paint can be used tastefully to add sparkle.
To turn the block into an ornament, cut a small backing piece from felt or fabric measuring 6.5″ square. Place the right sides together, stitch around the edges (leaving a small gap), and turn the piece right side out. Press and hand-stitch the opening closed.
Sew or glue a ribbon loop to the top back of the ornament for hanging. A piece of twine, rickrack, or red satin ribbon works beautifully. Your Santa Ornament Made from a Log Cabin Block is now complete and ready to hang!
The Santa Ornament Made from a Log Cabin Block is incredibly versatile and can be used in a wide variety of holiday decor projects. While it shines as a standalone ornament, it can also be incorporated into other Christmas-themed crafts for a cohesive look.
Try creating a set of these ornaments with slight variations in fabric for each. Some Santas can have patterned hats, others solid; some with glittery beards or even rosy cheeks made from blush pink fabric. This turns your tree into a festive handmade showcase.
You can also use the Santa Ornament Made from a Log Cabin Block as a gift tag on wrapped presents. Simply write the recipient’s name on the back, and it becomes a reusable keepsake that doubles as decor for years to come.
Create a festive garland by sewing multiple Santa blocks in a row and stringing them along a fireplace mantle or stair railing. This transforms the traditional quilt block into a dynamic holiday display for larger areas.
If you’re making Christmas stockings, consider appliquéing the Santa Ornament Made from a Log Cabin Block onto the stocking front for a quilted touch. It adds warmth and a handmade look to your family’s holiday traditions.
Quilters can even include this block in a holiday quilt sampler or wall hanging. Mix and match it with other Christmas-themed blocks—like trees, stars, and snowflakes—for a cheerful seasonal creation. Its clear Santa imagery makes it a standout.
The charm of the Santa Ornament Made from a Log Cabin Block lies in its simplicity and meaning. It combines the comfort of traditional quilting with the magic of Christmas, creating something that’s not just decorative but filled with heart.
What size is the finished Santa Ornament Made from a Log Cabin Block?
The finished ornament measures approximately 6.5″ square before any quilting or finishing touches are added.
Can I make this Santa ornament without a sewing machine?
Yes! It can be entirely hand-sewn if you prefer traditional quilting or don’t have access to a machine.
Is this project suitable for beginners?
Absolutely. The Santa Ornament Made from a Log Cabin Block uses basic straight-line sewing and is a great way to practice precision.
What type of fabric is best for this ornament?
Quilting cotton works best due to its crispness and ease of handling, but felt and flannel are also fun alternatives.
Can I scale this pattern up or down?
Yes, just adjust your strip widths proportionally. Using 1″ or 2″ wide strips will change the final size accordingly.
Is this a safe project to do with kids?
Yes, with supervision. Kids can help choose fabrics, lay out the block, and glue on eyes and trims.
The Santa Ornament Made from a Log Cabin Block is a delightful holiday craft that blends nostalgia, creativity, and quilting tradition into a single festive keepsake. With just a few fabric strips, some simple sewing, and a bit of imagination, you can create an ornament that brings handmade warmth to your Christmas decor.
This project is perfect for all skill levels and offers a great way to use up fabric scraps while making something heartfelt and joyful. Whether you’re crafting for your own home, making gifts, or looking to start a new holiday tradition, this charming ornament is sure to become a favorite.
What did you think of this pattern? Have you made your own version of the Santa Ornament Made from a Log Cabin Block? Share your thoughts, photos, and creative variations in the comments below—we’d love to hear from you!