
Crochet Easy Mini Fish Pattern
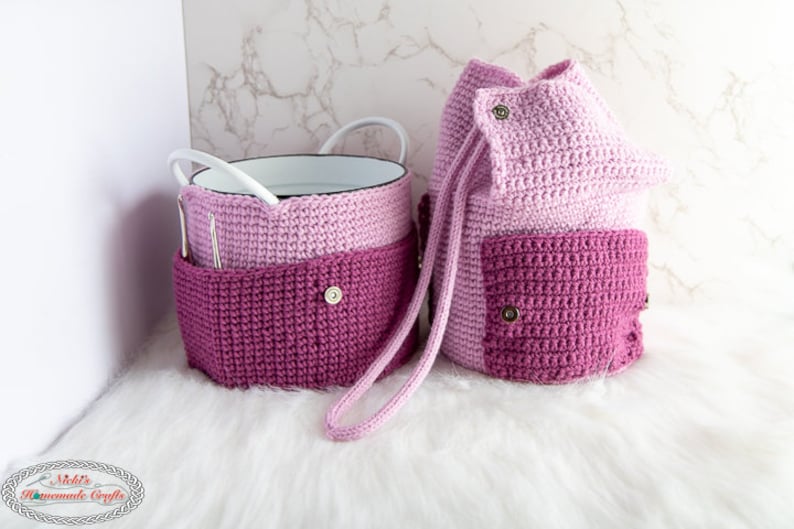
Looking for a fun and practical crochet project? This Crochet Yarn Storage Bucket Pattern is the perfect solution to keep your yarn stash organized and stylish. Whether you have a small crafting corner or a full-blown creative space, this pattern will help you stay neat and efficient while adding a handmade touch to your environment.
The beauty of this Crochet Yarn Storage Bucket Pattern lies in its simplicity and versatility. You can customize the size, colors, and textures according to your preferences and needs. It’s ideal for storing yarn balls, crochet hooks, or even small projects in progress. Plus, it’s beginner-friendly, making it a great choice for anyone looking to practice basic crochet stitches while creating something useful.
In this blog post, you’ll learn how to crochet your own yarn storage bucket step-by-step. We’ll guide you through the materials, measurements, and techniques needed to create a functional, durable, and decorative storage bucket. So grab your hook and let’s dive into this Crochet Yarn Storage Bucket Pattern that’s both fun to make and incredibly useful!
When beginning a Crochet Yarn Storage Bucket Pattern, selecting the right materials is essential for durability and structure. Use sturdy cotton yarn or a bulky weight yarn for best results. These materials hold their shape well, especially for items meant to carry weight like yarn buckets.
You’ll need approximately 250–300 yards of bulky cotton yarn. If using multiple colors for stripes or accents, split the yardage accordingly. Choose a color scheme that fits your craft room or project area aesthetic. Neutral tones work well for a minimalist look, while bright colors can make your workspace feel more creative and energized.
A 6.5 mm (K-10.5) crochet hook is recommended for this project. This size gives the bucket a firm texture while maintaining flexibility. If you want a sturdier bucket, consider using a smaller hook for tighter stitches. You’ll also need a yarn needle for weaving in ends and optional stitch markers to keep track of your rounds.
For additional structure, many crocheters use plastic canvas or heavy interfacing inside the walls and base of the bucket. This gives the piece extra rigidity and helps it stand upright when empty. Measure your bucket diameter and height to cut the plastic canvas accordingly.
Final measurements for the completed bucket:
You may adjust the dimensions if you need a smaller or larger container. This Crochet Yarn Storage Bucket Pattern is flexible, making it easy to modify while keeping the overall shape.
Once you have your yarn, hook, and optional stabilizers ready, you’re all set to start your crochet journey. Let’s move on to the foundational steps that bring this Crochet Yarn Storage Bucket Pattern to life.
Start your Crochet Yarn Storage Bucket Pattern by creating a sturdy flat base. This will support the weight of the yarn and keep your bucket upright. Use a magic ring or chain-4 joined with a slip stitch to form the center ring of the base.
Round 1: Chain 2 (counts as first half double crochet), work 11 half double crochets (hdc) into the ring. Join with a slip stitch to the top of the chain 2. (12 hdc)
Round 2: Chain 2, work 2 hdc in each stitch around. Join. (24 hdc)
Round 3: Chain 2, (1 hdc in next st, 2 hdc in next) repeat around. Join. (36 hdc)
Continue increasing in this pattern until your circle reaches approximately 9 inches (23 cm) in diameter. For most people, this takes about 8–9 rounds. The base should lie flat and be firm.
Now begin working even rounds to build the sides of your Crochet Yarn Storage Bucket Pattern.
Next Round: Chain 1, work 1 single crochet (sc) in the back loop only of each stitch around. This will help form a clean edge between the base and the wall.
Following Rounds: Chain 2, work 1 hdc in each stitch around. Join. Repeat this round until the sides measure 10 inches (25 cm) tall.
If desired, you can add handles by creating chain spaces and skipping stitches in one of the rounds near the top.
For example:
Handle Round: Chain 2, hdc in next 5 stitches, chain 8 (skip 6 stitches), hdc in next 10 stitches, chain 8 (skip 6), hdc in remaining stitches. Next round: hdc in each stitch and 8 hdc into each chain space.
Finally, fasten off and weave in all ends with a yarn needle. If using plastic canvas, insert it between rounds before closing the final round, or sew a fabric lining to hold the canvas in place.
You now have a beautiful and functional Crochet Yarn Storage Bucket Pattern ready to use!
One of the best things about the Crochet Yarn Storage Bucket Pattern is how easily it can be personalized. From choosing colors to adding embellishments, you can make this project reflect your unique style.
Start by experimenting with color changes. Try using two or three complementary colors in wide or narrow stripes. Use color blocking for a modern look, or a gradient yarn for an ombré effect. Changing colors every few rounds gives your bucket a fresh, layered design.
Another option is to add texture. While the basic version uses hdc for structure, you can substitute rows of puff stitches, crossed double crochets, or grit stitch to add visual interest. Be sure to keep your tension tight for consistency.
Consider attaching appliqués or crocheted motifs to the exterior. Flowers, stars, or labels like “YARN” or “HOOKS” can make your storage bucket not only functional but also decorative. Use surface slip stitching to outline patterns or write words on the side.
Want your Crochet Yarn Storage Bucket Pattern to be collapsible for travel? Skip the plastic canvas and use a softer yarn. Or make a matching drawstring lid to cover the bucket and carry your supplies without spills.
You can also modify the dimensions for different uses. Make smaller buckets for notions like scissors or tape measures, or create a taller one for skeins of bulky yarn. Just adjust the base rounds and side height accordingly.
Personalizing your bucket not only makes it special, but also a conversation starter. Every crochet corner deserves a handmade storage piece—and this Crochet Yarn Storage Bucket Pattern is the ideal canvas for creativity.
There are many reasons to love the Crochet Yarn Storage Bucket Pattern. It’s not just about storage—it’s about adding beauty, order, and creativity to your crafting space.
First, this project is incredibly practical. If you’re tired of tangled yarn or overflowing bins, this storage bucket is a game-changer. You’ll finally have a neat place for each skein, keeping your workspace organized and stress-free.
Second, it’s eco-friendly. Instead of buying plastic or fabric bins, you’re using yarn and your own hands to create something durable. It’s a sustainable option that aligns with handmade values and reduces waste.
Third, the Crochet Yarn Storage Bucket Pattern makes a great gift. Know someone who crochets or knits? Surprise them with a personalized storage bucket filled with crafting goodies. It’s thoughtful, useful, and sure to be appreciated.
Fourth, it’s a wonderful way to practice your crochet skills. Whether you’re learning to work in the round, master even stitch tension, or experiment with handles and edging, this pattern offers an ideal platform to grow.
Fifth, it’s a low-cost project. With one or two skeins of cotton yarn, you can create a lasting storage solution. There’s no need for expensive tools or materials—just yarn, a hook, and your creativity.
Finally, it’s simply fun to make. The repetitive rhythm of the stitches is relaxing, and watching your bucket take shape is highly rewarding. You’ll be surprised how quickly it comes together—and how much you’ll want to make more than one!
Can I use acrylic yarn for this pattern?
Yes, but cotton is sturdier. Acrylic may not hold its shape as well unless you use reinforcement.
How long does it take to make one bucket?
Depending on your crochet speed, it usually takes 4–6 hours.
Can I machine wash the finished bucket?
If made with cotton yarn, yes. Use cold water and reshape while drying.
What size hook should I use if I crochet loosely?
Use a smaller hook (like 6.0 mm) to maintain firmness and structure.
Is this a good beginner project?
Yes! It uses basic stitches like sc and hdc. Perfect for building confidence.
Can I make this pattern larger or smaller?
Absolutely! Just increase or decrease the number of rounds in the base and sides.
Creating your own Crochet Yarn Storage Bucket Pattern is a fulfilling way to combine functionality with creativity. With the right yarn, hook, and a little time, you can organize your craft room beautifully while showcasing your crochet skills. Whether it’s for yourself or a fellow crafter, this pattern is both useful and heartfelt. Ready to give it a try? Let us know your thoughts or share photos of your finished project—we’d love to see how your handmade yarn bucket turns out!


