
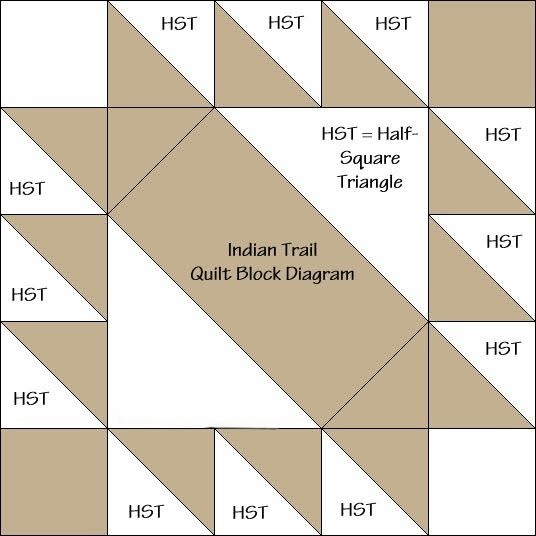
Star Oklohama Quilt Block Pattern
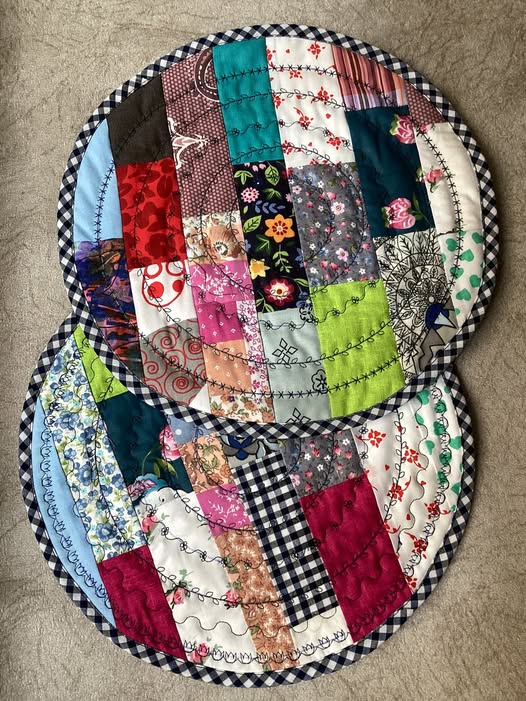
Scrap fabric patchwork placemats – quilt pattern projects are one of the most delightful ways to turn leftover fabric into something functional and beautiful. For quilters, crafters, or anyone who loves sewing, these placemats are a perfect opportunity to experiment with colors, textures, and patterns while reducing fabric waste. They can be created using simple sewing techniques and can be customized to suit any home décor style, from rustic and cozy to modern and vibrant.
One of the best things about making scrap fabric patchwork placemats is that they are beginner-friendly yet satisfying for experienced quilters. The process allows for complete creativity, as no two placemats will ever be exactly the same. You can mix prints, solids, and even novelty fabrics to create unique dining table accents. Plus, because they are smaller projects compared to full-sized quilts, they can be completed quickly, making them a fantastic weekend or evening sewing project.
Not only do these quilt patterns help you use up leftover fabric, but they also allow you to practice essential quilting skills such as cutting, piecing, pressing, and binding. This makes them a wonderful skill-building exercise for anyone interested in quilting. Whether you create them for your own dining table, as gifts for friends and family, or even for selling at craft fairs, the satisfaction of turning fabric scraps into something beautiful and practical is incredibly rewarding.
When starting your scrap fabric patchwork placemats – quilt pattern, the first step is selecting fabrics. The charm of patchwork lies in its variety, so don’t shy away from mixing different colors and prints. Look for fabrics that share a similar weight and texture so they sew together smoothly. Cotton quilting fabric is the most common choice because it’s easy to handle and durable enough for everyday use.
Start by gathering all your leftover scraps from previous projects. Lay them out to see which colors and prints work well together. Some quilters prefer a color-coordinated palette, such as shades of blue and green, while others enjoy a more eclectic look with bold contrasts. Both approaches can result in stunning placemats.
Another tip is to include a few neutral fabrics to balance the brighter or busier prints. This helps the eye rest and makes the overall design feel cohesive. You can also experiment with themed fabrics, such as florals for spring, plaids for a rustic kitchen, or festive prints for the holidays.
Pre-washing your scraps is important to prevent uneven shrinking or color bleeding later. Since your pieces may come from different fabric batches, pre-washing ensures they are all clean, soft, and ready to work with. After washing, press them flat to make cutting easier and more precise.
Consider the placement of your fabric pieces carefully. A balanced arrangement can make the final placemat look intentional and stylish rather than chaotic. Use a design board or a flat surface to arrange your patches before sewing them together. This allows you to swap pieces around until you’re happy with the layout.
Finally, remember that part of the beauty of scrap fabric patchwork placemats is their imperfection. Uneven prints, slightly mismatched seams, and quirky combinations give them personality and charm, so embrace the uniqueness of your project.
Once your fabrics are chosen, it’s time to cut and piece them together. The quilt pattern you choose can be as simple or as complex as you like. Beginners might prefer basic squares or rectangles, while more experienced quilters can experiment with triangles, hexagons, or even curved pieces.
Accuracy in cutting is essential to ensure the pieces fit together neatly. Use a rotary cutter, quilting ruler, and self-healing cutting mat for best results. Decide on the size of each piece beforehand so that your design remains consistent. For example, you might use 3-inch squares or 4×6-inch rectangles depending on the look you want.
Once the pieces are cut, start arranging them according to your desired design. Sew them together in rows, pressing the seams after each step. Pressing towards the darker fabric helps prevent shadows from showing through lighter pieces. Keep checking your alignment to ensure the seams match up when joining rows.
Chain piecing is a great time-saving technique. This involves feeding multiple fabric pairs through the sewing machine without cutting the thread in between. It’s efficient and helps maintain an even stitch length.
When all the rows are assembled, sew them together to form the full placemat top. At this stage, you’ll see your scrap fabric patchwork placemats coming to life. It’s rewarding to watch the random scraps transform into a cohesive and attractive piece.
If you’re working with irregularly shaped scraps, you can use a foundation piecing method. This involves sewing fabric pieces onto a base layer, trimming them to fit, and then joining them together. This is particularly helpful for using up very small scraps while keeping the placemat sturdy.
With your patchwork top ready, the next step is quilting and finishing. This is where your quilt pattern adds texture and stability to the placemat. Place your patchwork top on a layer of batting and a fabric backing, making a sandwich with the batting in the middle.
Baste the layers together using safety pins or temporary fabric adhesive to keep them from shifting during quilting. Choose a quilting design that complements your patchwork. Simple straight-line quilting works well and is easy for beginners, while free-motion quilting adds a more artistic touch for advanced quilters.
Quilt through all three layers, starting from the center and working outwards to prevent puckering. Adjust your stitch length to around 2.5 mm for durability. If you’re using a walking foot, it will help feed the layers evenly through the machine.
After quilting, trim the placemat to its final size, ensuring the edges are square and even. The last step is binding, which finishes the edges neatly. You can use pre-made binding or make your own from coordinating fabric scraps. Sew the binding to the front of the placemat, fold it over to the back, and stitch it down securely.
For extra durability, especially if the placemats will be washed frequently, consider double-stitching the binding. This ensures the edges stay intact even after repeated use.
Once finished, give your scrap fabric patchwork placemats a final press. They are now ready to brighten up your dining table or be wrapped up as a thoughtful handmade gift.
One of the joys of making scrap fabric patchwork placemats – quilt pattern projects is the endless room for creativity. You can customize the size, shape, and style to fit your needs and personal taste.
Try creating themed sets for different seasons or holidays. For example, autumn placemats could feature warm earth tones and leaf prints, while summer ones could have bright tropical fabrics. This way, you can swap them out throughout the year to refresh your table décor.
Experiment with different shapes beyond the standard rectangle. Oval, hexagonal, or even circular placemats can add a unique touch to your table setting. Adjust your quilt pattern accordingly for the new shape.
You can also incorporate embellishments such as embroidery, applique, or decorative stitching. These details add personality and make each placemat truly one-of-a-kind. For a rustic farmhouse look, consider frayed-edge seams or raw-edge applique.
Mixing textures can also elevate your design. Combine smooth cotton with textured linen or denim scraps for an interesting tactile experience. Just ensure the fabrics have similar care requirements so they can be washed together without issues.
Finally, think about sustainability. Using up every bit of scrap fabric not only reduces waste but also makes your project eco-friendly. Even the tiniest leftover pieces can be sewn together into new patchwork sections or used for matching coasters.
1. What size should I make my placemats?
Standard placemats are around 12×18 inches, but you can adjust the size to fit your table or personal preference.
2. Can I wash patchwork placemats in the machine?
Yes, as long as you pre-wash the fabrics before sewing and use a durable quilting method, they can be machine-washed and dried.
3. Do I need a sewing machine to make them?
While it’s possible to sew them by hand, a sewing machine will make the process faster and ensure stronger seams.
4. What type of batting should I use?
Cotton batting is a popular choice for placemats because it’s thin, durable, and washes well. Polyester batting can also work if you prefer a slightly puffier look.
5. Can I use non-cotton fabrics?
Yes, but ensure all fabrics have a similar weight and care instructions to avoid problems after washing.
6. How do I make them heat-resistant?
Use heat-resistant batting if you plan to place hot dishes directly on the placemats.
7. How many placemats should I make for a set?
Most sets include 4 or 6 placemats, but you can make any number to suit your household or gifting needs.
8. Can I sell my handmade placemats?
Absolutely! Handmade placemats are popular at craft fairs and online marketplaces.
9. Is it okay to mix different patchwork styles in one set?
Yes, mixing styles can create a charming and eclectic look.
10. How long does it take to make one placemat?
Depending on the design, a placemat can take anywhere from 1 to 3 hours to complete.
Creating scrap fabric patchwork placemats – quilt pattern projects is a joyful way to transform leftover materials into something useful and beautiful. From selecting fabrics and piecing them together to quilting and finishing, every step offers a chance to express creativity and craftsmanship.
These placemats are not only functional but also carry the charm of handmade artistry. I hope this guide has inspired you to start your own set. Please share your honest opinion and suggestions—I’d love to hear about your experiences and creative variations.

