Crochet Cupcake Hat Pattern
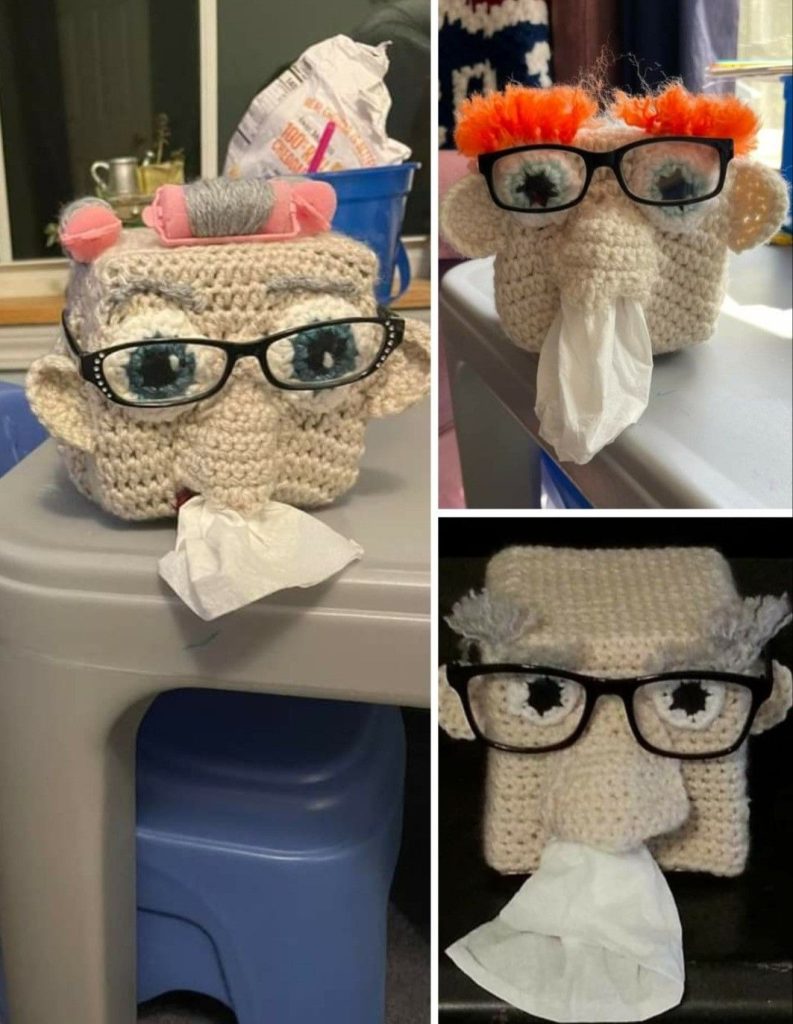
If you love adding a personal and cozy touch to your home décor, a Crochet Tissue Box Cover Pattern – Crochet Pattern is the perfect project for you. This charming handmade accessory transforms an ordinary tissue box into a beautiful statement piece. Whether you are a beginner looking for an easy project or an advanced crocheter aiming to create a unique home accessory, this pattern is versatile and enjoyable. The best part? You can customize it with your favorite colors, textures, and stitches to perfectly match your style.
Creating a Crochet Tissue Box Cover Pattern – Crochet Pattern is not only a fun craft project but also a wonderful way to add warmth to any room. These covers make excellent gifts for friends and family, especially when personalized to suit their tastes. You can use cotton yarn for a fresh look in the bathroom, soft acrylic for a cozy living room feel, or even elegant thread for a delicate touch in the bedroom. With so many possibilities, you can make one for every season or occasion.
In this guide, we will explore step-by-step how to create your very own Crochet Tissue Box Cover Pattern – Crochet Pattern. We will discuss the materials you’ll need, explain how to measure your tissue box for a perfect fit, and guide you through the process of crocheting the cover. By the end, you’ll have not only a beautiful cover but also the knowledge to adapt the pattern for different box sizes and styles.
When it comes to making a Crochet Tissue Box Cover Pattern – Crochet Pattern, choosing the right materials is essential for achieving the perfect look and durability. The yarn type, hook size, and additional embellishments will influence the final result.
First, select a yarn that suits the room where you plan to place the tissue box. Cotton yarn is ideal for bathrooms and kitchens because it is absorbent and easy to wash. Acrylic yarn works well for living rooms and bedrooms, offering softness and a variety of color options. Wool can add warmth and a rustic feel but may require more careful cleaning.
Your crochet hook size should match the yarn’s recommended gauge. A tighter stitch will provide better structure for the cover, ensuring it stays in place on the tissue box. You can use a smaller hook than usual to achieve a firmer fabric if needed.
For added charm, consider decorative elements like buttons, ribbons, appliqués, or crochet flowers. These embellishments can be sewn on after the main body is complete, giving your cover a unique and personalized finish.
If sustainability is important to you, you can use leftover yarn scraps from previous projects. This not only reduces waste but also gives your Crochet Tissue Box Cover Pattern – Crochet Pattern a colorful, patchwork-like design.
Finally, remember to choose colors that complement the surrounding décor. Neutral tones blend seamlessly, while bold hues can make the tissue box a focal point in the room.
Before starting your Crochet Tissue Box Cover Pattern – Crochet Pattern, accurate measurements are key to a snug and polished fit. Tissue boxes come in various shapes and sizes, so measuring your specific box will ensure a perfect outcome.
Start by measuring the height, width, and length of your tissue box. Note these dimensions down and add a small allowance for comfort and ease when slipping the cover on and off. This will prevent the cover from being too tight or too loose.
Once you have the measurements, decide on the stitch pattern you want to use. Basic stitches such as single crochet (sc) or half double crochet (hdc) work well for a sturdy cover. However, decorative stitches like shell, puff, or bobble can add texture and interest to your project.
Plan your work in sections: the top panel with an opening for the tissues, the four side panels, and possibly a base if you want full coverage. You can work the cover as one continuous piece or crochet each panel separately and seam them together.
If you are new to crochet, keeping the design simple will make the process more manageable. Advanced crocheters might experiment with color changes, intricate patterns, or even tapestry crochet to create designs on the cover.
Remember to make a small gauge swatch before starting the main project. This ensures your stitches match the pattern’s tension and that the finished piece will fit the box correctly.
Now let’s get into creating your Crochet Tissue Box Cover Pattern – Crochet Pattern from start to finish. Follow these steps for a neat and professional result.
Begin with the top panel by chaining a foundation row that matches the length of your tissue box’s top, minus the tissue opening. Use single crochet or half double crochet for a strong base. Work evenly until you reach the width needed, leaving an open space in the center for the tissues to pull through.
Once the top panel is done, crochet each side panel individually. Match their length and height to your measurements. Use the same stitch pattern throughout for consistency or mix different stitches for variety.
Attach the side panels to the top using slip stitches or a whip stitch. This creates a smooth join and prevents gaps between sections.
If you want the cover to be removable for washing, avoid attaching the base panel. If you prefer full coverage, crochet a base piece and join it to the sides.
Weave in all loose ends with a tapestry needle, making sure they are secure and invisible from the outside.
Finally, add any embellishments or decorative touches, ensuring they are firmly sewn so they don’t detach during use.
The beauty of a Crochet Tissue Box Cover Pattern – Crochet Pattern is its flexibility for customization. You can adapt it to fit any style, occasion, or theme.
Seasonal designs are always a hit. For example, crochet in red and green with snowflake appliqués for Christmas, or use pastel shades and floral motifs for spring.
You can also create themed covers for specific rooms in your home. A nautical-themed blue and white striped cover would look charming in a beach house or bathroom. In a child’s bedroom, bright colors and fun shapes like stars or animals can make the tissue box more playful.
Texture is another great way to personalize your design. Try alternating between smooth stitches and textured stitches like popcorn or puff stitches for an interesting tactile effect.
Consider adding practical features like a buttoned flap or elastic at the base to make removing and replacing the cover easier.
If you enjoy colorwork, experiment with tapestry crochet or intarsia to incorporate patterns, words, or images directly into the fabric. This can turn your cover into a truly one-of-a-kind creation.
Lastly, remember that crochet is an art form. Don’t be afraid to let your personality shine through the yarn choices, stitches, and finishing touches.
1. What is the best yarn for a Crochet Tissue Box Cover?
Cotton yarn is highly recommended because it’s durable, washable, and holds its shape well. Acrylic is also a great option for softness and variety of colors.
2. Can beginners make a Crochet Tissue Box Cover Pattern – Crochet Pattern?
Yes! This project is beginner-friendly, especially if you stick to basic stitches like single crochet or half double crochet.
3. How long does it take to make a tissue box cover?
Depending on your skill level and design complexity, it can take anywhere from a few hours to a weekend to complete.
4. Can I wash my crochet tissue box cover?
Yes, most covers can be hand-washed or machine-washed on a gentle cycle, especially if made with cotton or acrylic yarn. Always follow the yarn care instructions.
5. Do I have to follow a specific pattern?
Not necessarily. You can design your own by measuring your tissue box and using any stitch pattern you like. The instructions in this article can help you create a custom fit.
6. Can I make covers for different box shapes?
Absolutely. You can adapt the pattern to fit square, rectangular, or even oval tissue boxes by adjusting the measurements and shaping accordingly.
Creating a Crochet Tissue Box Cover Pattern – Crochet Pattern is a rewarding project that combines functionality with creativity. With the right materials, accurate measurements, and your chosen stitch patterns, you can transform an ordinary household item into a charming decorative piece. The customization possibilities are endless, making it a fun project for all skill levels.
I hope this guide has inspired you to start your own crochet tissue box cover. If you’ve made one before or decide to try this project, I would love to hear your honest opinion and suggestions for improvement. Your feedback helps create even better crochet ideas for the future.