
Crochet Lace Butterfly Scarf Pattern
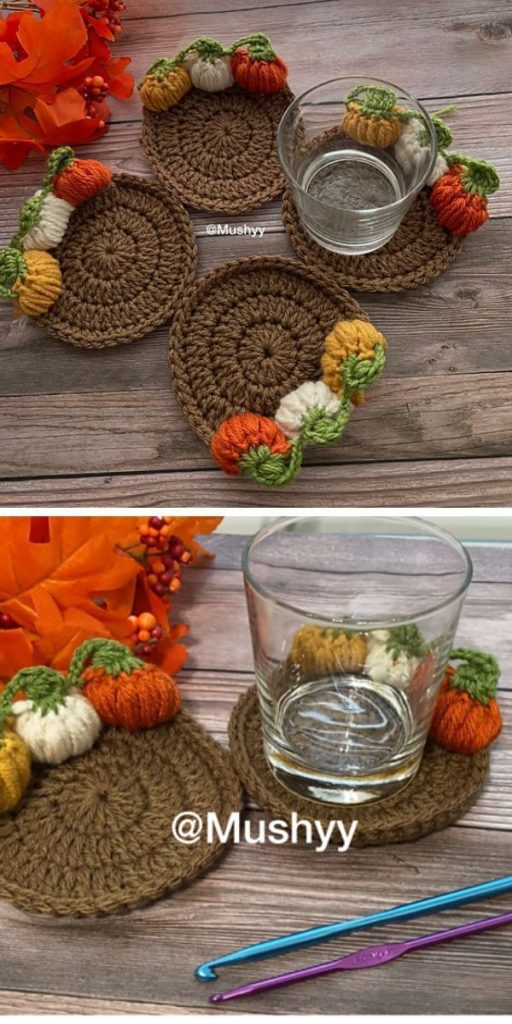
If you’re looking for a charming and seasonal crochet project, pumpkin coasters – crochet pattern is the perfect choice. These cute and functional coasters not only protect your table from hot mugs or cold drinks but also add a touch of cozy autumn décor to your home. Whether you’re preparing for a fall gathering, decorating for Halloween, or simply want to bring the warm colors of the season indoors, these coasters will fit the bill. The best part is that this pattern is beginner-friendly, yet detailed enough to keep even experienced crocheters interested.
Making your own pumpkin coasters – crochet pattern is also an eco-friendly option. Instead of buying mass-produced home décor items, you can craft them yourself using yarn you already have on hand. Plus, handmade items always carry that special personal touch, making them great as gifts for family and friends. You can customize the size, shade, and texture to suit your taste, turning each coaster into a unique piece of art. Imagine a table set with rustic, hand-crocheted pumpkins under each cup — it’s the little details that create unforgettable moments.
In this guide, we’ll walk you through everything you need to know about creating pumpkin coasters – crochet pattern, from choosing the right materials to following the step-by-step instructions. You’ll learn tips to keep your stitches even, how to add a stem and leaf for extra realism, and ways to adapt the pattern to other shapes or festive designs. Whether you’re making them for your own home or to sell at a craft fair, these coasters are sure to be a hit.
To start your pumpkin coasters – crochet pattern, you’ll need some basic crochet tools and materials. Choosing the right supplies will make the process smoother and the final result more durable and visually appealing.
First, you’ll need yarn in your preferred colors. Traditionally, orange is used for the pumpkin body, green for the leaf, and brown for the stem. Cotton yarn is a great choice because it is absorbent, holds its shape well, and is easy to clean — perfect for coasters.
Next, choose the appropriate crochet hook. A hook size between 3.5 mm and 4 mm usually works best for medium-weight cotton yarn. The size may vary depending on your tension; if you crochet tightly, you might go up half a size to avoid overly stiff coasters.
You’ll also need a yarn needle for weaving in ends neatly. This will help your coaster look professional and prevent loose threads from unraveling over time.
Scissors are essential for trimming yarn after you’ve finished each section. Keep them sharp for clean cuts and to avoid fraying.
Finally, consider having stitch markers on hand, especially if you’re a beginner. They help keep track of rounds or pattern repeats, ensuring a uniform look for all your pumpkin coasters.
Creating the pumpkin coasters – crochet pattern begins with making the circular base. Start by forming a magic ring with your orange yarn. This adjustable loop allows you to pull the center tight, giving the coaster a neat, closed middle.
For the first round, crochet a series of double crochets into the magic ring, usually about twelve stitches. This will form the flat, round base of the pumpkin. Join the round with a slip stitch to keep the shape even.
The next step involves increasing the size of your circle. For the second round, crochet two double crochets into each stitch around, doubling your stitch count. This expansion helps maintain a flat shape without curling.
Continue with the third round, alternating between one double crochet in the first stitch and two double crochets in the next. This gradual increase keeps the circle flat and symmetrical. Depending on your desired coaster size, you can add more rounds, always increasing evenly.
Once the base is complete, it’s time to add a bit of texture to mimic the natural ridges of a pumpkin. You can achieve this by working front post and back post stitches in alternating sections. This will create a gentle curve and depth.
Lastly, finish with a slip stitch around the edge to give it a clean border. Fasten off and weave in all ends using your yarn needle.
No pumpkin coasters – crochet pattern is complete without a stem and leaf. These small details transform a plain round coaster into a recognizable pumpkin design.
To make the stem, use brown yarn and attach it to the top center of the coaster. Crochet a short chain, then work single crochets back down to the base, securing it firmly. The stem should be small yet noticeable.
For the leaf, switch to green yarn. Start with a small chain and then work single crochets, half-double crochets, and double crochets in sequence along the chain to create a tapered leaf shape. Slip stitch it to the base near the stem for a realistic look.
If you want to add a playful twist, you can crochet a curly vine. Simply chain a longer length, then place two single crochets into each chain stitch. The natural curl will form automatically as you work.
Once the stem and leaf are attached, weave in any remaining ends and trim the excess yarn. This finishing touch ensures your coaster is sturdy and visually complete.
Remember to make each stem and leaf consistent in size if you’re creating a matching set. This creates a more professional and cohesive look when the coasters are displayed together.
The beauty of the pumpkin coasters – crochet pattern is how easily it can be customized. You can adjust colors, sizes, and even add embellishments to suit different occasions or personal preferences.
For a modern twist, try making white or cream pumpkins for a minimalist farmhouse vibe. Pair them with gold or beige stems for an elegant look.
You can also experiment with variegated yarns to add a subtle blend of colors, giving your pumpkin a more realistic, shaded appearance.
If you love holiday themes, adapt the pattern for Halloween by adding a simple embroidered jack-o’-lantern face. This makes your coasters double as festive decorations.
Beyond table use, these crochet pumpkins can serve as small wall hangings, appliqués for tote bags, or even as part of a garland. This versatility makes them an excellent stash-busting project.
For gifting, consider making a set of four or six coasters, tied together with a ribbon. Handmade items like these are always appreciated and show thoughtfulness.
1. How long does it take to make one pumpkin coaster?
On average, it takes about 30 to 45 minutes for an experienced crocheter to make one coaster. Beginners may take a bit longer.
2. Can I use acrylic yarn instead of cotton?
Yes, but cotton is preferred for coasters because it’s more heat-resistant and absorbent. Acrylic may not protect as well from heat or moisture.
3. How do I wash my pumpkin coasters?
Hand wash in cool water with mild soap, then lay flat to dry. Avoid wringing or machine drying to maintain their shape.
4. Can I make the coaster larger for bigger mugs?
Absolutely. Simply add more rounds in the increasing stage until you reach your desired size.
5. Do I need to block my coasters?
Blocking is optional but can help your coasters lay flat and look more polished.
6. Is this pattern beginner-friendly?
Yes. The stitches involved are basic, and the project is small, making it perfect for practice.
7. Can I sell the coasters I make from this pattern?
Yes, handmade coasters are popular craft fair items. Just remember to credit the pattern if it’s from a designer.
8. What crochet stitches are used in this pattern?
Primarily double crochets, single crochets, and optional front/back post stitches for texture.
9. Can I use this pattern for other shapes?
Yes, with some adjustments. You can adapt the same steps to create apples, oranges, or themed coasters.
10. How many coasters should I make for a set?
Four to six coasters is standard, but you can adjust based on your needs.
Creating pumpkin coasters – crochet pattern is a fun and rewarding project that combines functionality with seasonal charm. From choosing the right materials to adding the perfect finishing touches like stems and leaves, this guide has walked you through each step in detail.
These coasters make wonderful home décor, heartfelt gifts, and even items to sell at craft fairs. With the variations and creative ideas shared, you can personalize your pumpkins to match any style or occasion.
I’d love to hear your thoughts — share your honest opinion about this tutorial and any suggestions you might have for future crochet patterns.