
Crochet Cat Hair Ties Pattern
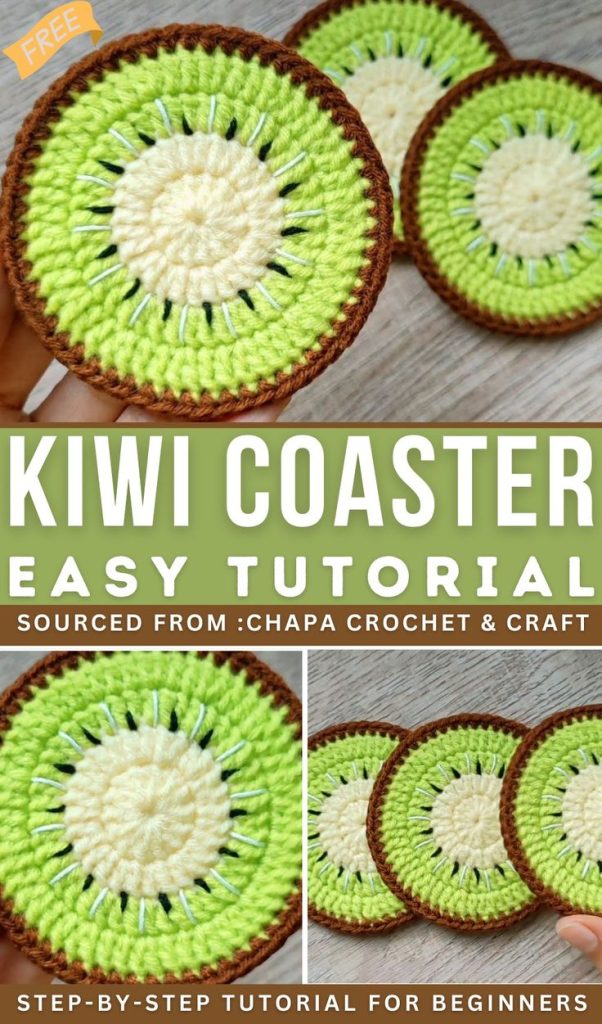
The Kiwi Coaster – Crochet Pattern is a delightful and practical project that blends creativity with functionality. This fun crochet design captures the vibrant look of a sliced kiwi, making it the perfect addition to your home décor or a thoughtful handmade gift. Whether you’re an experienced crocheter or just starting, this pattern offers an enjoyable experience while enhancing your crochet skills. The bright green, white, and black details mimic the juicy fruit’s appearance, adding a cheerful touch to any coffee table.
Crocheting a Kiwi Coaster – Crochet Pattern is not just about creating a decorative piece; it’s also about experimenting with colors, stitches, and textures. You can customize the coaster’s size, shades of green, or even experiment with yarn textures to achieve a unique look. Many crafters find this project a refreshing break from larger and more time-consuming patterns because it works up quickly and still looks impressive. Plus, its round shape makes it an excellent exercise for practicing circular crochet techniques.
For those who love handmade crafts, the Kiwi Coaster – Crochet Pattern can also be a great introduction to designing fruit-themed items. This project teaches you the basics of color changes, working in the round, and shaping without making it overly complex. You’ll enjoy the process of bringing a kiwi slice to life with yarn, turning a simple ball of thread into a playful and functional piece. The final result will make you smile every time you use it, and your guests are sure to notice the creative flair on your table.
When starting your Kiwi Coaster – Crochet Pattern, gathering the right materials and tools will make your work smoother and more enjoyable. Selecting quality yarn and appropriate tools ensures your coaster looks neat and lasts longer. This project doesn’t require many supplies, so it’s budget-friendly for crafters at any level.
You’ll typically need cotton yarn for this project, as it’s absorbent and holds its shape well. Cotton is also heat-resistant, making it perfect for coasters that may hold hot mugs. The color scheme usually involves bright green for the fruit’s flesh, a small circle of white for the inner ring, and black or dark brown for the seeds. A light brown or beige can be used for the kiwi skin.
A crochet hook suited to your yarn thickness will help maintain the correct tension and create even stitches. Many crocheters prefer a 3.5 mm to 4 mm hook for this type of project. A yarn needle will be useful for weaving in ends neatly, ensuring a polished finish. You’ll also need a pair of scissors to trim excess yarn and a stitch marker to keep track of rounds when working in the circle.
When choosing yarn, consider using mercerized cotton for a smoother and shinier finish. It will enhance the Kiwi Coaster – Crochet Pattern’s appearance, making the colors more vivid. If you prefer a softer look, regular cotton yarn works beautifully. Experimenting with different yarn textures can also give your coasters a more rustic or modern feel.
Proper preparation means fewer interruptions during your work. Once all materials are ready, you can focus entirely on the creative process. Many crafters even prepare multiple sets of materials in advance to make several coasters in one session, especially when gifting them or selling them at craft fairs. This efficiency makes it easy to build a small collection in just a few hours.
Finally, keep your workspace organized with small containers for yarn scraps, needles, and stitch markers. A tidy workspace not only makes crafting more enjoyable but also helps prevent mistakes and misplaced tools. By having everything ready, you can dive into your Kiwi Coaster – Crochet Pattern without delays.
Starting the Kiwi Coaster – Crochet Pattern begins with creating a magic ring or an adjustable loop. This technique allows you to close the center tightly, preventing any hole in the middle of your coaster. Work the first round with your inner white color, representing the kiwi’s core.
Once the base round is complete, switch to green yarn to create the main fruit section. Gradually increase stitches in each round to keep the coaster flat while forming a perfect circle. The green section will usually make up most of your coaster’s size. Remember to maintain even tension to avoid curling edges or uneven shapes.
After completing the green area, use black or dark brown yarn to embroider the kiwi’s seeds. These small stitches can be spaced evenly in a circular pattern to replicate a real kiwi slice’s look. Take your time with this step to ensure neat, symmetrical placement for a professional finish.
Next, switch to your outer skin color, often light brown or beige, for the final border. Crochet one or two rounds in this color to frame the kiwi slice beautifully. This step not only adds to the aesthetic appeal but also reinforces the coaster’s structure.
Once all rounds are completed, weave in any loose ends with your yarn needle. This will secure your stitches and prevent unraveling over time. Lightly blocking the coaster can also help it lay completely flat and give it a more polished appearance.
At this stage, your Kiwi Coaster – Crochet Pattern is ready to use or gift. You’ll be amazed at how quickly and beautifully the project comes together. Each coaster can be made in less than an hour once you get the hang of it.
One of the joys of working on a Kiwi Coaster – Crochet Pattern is the flexibility to experiment with creative variations. You can adapt the basic design to match different tastes, occasions, or décor styles.
Consider making coasters in different fruit themes, such as watermelon, orange, or lemon, using the same pattern structure but swapping yarn colors. This creates a vibrant fruit coaster set that’s perfect for summer gatherings or kitchen décor.
You can also play with yarn textures, such as using a blend of cotton and bamboo for a softer, silkier finish. Variegated yarns can add subtle color transitions, giving your kiwi a more artistic look.
Adding embellishments like small crochet leaves attached to the edge of the coaster can make the design even more charming. These little extras can turn a simple coaster into a conversation piece.
If you enjoy larger projects, try enlarging the pattern to create matching placemats or table centerpieces. This way, the kiwi design becomes a recurring theme on your dining table, tying the whole décor together.
Another fun idea is to stitch the coasters together into a larger panel, which could be used as wall art or a decorative table runner. The Kiwi Coaster – Crochet Pattern is versatile enough to be more than just a coaster.
Finally, consider making themed sets for special occasions, such as tropical-themed parties or as gifts for friends who love unique home accessories. Handmade coasters are thoughtful, practical, and carry a personal touch that store-bought items can’t match.
Perfecting your Kiwi Coaster – Crochet Pattern requires attention to detail and patience. The first tip is to maintain consistent stitch tension throughout the project. Uneven tension can cause the coaster to curl or become misshapen.
Always count your stitches at the end of each round to ensure accuracy. Missing or adding extra stitches can alter the coaster’s shape. Using a stitch marker helps you keep track of the beginning of each round, especially when increasing stitches.
When changing colors, secure your yarn neatly and weave in the ends as you go. This prevents tangling and gives your work a cleaner look. For smoother color changes, try carrying the unused yarn along the back of your work.
Blocking your finished coaster can make a big difference in its appearance. Lightly dampen it, shape it into a perfect circle, and let it dry flat. This process evens out stitches and ensures the coaster lies flat on the table.
Don’t be afraid to make a test coaster first. This lets you adjust hook size or yarn type before committing to a full set. A trial run also helps you familiarize yourself with the pattern and spot any tricky steps in advance.
Lastly, enjoy the process! The Kiwi Coaster – Crochet Pattern is meant to be a fun and relaxing project. Even if it’s not perfect, the handmade charm will always shine through.
1. What type of yarn works best for the Kiwi Coaster – Crochet Pattern?
Cotton yarn is ideal because it’s absorbent, heat-resistant, and durable, making it perfect for coasters.
2. How long does it take to make one Kiwi Coaster?
On average, it takes less than an hour to complete one coaster once you’re familiar with the pattern.
3. Can beginners make the Kiwi Coaster – Crochet Pattern?
Yes! The pattern uses basic stitches and simple color changes, making it beginner-friendly.
4. Do I need special tools for this project?
You’ll need a crochet hook, yarn needle, scissors, and optionally, a stitch marker for accuracy.
5. How do I keep my coaster from curling?
Maintain even tension, increase stitches evenly, and block the finished piece to keep it flat.
6. Can I wash the Kiwi Coaster?
Yes, use gentle handwashing or a delicate cycle in cold water, and lay flat to dry.
The Kiwi Coaster – Crochet Pattern is a cheerful and practical crochet project that adds a touch of handmade charm to your home. From learning circular crochet techniques to experimenting with colors and textures, it offers endless opportunities for creativity. Whether you’re making them for yourself, gifting them, or selling them, these coasters are a fun way to showcase your crochet skills.
Now that you know exactly how to make your own kiwi-inspired coaster, I’d love to hear your thoughts. Share your honest opinion and suggestions so we can keep improving and inspiring each other in the world of crochet.
