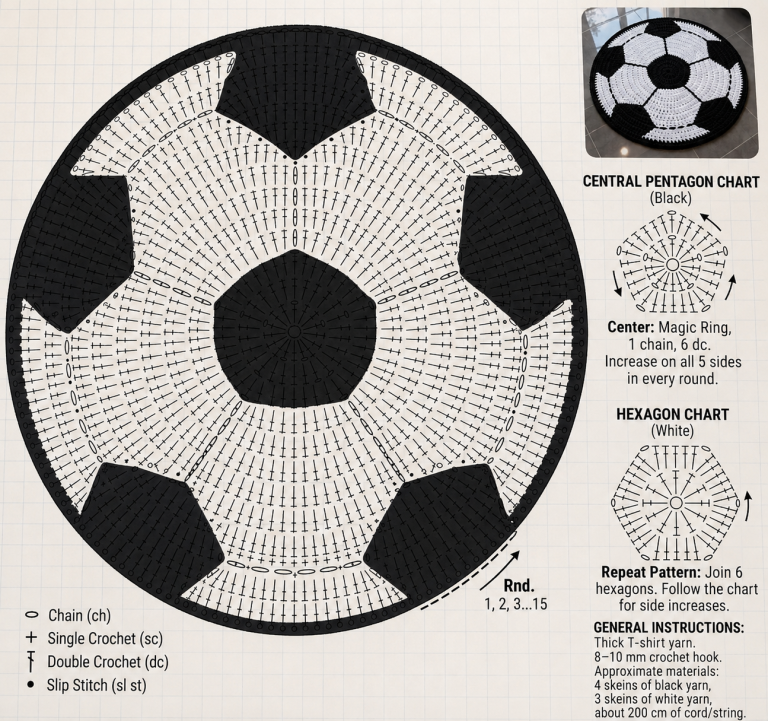
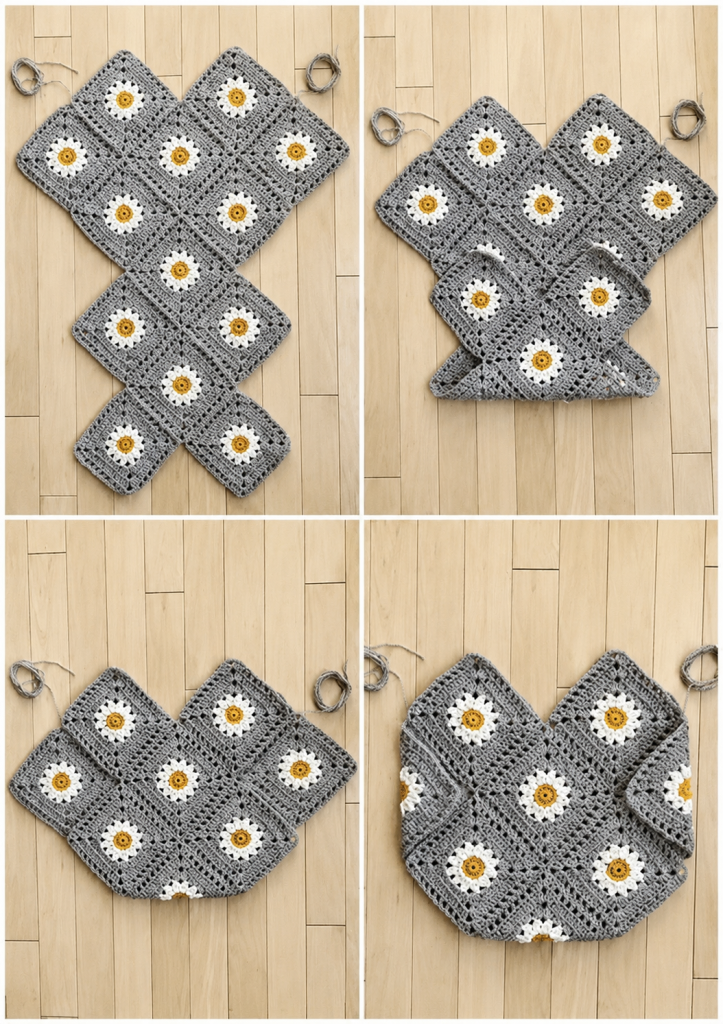
Crochet Soccer Ball Rug Pattern
Creating a Swan Crochet Rug Pattern is a beautiful and rewarding project that combines creativity, craftsmanship, and elegance. Whether you are an experienced crocheter or a beginner seeking a graceful design, this Step by Step Tutorial will guide you through the process of making your very own swan-shaped rug. With soft yarn, detailed stitches, and a gentle flow of design, this crochet rug can add a touch of sophistication to any home decor — from a nursery to a living room.
The Swan Crochet Rug Pattern – Step by Step Tutorial focuses on helping you master the stitches and shaping techniques required to bring this delicate swan to life. It’s not just about following a pattern — it’s about understanding how each part of the design contributes to the final look. You’ll learn how to work with increases, decreases, and curved sections to create the graceful lines of the swan’s neck and wings. This rug can be made in various sizes and colors, depending on your preference and room decor.
Before diving into the Swan Crochet Rug Pattern, take a moment to prepare your materials and familiarize yourself with the stitches. You’ll need a soft and durable yarn, such as cotton or acrylic, a compatible crochet hook, scissors, a yarn needle, and optionally some non-slip backing if you plan to use the rug on smooth floors. The result will be a piece that not only enhances the beauty of your space but also carries the satisfaction of something handmade with care and creativity.
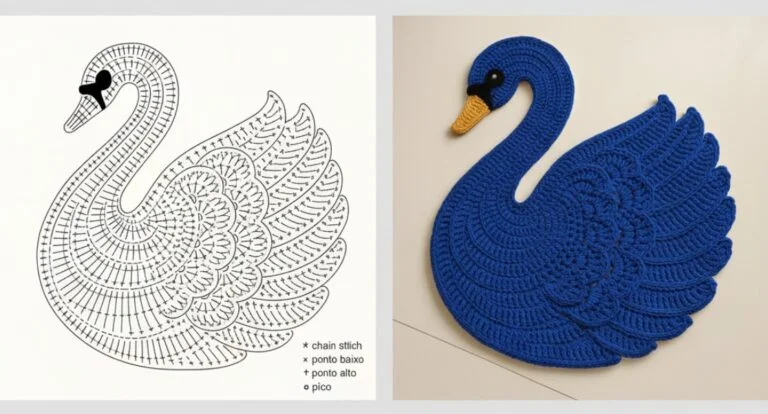
The structure of the Swan Crochet Rug Pattern is divided into distinct sections that come together harmoniously to form the final piece. The main body, the neck, the wings, and the beak each require attention to shape and proportion. The body is the base of your rug — typically oval or circular — while the neck and head form the elegant curve that gives the swan its signature appearance.
To begin, crochet a solid base in a neutral tone such as white, cream, or light gray. These colors help maintain the natural swan aesthetic, though you can also experiment with pastel shades for a softer, whimsical look. Using tight stitches such as single crochet ensures a dense texture suitable for rugs. Working in the round, you’ll gradually increase stitches to shape the rug evenly without curling or distorting.
When shaping the neck, focus on smooth transitions between rows. The Swan Crochet Rug Pattern often uses short rows and strategic increases to create curvature. You can use stitch markers to keep track of your turns and ensure both sides remain symmetrical. The wings, often crocheted separately and sewn onto the body, give the piece dimension and texture. Feather-like detailing can be achieved using shell stitches or puff stitches, which add depth to the overall design.
A small detail, such as a yellow or gold beak and a black eye made from embroidery or a small piece of felt, completes the classic swan look. This combination of simplicity and refinement is what makes the Swan Crochet Rug Pattern – Step by Step Tutorial so special for crocheters who appreciate delicate yet functional art.
Once the components are completed, sew them together carefully. Use invisible stitching for a clean finish. It’s important to block your rug — lightly steam or wet it, then shape and let it dry flat — to achieve a smooth, professional appearance.
Step 1: Create the Rug Base
Start with a magic ring and crochet 6 single crochets into the ring. Gradually increase in each round, adding six stitches per round to keep the circular shape expanding evenly. Continue until the rug base reaches your desired width, usually around 70 to 100 cm, depending on where you plan to use it.
Step 2: Shape the Neck and Head
From the upper edge of the base, begin working short rows to build the neck. The Swan Crochet Rug Pattern – Step by Step Tutorial emphasizes gentle increases on one side and decreases on the opposite side to form the natural curve. As you reach the top, narrow the shape for the head and slightly widen it again for the crown of the swan’s head.
Step 3: Add Wing Details
Crochet the wings separately using shell stitches. Start from the center and work outward in semicircles. You can create layered feathers by alternating between different stitch heights such as double crochet and treble crochet. Attach the wings along the body, ensuring they flow smoothly with the contour.
Step 4: Add Decorative Features
The finishing touches are essential. Crochet a small triangle for the beak in yellow or golden yarn and stitch it onto the face. Use a tiny black circle or an embroidered stitch for the eye. If you prefer, add a soft border around the rug using picot or scalloped edging to enhance its decorative appeal.
Step 5: Secure and Finish the Rug
Weave in all yarn ends securely. If the rug will be placed on a smooth floor, attach a non-slip mat underneath to prevent sliding. The Swan Crochet Rug Pattern creates a thick, cozy texture, making it perfect for nurseries, bedrooms, or reading corners.
Step 6: Blocking and Care
Blocking is crucial for maintaining the swan’s shape. Gently dampen the rug and stretch it to the correct proportions. Allow it to dry flat. For cleaning, hand wash with mild soap and lay flat to dry. Avoid wringing or using high heat, as it may distort the shape.
The Swan Crochet Rug Pattern – Step by Step Tutorial allows endless customization. You can change the size, color, or stitch pattern to suit your taste. For instance, using gradient yarn can add a dreamy, ombré effect to the wings. Alternatively, using soft pastel yarns can create a charming baby rug, while bold colors give it a modern touch.
If you want to make the rug more three-dimensional, consider adding layered feathers using textured stitches such as puff stitch or bobble stitch. This technique adds softness and realism to the swan’s wings. You can even use fluffy yarns to make the rug feel cozy and luxurious underfoot.
Personal touches like adding a small crown or bow to the swan’s neck can make it even more special — perfect for themed nurseries or as a thoughtful handmade gift. The Swan Crochet Rug Pattern can also be resized to make smaller decorative mats or larger statement rugs for your living room.
When choosing yarn, prioritize durability and easy maintenance. Cotton yarns are ideal because they are sturdy, washable, and soft. If you prefer extra warmth and fluffiness, blend acrylic with cotton or wool. Just remember to choose materials that align with your rug’s intended use.
Lighting and placement can also enhance the rug’s visual appeal. Place your finished swan rug near natural light or on a neutral floor to highlight its elegant shape and delicate features.
Finally, document your progress! Taking pictures during the process helps you track your work and share your creativity with others. Many crocheters love posting their Swan Crochet Rug Pattern results online to inspire others to try this charming design.
One common issue beginners face is uneven shaping in the swan’s neck. To fix this, always count your stitches and mark turning points carefully. The Swan Crochet Rug Pattern – Step by Step Tutorial emphasizes precision in stitch placement, especially in curved sections.
Another mistake is using yarn that is too thin or stretchy, which can cause the rug to lose its structure. Choose a medium to bulky weight yarn for stability. Tight, consistent tension also helps maintain the rug’s integrity and prevents curling.
Be cautious when sewing the wings and head — uneven placement can make the swan appear distorted. Always pin pieces in place before stitching them together permanently.
Overcrowded stitches can make the rug pucker or warp. To prevent this, increase gradually and evenly as you expand the body. Blocking the rug at the end helps correct minor imperfections and enhances the professional finish.
Finally, don’t skip the non-slip backing if the rug will be placed on tile or wood. It ensures safety and longevity.
1. What level of skill is required for the Swan Crochet Rug Pattern?
This pattern is suitable for intermediate crocheters, but beginners can also complete it with patience and careful following of the Step by Step Tutorial.
2. What type of yarn works best for this project?
Cotton or cotton-blend yarns are ideal because they’re durable, washable, and maintain shape well.
3. Can I resize the Swan Crochet Rug?
Yes, simply increase or decrease the base rounds and neck length to adjust the overall size.
4. How long does it take to complete the rug?
Depending on your speed, it can take between 2 to 5 days of consistent crocheting.
5. Can I make this rug for a baby’s room?
Absolutely! The soft texture and gentle design make it perfect for nurseries. Just use baby-safe yarn.
6. How do I wash and maintain the rug?
Hand wash with mild soap, rinse gently, and dry flat. Avoid twisting or high heat drying.
7. Do I need a pattern template?
While not mandatory, using a drawn outline or printed diagram helps guide proportions for beginners.
The Swan Crochet Rug Pattern – Step by Step Tutorial is a delightful project that blends elegance and practicality. Through careful shaping, detailed stitching, and creativity, you can craft a swan rug that adds beauty and warmth to your home. From its graceful neck to its soft wings, every stitch reflects the charm of handmade artistry.
If you followed this tutorial, you now have the tools to create your own swan masterpiece. Remember to experiment with colors and textures to make it truly unique. We’d love to hear your honest opinion — what did you think of this tutorial? Share your thoughts and suggestions below to help inspire even more crochet lovers!

