
Crochet Cat Hair Ties Pattern
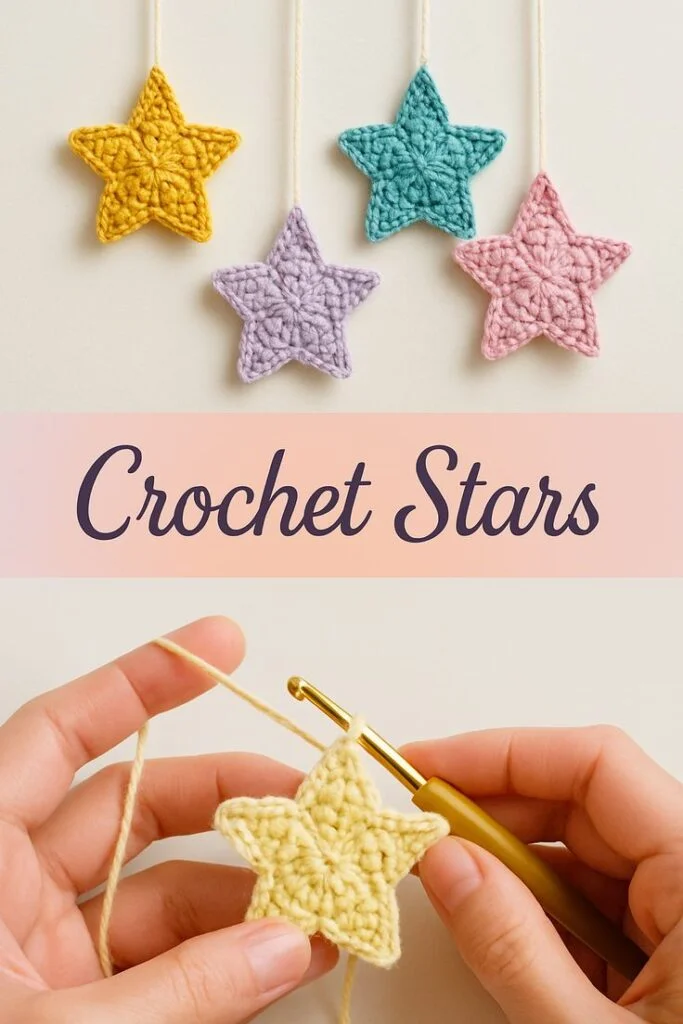
Crochet a Star for Beginners – Free Pattern is a wonderful way to begin your creative crochet journey. Whether you’re a complete beginner or already comfortable with basic stitches, making a crochet star is an easy, relaxing, and rewarding project.
This charming little motif can be used as a Christmas ornament, part of a garland, a coaster, or even as an appliqué for clothing and blankets. The beauty of learning to crochet a star lies in its simplicity and versatility — a small project that offers a great opportunity to practice your crochet skills while creating something beautiful.
If you’ve been wanting to try crochet but feel intimidated by complex patterns, this free crochet star pattern is the perfect place to start. It’s a project that doesn’t require much yarn or time, yet it gives you a solid understanding of shaping, counting stitches, and following a simple pattern. You’ll only need a small amount of yarn, a hook that matches your yarn weight, and a few basic crochet tools like scissors and a tapestry needle. The best part is that you can finish a star in less than an hour once you get the hang of it.
Many crocheters love the Crochet a Star for Beginners – Free Pattern because it’s both relaxing and satisfying. Watching your stitches come together to form a perfect little star is magical, especially when you realize how quickly you can create one. It’s also an excellent project for using leftover yarns, experimenting with colors, and adding handmade touches to your home or gifts. In the following sections, we’ll explore how to make your crochet star, the materials you’ll need, step-by-step instructions, and creative ways to use your finished stars.
Before you start working on your Crochet a Star for Beginners – Free Pattern, it’s essential to gather all your materials. Having everything ready will make the process smoother and more enjoyable. You’ll need just a few simple items that are easy to find at any craft store or online.
First, you’ll need yarn. For beginners, cotton or acrylic yarn is ideal because it’s easy to work with and shows stitches clearly. Choose a medium-weight yarn (category 4) in your favorite color. You can also experiment with multiple colors for a festive touch. Lighter or thinner yarns work too but may require a smaller hook.
Next, select the right crochet hook. Check your yarn label for the recommended hook size. Typically, a 4mm to 5mm hook works perfectly for a crochet star. If your stitches feel too tight, try a slightly larger hook; if they’re too loose, use a smaller one.
You’ll also need a pair of sharp scissors for cutting yarn and a tapestry needle to weave in your ends neatly. A stitch marker can be helpful if you’re new to counting stitches, though it’s not strictly necessary for this pattern.
Optional but useful items include blocking tools if you want your stars to have a crisp shape. You can pin them to a foam board and spray lightly with water or starch to help them hold their form.
Finally, gather some inspiration! Having a few color combinations or finished examples nearby can motivate you as you start your Crochet a Star for Beginners – Free Pattern. Now that you’re ready, it’s time to begin the fun part — crocheting your first star.
Now let’s get to the most exciting part — learning how to Crochet a Star for Beginners – Free Pattern step by step. This section will guide you carefully through each stage, so even if you’re brand new to crochet, you’ll find it easy to follow.
Start by making a magic ring (or you can chain 4 and join with a slip stitch to form a ring). The magic ring gives your star a neat center and helps it lie flat. Inside this ring, work 10 single crochets (sc). Pull the ring tight and join with a slip stitch to close the round.
For the next round, chain 3 (this counts as your first double crochet), and work 1 double crochet (dc) in the same stitch. Continue making 2 double crochets in each stitch around, for a total of 20 stitches. Join with a slip stitch to the top of your starting chain 3.
Now comes the shaping part that turns your circle into a star. Chain 5, then skip one stitch and slip stitch into the next. This forms your first star point. Repeat this step around — chain 5, skip one stitch, slip stitch into the next — until you have 10 chain loops around your circle.
For the next round, you’ll build each star point. Into the first chain loop, work 1 single crochet, 1 half double crochet, 3 double crochets, 1 half double crochet, and 1 single crochet. Slip stitch into the next loop to anchor it. Repeat this process around the circle until you have five full star points. Join with a slip stitch and fasten off your yarn.
Once your Crochet a Star for Beginners – Free Pattern is complete, weave in the loose ends with a tapestry needle. If your star curls slightly, you can block it gently by pinning it and misting it with water.
Now, take a moment to admire your creation! You’ve just crocheted your very first star — a simple yet lovely project that proves how enjoyable crochet can be.
One of the best things about learning the Crochet a Star for Beginners – Free Pattern is discovering how versatile these stars can be. With just a few small tweaks, you can turn them into decorations, accessories, or gifts that showcase your creativity.
You can start by making Christmas ornaments. Simply attach a loop of yarn or ribbon to one point of your star and hang it on your tree. They also make great gift toppers — a handmade touch that adds warmth and personality to your wrapping.
Crochet stars can also become part of a garland. Join several stars together with a long chain of crochet stitches or a piece of twine. Hang your garland across a mantel, window, or wall to brighten any space.
If you love home décor, consider making a batch of stars in neutral tones. Sew them together to create coasters, table runners, or wall art. Cotton yarn works best for these practical uses since it holds shape and absorbs moisture.
You can also attach a pin or magnet to the back of your crochet star for fun accessories. They make adorable brooches, fridge magnets, or even keychains. Adding a touch of glitter yarn or metallic thread can make them sparkle beautifully.
Another creative idea is using crochet stars in baby mobiles or nursery décor. Their soft texture and charming shape are perfect for crafting a handmade, gentle environment for little ones.
With so many possibilities, the Crochet a Star for Beginners – Free Pattern is not only a fun project but also a gateway to endless creativity. Once you start making them, it’s hard to stop!
Even though the Crochet a Star for Beginners – Free Pattern is simple, beginners may encounter small challenges at first. The following tips will help you crochet smoothly and achieve even, symmetrical stars every time.
The first tip is to maintain consistent tension. Beginners often crochet too tightly or too loosely, which affects the shape of the star. Try to relax your hands and keep your yarn flowing smoothly.
Count your stitches carefully. Each point of the star must have the same number of stitches to look balanced. Using a stitch marker can help you remember where each round begins.
Choose the right yarn for your skill level. Smooth yarns with a light color make it easier to see stitches. Avoid fuzzy or textured yarns until you feel more confident.
If you notice your star curling, don’t worry — it’s common. Simply block your finished piece by pinning it flat and lightly spraying it with water. Once dry, it will hold a beautiful shape.
Don’t rush! Crochet is meant to be relaxing. Take your time, enjoy the rhythm of the stitches, and celebrate your progress. Every star you make will improve your skill.
Finally, experiment with color. Making stars in different shades adds charm and variety to your projects. Bright colors are perfect for festive decorations, while soft tones create a cozy, handmade look.
1. What type of yarn is best for crocheting a star?
Medium-weight cotton or acrylic yarn is ideal because it’s easy to work with and helps the star hold its shape.
2. How long does it take to make one crochet star?
Most beginners can finish a star in 30 to 45 minutes. Once you get comfortable, you can make one in about 15 minutes.
3. Can I make crochet stars with leftover yarn?
Absolutely! This pattern is perfect for using small scraps of yarn in different colors.
4. How do I make my crochet star stiff or flat?
You can block the star by pinning it and spraying it lightly with water or starch. Let it dry completely to keep its shape.
5. Is the Crochet a Star for Beginners – Free Pattern suitable for kids?
Yes, with supervision. It’s a fun and simple project that can help kids learn basic crochet skills.
6. Can I use this pattern for commercial purposes?
You can sell the finished stars you make, but always respect the pattern creator’s copyright if you’re following someone’s specific design.
Learning how to Crochet a Star for Beginners – Free Pattern is an enjoyable and fulfilling way to practice your crochet skills while creating something beautiful and versatile. With just a bit of yarn, a hook, and patience, you can craft delightful stars for decoration, gifts, or everyday use. Each star you make will help you grow as a crocheter, improving your technique and creativity.
Now that you know how to make your own crochet stars, it’s time to grab your yarn and start stitching! If you’ve enjoyed this guide or have your own tips and variations, please share your honest opinion and suggestions. Your feedback helps inspire others and keeps the crochet community vibrant and welcoming.
