
Spiral Sunburst Quilt Pattern
The Shadow Star Quilt Pattern is one of the most striking and timeless quilt block designs, capturing the charm of traditional patchwork while offering endless creative possibilities for modern quilters. This pattern, also known as Blockheads 5 – Group 2 | Block 30: Shadow Star Quilt Pattern, beautifully combines geometry, contrast, and precision. Whether you are new to quilting or an experienced maker, mastering this block can open the door to stunning quilts that sparkle with depth and movement.
At first glance, the Shadow Star Quilt Pattern may look complex, but with the right guidance, fabric selection, and cutting techniques, even beginners can achieve a professional result. The overlapping star effect is created through clever placement of light and dark fabrics, forming the illusion of shadow and dimension that makes the quilt come alive. Each point of the star shines brightly against its contrasting tones, creating a sense of harmony that perfectly balances modern minimalism with classic quilting tradition.
This pattern has recently gained renewed popularity thanks to the Blockheads 5 – Group 2 | Block 30: Shadow Star Quilt Pattern series, where quilters around the world share their interpretations of this beautiful block. With a few thoughtful design choices—such as fabric contrast, pressing direction, and precise seams—you can create a quilt that looks both elegant and dynamic. In this article, we’ll walk through the essential elements of this pattern, from construction tips to color placement ideas, to help you confidently create your own Shadow Star masterpiece.
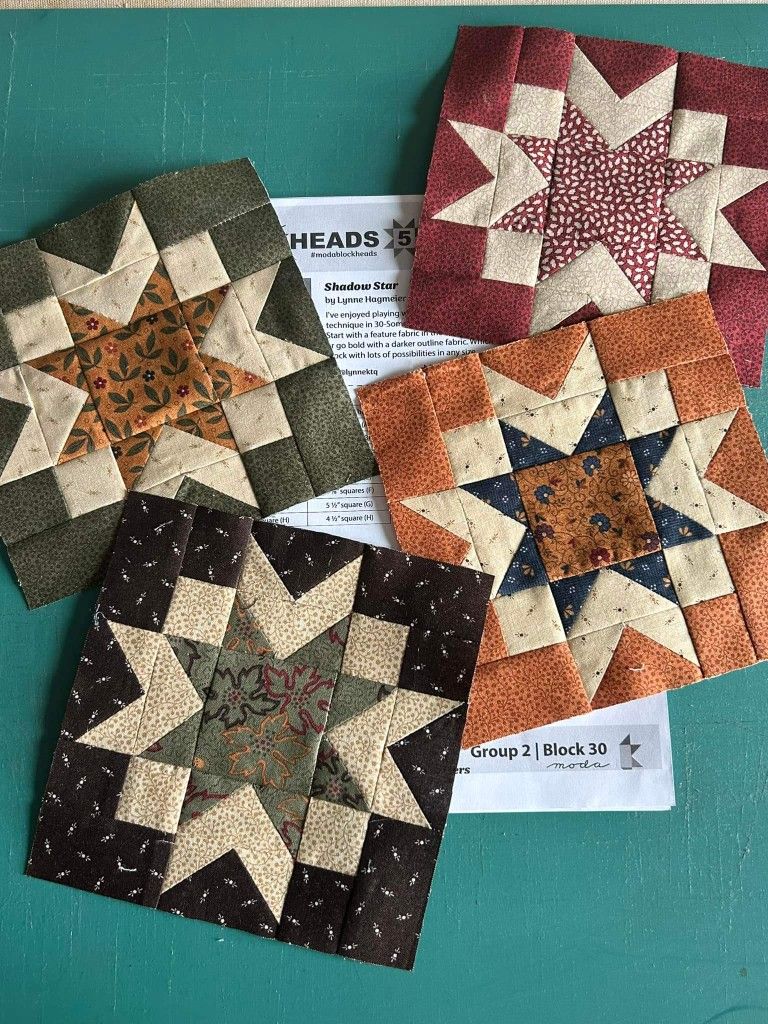
The Shadow Star Quilt Pattern is built on a combination of squares, half-square triangles (HSTs), and flying geese units. Together, these elements form the recognizable star shape surrounded by shadows that give the design its unique visual depth. The illusion of light and shadow is what sets this quilt apart from other star blocks—it’s not just a flat design but one that seems to pop from the fabric surface.
To begin, choose fabrics in three contrasting values: light, medium, and dark. The light fabric will form the highlight of the star, the medium tones will shape the body, and the dark fabric will create the shadow effect. A common mistake among quilters is not using enough contrast; without it, the star’s shadow loses its definition. Remember, strong contrast is what makes the Shadow Star Quilt Pattern truly shine.
This block is typically made at 9″ or 12″ finished size, depending on the overall quilt layout. You can scale it up or down, but maintaining proportional cuts is essential for keeping the star balanced. Most quilters find that using a rotary cutter, ruler, and cutting mat ensures precise and repeatable results for all the required units.
Accurate piecing is the key to success. When assembling the Shadow Star Quilt Pattern, it’s helpful to lay out all your pieces before stitching. Arrange them carefully to visualize how the shadows will fall once the block is complete. This preview step reduces errors and ensures that your colors are in the correct positions.
Pressing direction is another crucial element. Always press seams toward the darker fabric to prevent show-through and keep your block crisp. Some quilters prefer to press seams open for a flatter finish, especially when working with multiple layers of fabric intersecting in the center.
Lastly, take time to square up each section before joining them. A squared block ensures perfect alignment when joining multiple Shadow Star blocks in a quilt top. These careful steps lead to professional-quality results that highlight the stunning interplay of light and shadow characteristic of this timeless design.
When starting your Shadow Star Quilt Pattern, accurate cutting is the foundation of success. Begin by starching your fabrics lightly before cutting; this helps reduce stretching and distortion during sewing. Pre-washed and pressed fabrics will also help your pieces align perfectly.
For one 12-inch finished block, you’ll need:
Cut your pieces into squares and rectangles as specified by your chosen template. The Blockheads 5 – Group 2 | Block 30: Shadow Star Quilt Pattern often provides cutting guides, but if you’re drafting your own, remember to add ¼-inch seam allowances to all sides.
Half-square triangles (HSTs) are often used in this block. To create perfect HSTs, draw a diagonal line on the wrong side of a square, sew ¼ inch on each side of that line, and cut along it. Press toward the darker fabric. Repeat this for all your pairs, making sure your units measure exactly as required before trimming.
For flying geese units, the “four-at-a-time” method is efficient and reduces fabric waste. These units create the outer star points that radiate from the center of the Shadow Star. Keep your points sharp by using an accurate ¼-inch seam and avoiding over-trimming.
Once all your pieces are ready, label or group them by fabric value. This organization step might seem small, but it makes assembly faster and more accurate, preventing confusion when sewing your final layout. Preparing your fabrics properly ensures that the Shadow Star Quilt Pattern retains its clean geometry and crisp edges, making the finished block truly stunning.
Sewing the Shadow Star Quilt Pattern requires patience and precision. Start from the center square and work outward. Assemble small sub-units like HSTs and flying geese first, pressing carefully between each step. Chain-piecing can speed up the process, especially when making multiple blocks for a full quilt.
As you sew, use pins to match seams and points accurately. The star’s beauty lies in its sharp angles and symmetrical alignment, so take time to ensure everything lines up before stitching. Many quilters find that using a scant ¼-inch seam helps maintain proper proportions when joining multiple pieces.
After assembling each quadrant, join them into rows, and finally, sew the rows together. Your Shadow Star Quilt Pattern will begin to reveal its dimensional design—the star emerging from its shadowed background. If your seams don’t align perfectly, don’t worry. Small adjustments or careful pressing can help fix minor inconsistencies.
Consider rotating the direction of your seams in different sections to reduce bulk. This simple habit can make your quilt easier to quilt later. Once your block is finished, give it a final press with steam to set the seams and flatten the surface. Always check the final measurements and square up your block to the exact finished size.
If you’re assembling multiple blocks for a quilt, plan your layout before sewing rows together. Alternating light and dark backgrounds can add even more dimension, creating a quilt top that shimmers with movement and contrast. The Shadow Star Quilt Pattern is versatile, allowing endless variations with color and layout that reflect your personal style.
One of the most enjoyable aspects of the Shadow Star Quilt Pattern is exploring color. The interplay of light, shadow, and contrast transforms each block into a unique expression of creativity. You can use monochromatic tones for a subtle, sophisticated look or bold complementary colors for dramatic flair.
For a vintage feel, try using muted reproduction fabrics in browns, reds, and creams. These shades evoke traditional quilts with a cozy, heirloom aesthetic. On the other hand, bright modern solids create a strikingly contemporary version of the Blockheads 5 – Group 2 | Block 30: Shadow Star Quilt Pattern, making each star appear crisp and energetic.
Ombre fabrics also work beautifully for this design. By gradually shifting from light to dark tones, the star’s shadow effect becomes even more dynamic. You can position the darkest tones at the corners for added depth or at the center for a glowing effect.
Another creative variation is alternating the direction of your stars within the quilt. This approach gives the illusion of movement, as if the stars are spinning across the quilt top. Pair this with a high-contrast background to amplify the shadow effect even further.
Don’t hesitate to experiment with quilting motifs as well. Dense echo quilting around the star points enhances their definition, while curved or spiral quilting can soften the geometry and create a beautiful texture. Whether you’re hand-quilting or using a longarm machine, these finishing details elevate the Shadow Star Quilt Pattern from simple to spectacular.
Lastly, consider adding a border or sashing that complements the pattern’s symmetry. A dark border can frame the quilt like a piece of art, emphasizing the glowing stars within. Every design choice you make—fabric, color, quilting, and layout—adds a personal touch that turns the Shadow Star Quilt Pattern into a one-of-a-kind creation.
1. What size should I make the Shadow Star Quilt Block?
The most common sizes are 9″ and 12″ finished blocks, but you can resize the pattern by adjusting your cutting measurements proportionally.
2. Is the Shadow Star Quilt Pattern suitable for beginners?
Yes, especially with step-by-step guidance. The design looks complex but relies on basic units like half-square triangles and flying geese.
3. What fabrics work best for the Shadow Star Quilt Pattern?
Use three values of fabric—light, medium, and dark—to create strong contrast and define the shadow effect clearly.
4. How can I ensure my points stay sharp?
Accurate cutting, a consistent ¼-inch seam allowance, and proper pressing direction help keep points crisp.
5. Can I use scraps for this pattern?
Absolutely! The Shadow Star Quilt Pattern is perfect for scrap quilting, as long as your fabrics have good contrast.
6. What quilting design complements this block?
Straight-line or echo quilting enhances the geometry, while free-motion designs add texture and personality.
7. How can I make my Shadow Star blocks more dimensional?
Play with light and dark placement or add gradient fabrics to emphasize the shadow illusion.
The Shadow Star Quilt Pattern beautifully combines the artistry of color placement with the precision of piecing. As part of the Blockheads 5 – Group 2 | Block 30: Shadow Star Quilt Pattern collection, it offers both tradition and innovation, letting quilters express creativity through thoughtful design. By mastering cutting accuracy, seam alignment, and color contrast, you can create a quilt that truly shines—full of depth, movement, and personality.
Now that you’ve learned how to make your own Shadow Star Quilt Pattern, I’d love to hear your thoughts! Share your honest opinion, creative variations, or suggestions for future quilting projects. Your feedback helps keep this beautiful craft alive and evolving.


