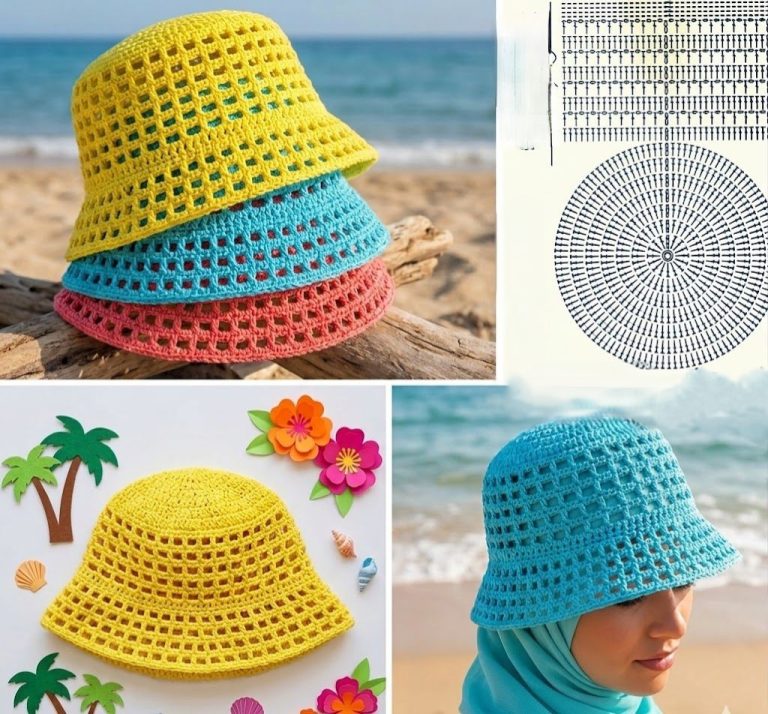
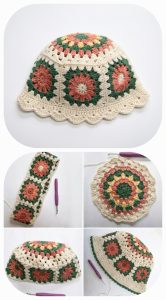
Crochet Easy Bucket Hat Pattern
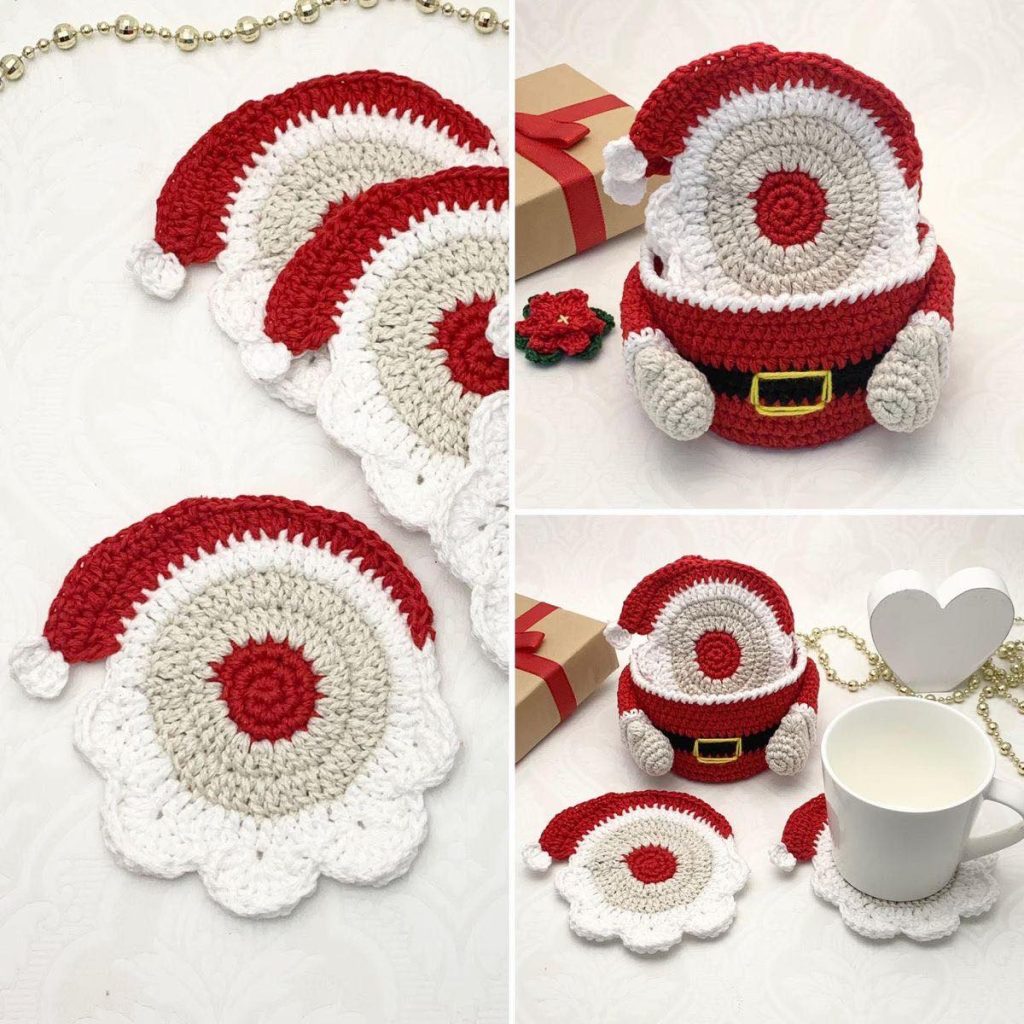
The Crochet Santa Coasters Pattern is one of the most delightful and festive crochet projects you can make for the holiday season. These cute and functional coasters not only protect your table surfaces but also bring the Christmas spirit right into your home. Whether you are a beginner looking for a fun project or an experienced crocheter eager to add a charming touch to your décor, this pattern is perfect for spreading joy and warmth during the holidays.
Creating your own Crochet Santa Coasters Pattern allows you to combine creativity, practicality, and tradition. Each coaster can be customized with different yarn textures, colors, and facial expressions, making every piece unique. Handmade decorations like these add a personal touch to your Christmas table setting, and they also make wonderful handmade gifts for friends and family. Plus, these Santa-themed coasters are quick to crochet, making them ideal for last-minute crafting sessions before Christmas arrives.
What makes the Crochet Santa Coasters Pattern even more special is how it embodies the cozy essence of the holidays. Picture a steaming cup of cocoa resting on a smiling Santa face, surrounded by twinkling lights and festive decorations. These small details create a magical atmosphere that reminds us of the beauty of handmade traditions. In this article, you’ll learn how to crochet these adorable coasters step by step, get helpful tips for yarn selection, discover creative variations, and find inspiration to make your Christmas décor truly unforgettable.
Before starting your Crochet Santa Coasters Pattern, it’s important to gather all the materials and tools you’ll need. Preparing in advance ensures your project runs smoothly and keeps your creative flow uninterrupted. You will need soft cotton yarn, preferably in festive shades like red, white, black, beige, and pink. Cotton is highly recommended because it absorbs moisture well and maintains shape beautifully, making it perfect for coasters.
You’ll also need a crochet hook that matches your yarn’s weight—usually a 3.5mm or 4mm hook works best for this pattern. Make sure to have scissors, a yarn needle for sewing parts together, and a stitch marker to help keep track of rounds. These small tools might seem simple, but they make a huge difference in accuracy and neatness.
For the Crochet Santa Coasters Pattern, safety eyes or small black beads can be used for Santa’s eyes, while a bit of pink yarn adds a cute blush effect to the cheeks. Some crafters prefer to embroider the facial details instead, which is a great option if you’re gifting the coasters to children. Remember, the magic lies in the details—so take your time when crafting Santa’s friendly face.
It’s also helpful to prepare a clean, flat workspace with good lighting. Crocheting under comfortable conditions allows you to focus better and enjoy the process. If you want to add extra sparkle, consider using metallic thread in the border or Santa’s hat trim. It’s a subtle way to make your Crochet Santa Coasters Pattern stand out even more on your festive table.
Lastly, always check your yarn gauge before starting. Doing a quick test round ensures your coaster will be the right size. Consistent tension and correct hook size are key to achieving a neat, professional look that makes your handmade coasters truly shine.
Let’s begin the fun part: creating your own Crochet Santa Coasters Pattern. Start by crocheting a magic ring and working single crochet stitches into it to form the base circle. Gradually increase each round until your coaster reaches approximately 4 inches in diameter. This will be the main background of Santa’s face, so make sure it’s flat and smooth.
Next, switch to white yarn to create Santa’s beard. Using a series of half-double and double crochet stitches will give the beard a fluffy, textured look. For added dimension, try incorporating loop stitches along the edge—it’s a creative way to mimic the softness of real Santa fluff. Once complete, fasten off and weave in the yarn ends neatly.
For Santa’s hat, use red yarn and crochet a curved shape that slightly overlaps the top edge of the coaster. Add a white trim to the hat and a small pom-pom at the tip for that classic Christmas look. This detail makes your Crochet Santa Coasters Pattern instantly recognizable and festive.
Now it’s time for the facial features. Use black yarn or beads for the eyes and pink or beige for the nose and cheeks. A small embroidered smile gives Santa a friendly, cheerful expression. Don’t be afraid to experiment with different facial expressions—each coaster can have its own personality, making your set even more adorable.
Once all the parts are attached, crochet a final border around the coaster using red or white yarn. This finishing touch reinforces the edges and gives the coaster a polished appearance. Your Crochet Santa Coasters Pattern is now complete and ready to spread Christmas cheer!
Achieving a professional finish with your Crochet Santa Coasters Pattern comes down to technique and attention to detail. One of the most important tips is to maintain even tension throughout the project. Uneven stitches can distort the shape of the coaster, especially since it needs to lie flat to function properly.
Blocking your finished coasters is another helpful step. Lightly dampen them and pin them on a flat surface to dry. This process helps them retain their shape and gives your work a clean, refined look. It’s a small effort that makes a big difference in the final result.
When choosing yarn, prioritize quality over quantity. Cotton yarn provides durability, while acrylic can add a softer touch. You can even blend fibers to create unique textures. Keep in mind that coasters often come in contact with moisture, so washable yarns are a must for easy maintenance.
Color coordination is also key. While red and white are traditional for Santa, you can experiment with modern palettes such as pastel pinks, creamy whites, or metallic golds for a contemporary twist. Personalizing your Crochet Santa Coasters Pattern this way ensures it matches your home décor and makes your holiday table even more special.
If you plan to make multiple coasters as gifts, set up a small production system—crochet all the base circles first, then the hats, then the beards. This approach saves time and helps maintain consistency across all pieces. Finally, remember to enjoy the process. Crochet is not just about creating—it’s also about relaxing and expressing yourself through art.
The Crochet Santa Coasters Pattern isn’t just for decoration—it’s a versatile piece that can be used in many creative ways during the holiday season. Beyond protecting your table, these coasters can serve as charming additions to your Christmas dinner setup. Imagine each place setting featuring a Santa coaster beneath a festive mug or plate—it immediately transforms the mood.
They also make perfect handmade gifts. Bundle a set of four coasters, tie them with a red ribbon, and add a personalized tag for a thoughtful touch. Handmade gifts like these show care and effort, making them even more meaningful. Your friends and family will appreciate the time you invested in creating something from the heart.
You can also use your Crochet Santa Coasters Pattern as appliqués for other Christmas projects. Attach them to stockings, pillows, or wall hangings to create coordinated décor. Their small size makes them easy to adapt and reuse across different crafts.
If you love participating in Christmas markets or selling handmade crafts online, these Santa coasters are great items to offer. They’re quick to make, affordable, and visually appealing—qualities that customers love. Be sure to photograph them well with festive backgrounds to capture their charm.
For a playful twist, you can crochet an entire holiday coaster collection featuring Santa, Rudolph, snowmen, and Christmas trees. This turns your home décor into a festive gallery of handmade joy. The Crochet Santa Coasters Pattern is just the beginning of endless creative possibilities!
1. What yarn is best for making Crochet Santa Coasters?
Cotton yarn is highly recommended for durability, absorbency, and easy cleaning. It helps the coaster maintain its shape and withstand daily use.
2. Can beginners make the Crochet Santa Coasters Pattern?
Absolutely! The pattern uses basic stitches such as single crochet, double crochet, and slip stitch, making it ideal for beginners.
3. How long does it take to complete one Santa coaster?
Depending on your skill level, each coaster can take between one to two hours to complete, making it a quick and satisfying project.
4. Can I customize the Santa design?
Yes! Feel free to experiment with different facial expressions, yarn colors, or even add accessories like small bells or buttons for a unique touch.
5. How should I care for my crochet coasters?
Hand wash them gently with mild detergent and lay flat to dry. Avoid wringing or stretching to maintain shape and texture.
6. Can I sell Crochet Santa Coasters made from this pattern?
Yes, as long as you create them by hand and photograph them yourself. Handmade sellers love these seasonal items for their charm and simplicity.
The Crochet Santa Coasters Pattern is a wonderful project that combines holiday cheer, creativity, and practicality. Whether you’re crafting for yourself, gifting loved ones, or selling your creations, these adorable coasters are sure to spread smiles and warmth. With simple stitches, a few materials, and a touch of imagination, you can bring Santa to life right on your coffee table.
Now that you know how to make your own festive coasters, it’s time to grab your yarn and hook and start creating! We hope this guide has inspired you to fill your holiday season with handmade joy. Don’t forget to share your honest opinion and suggestions—we’d love to hear how your Crochet Santa Coasters Pattern turned out!


