Crochet Snowman Wind Spinner Pattern
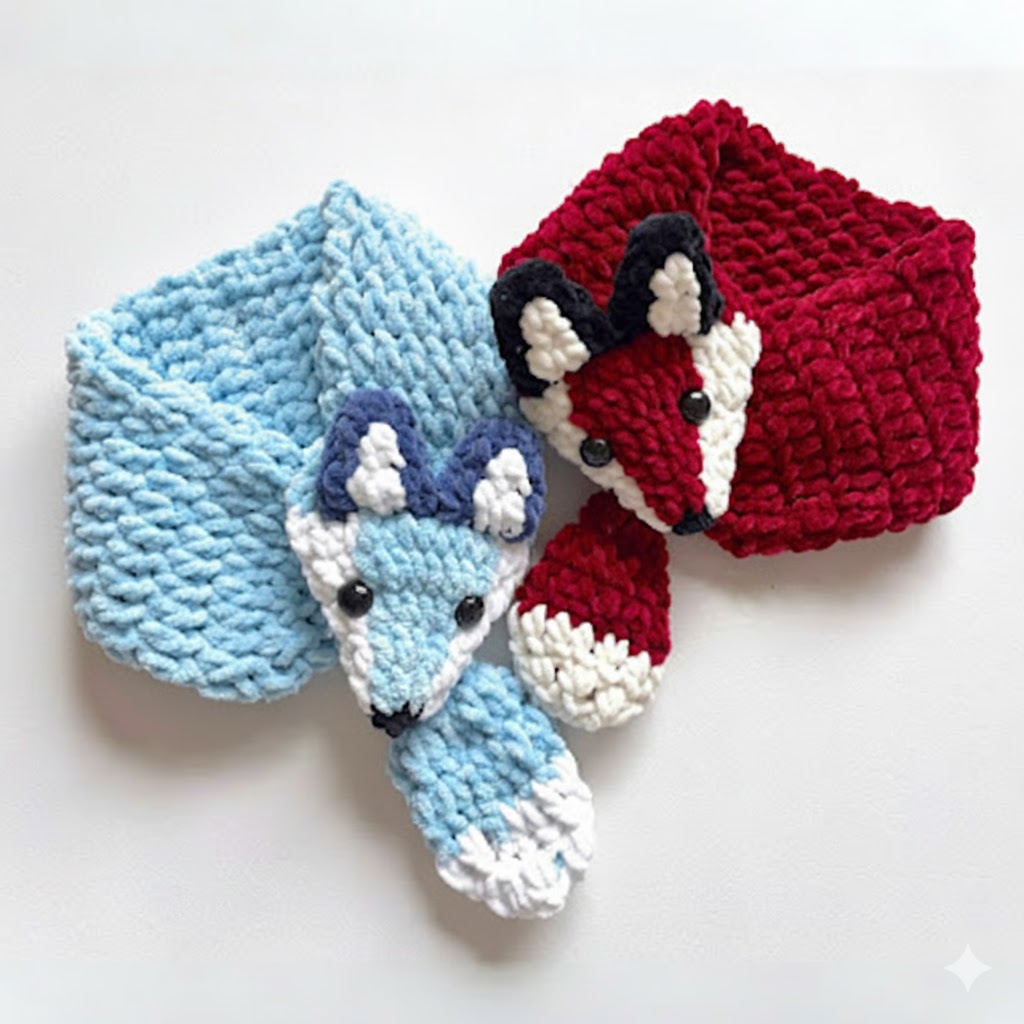
If you’re searching for a fun and cozy project to brighten up your winter wardrobe, the Crochet Fox Tail Scarf pattern is an adorable choice that combines warmth, creativity, and charm. This beginner-friendly pattern is a delightful way to bring a touch of woodland magic into your crochet collection while learning some useful techniques. Whether you’re making it for yourself, a child, or as a thoughtful handmade gift, this pattern offers both practicality and personality.
What makes the Crochet Fox Tail Scarf so appealing is its playful design. The scarf mimics the soft and fluffy look of a fox’s tail, giving it a unique appearance that stands out from ordinary scarves. You can experiment with different shades of orange, white, gray, or even fantasy colors to make it truly your own. The pattern works beautifully with various yarn textures, allowing you to adjust the level of fluffiness and comfort. It’s the kind of project that turns heads and starts conversations wherever you go.
Besides being cute, the Crochet Fox Tail Scarf pattern also teaches important crochet techniques, such as shaping, color changes, and adding texture. Even if you’re new to crochet, you’ll find this pattern easy to follow and rewarding to complete. Each stitch contributes to creating the iconic bushy tail look, and the result is a scarf that’s both functional and full of personality. In this article, we’ll walk you through how to make your own fox tail scarf, explore variations, and share tips to achieve the best results.
To start your Crochet Fox Tail Scarf, gather all your materials in advance. Choosing the right yarn is essential to achieve that fluffy and realistic look. Soft acrylic or wool-blend yarns are perfect choices since they offer both warmth and durability. The most popular color palette includes orange, white, and black — to mimic the natural colors of a fox’s fur — but you can also try creative alternatives like gray and cream for an arctic fox version.
Next, you’ll need an appropriate crochet hook. A 5.0 mm (H/8) hook is commonly used for medium-weight yarn, but you can adjust the size depending on your chosen yarn thickness. Having a pair of scissors, a tapestry needle, and stitch markers will also make your project smoother and more organized. These small tools help you keep your stitches even and your color transitions clean.
Before diving into the actual Crochet Fox Tail Scarf pattern, it’s helpful to make a small gauge swatch. This ensures that your stitches match the desired size and tension. Too loose, and the scarf might lose its structure; too tight, and it could feel stiff. Adjust your hook size as needed before beginning the main piece.
When it comes to yarn texture, fluffy or brushed yarns can add a beautiful, furry effect to your Crochet Fox Tail Scarf. Some crafters even combine two yarn types — one smooth and one textured — to create depth. Don’t be afraid to experiment! The charm of this project lies in the freedom to make it uniquely yours.
Lastly, set aside a comfortable workspace with good lighting. Crochet requires focus, especially when switching colors or shaping the scarf. Keeping your materials organized and your yarn untangled will make the process much more enjoyable and relaxing.
Once you’ve gathered everything, you’re ready to start crocheting. Prepare your yarns, take a deep breath, and let your creativity flow — your fox tail adventure begins now.
Begin your Crochet Fox Tail Scarf by making a foundation chain that determines the length of your scarf. Most adult sizes require around 150 chains, but you can adjust based on your desired length. Work your first row using single crochet stitches to create a strong and neat base. This will ensure that the scarf keeps its shape as you build the texture.
In the following rows, alternate between half-double and double crochet stitches to add softness and volume. As you progress, start introducing your secondary colors — typically white or black — to mimic the gradient of a fox tail. Color changes can be done smoothly by switching yarns at the end of a row or using the tapestry technique to carry the unused color along the edge.
One of the most enjoyable parts of the Crochet Fox Tail Scarf pattern is shaping the tail tip. To create a natural tapering effect, gradually decrease stitches every few rows. This narrowing makes the scarf look more realistic, just like a fox tail narrowing toward the tip. Using a lighter color for the last few rows adds a perfect touch of contrast and realism.
After finishing the main scarf, you can add a playful touch by crocheting small ears or paws at the ends. These optional details make the project even cuter, especially if you’re gifting it to a child. Use tight single crochet stitches for these embellishments so that they hold their shape well.
Once all the crocheting is done, weave in all loose ends neatly using a tapestry needle. This step gives your scarf a professional finish and prevents unraveling. Take your time here — a polished result always makes a difference.
Finally, block your Crochet Fox Tail Scarf gently by laying it flat and lightly shaping it with your hands. If you’re using natural fibers, steam blocking will help the stitches relax and give the scarf a smooth, even texture. When it’s completely dry, your fox tail scarf will be ready to wear or gift with pride.
Now that your Crochet Fox Tail Scarf is complete, it’s time to have fun styling it. This scarf is versatile enough to be worn with both casual and cozy winter outfits. The playful tail design adds a whimsical touch that works beautifully with coats, sweaters, or even over simple long-sleeve shirts. Wrap it around your neck or drape it over your shoulders — either way, it’s bound to stand out.
Customization is one of the best aspects of this project. You can easily personalize your Crochet Fox Tail Scarf pattern by using different yarn colors or adding accessories like buttons, tassels, or even safety eyes to make it more animated. If you prefer a minimalist look, keep the design simple and let the texture speak for itself.
You can also adjust the width and length according to your needs. For children, consider making shorter versions with softer yarns, ensuring comfort and ease of movement. For adults, a longer, more luxurious version can double as both a fashion accessory and a winter essential.
For a more realistic look, experiment with gradient or variegated yarns. These yarns automatically blend colors as you work, creating a natural fur-like pattern without manual color changes. It’s an easy trick to make your Crochet Fox Tail Scarf look professional with minimal effort.
This project also makes for a thoughtful handmade gift. Whether it’s for a birthday, holiday, or simply to surprise someone special, a handmade scarf always carries sentimental value. Wrap it beautifully, and include a little tag that says “Made with love.” It’s a gesture that warms both the body and the heart.
Lastly, remember that creativity has no limits in crochet. Once you master this pattern, you can experiment with other animal-themed designs — like raccoon tails or wolf fur styles — using the same basic structure. The Crochet Fox Tail Scarf pattern opens up endless possibilities for your crafting journey.
To achieve the best results, pay attention to consistency in tension. Uneven tension can affect the appearance of your Crochet Fox Tail Scarf, making some parts wider or tighter than others. Practice maintaining a steady rhythm as you crochet, and take breaks when needed to avoid strain.
Choosing quality yarn also makes a significant difference. Soft, durable fibers enhance both comfort and appearance. If you plan to wear the scarf often, go for washable yarns that retain their shape after cleaning.
When switching colors, always carry the yarn neatly along the inside edge or use a yarn bobbin to prevent tangling. Keeping your workspace tidy helps avoid frustration and ensures smooth progress.
Another tip is to keep a reference photo nearby while crocheting. Visual guidance can help you replicate the natural gradient and shape of a fox tail accurately. If you’re new to colorwork, practice small swatches before applying them to the main project.
Blocking is a crucial final step that many crafters overlook. It enhances the overall look of your Crochet Fox Tail Scarf by straightening edges and relaxing stitches. Even synthetic yarns benefit from light steam or shaping.
Finally, enjoy the process. Crochet is as much about creativity and relaxation as it is about the finished product. Every stitch tells a story — and your fox tail scarf will be a piece of art that reflects your personality and love for handmade crafts.
1. Is the Crochet Fox Tail Scarf suitable for beginners?
Yes! The Crochet Fox Tail Scarf pattern is beginner-friendly. It involves basic stitches like single crochet, half-double, and double crochet, with simple color changes.
2. How long does it take to complete a Crochet Fox Tail Scarf?
Depending on your skill level and the scarf’s length, it usually takes between 6 to 10 hours to complete.
3. What yarn is best for this project?
Acrylic or wool-blend yarns work best, especially those with soft or fluffy textures. Choose orange, white, and black for a realistic look.
4. Can I make this pattern in other colors?
Absolutely! Try gray and cream for an arctic fox version or experiment with fantasy colors for a fun twist.
5. How do I wash and care for the scarf?
Hand washing in cold water with mild detergent is recommended. Lay flat to dry to preserve its shape and texture.
6. Can I sell scarves made from this pattern?
Yes, as long as you create them yourself. Handmade scarves make wonderful gifts or craft fair items.
The Crochet Fox Tail Scarf pattern is a creative and heartwarming project that combines fun, fashion, and functionality. From choosing your yarn to finishing the last stitch, each step allows you to express your creativity while making something cozy and adorable. Whether you’re crocheting for yourself or creating a thoughtful gift, this pattern will bring joy to both maker and wearer.
We hope this guide has inspired you to pick up your hook and start your own fox-inspired masterpiece. If you’ve tried this pattern, please share your honest opinion and suggestions — your feedback helps make future creations even better. Happy crocheting!
