Crochet Cat Harness Pattern
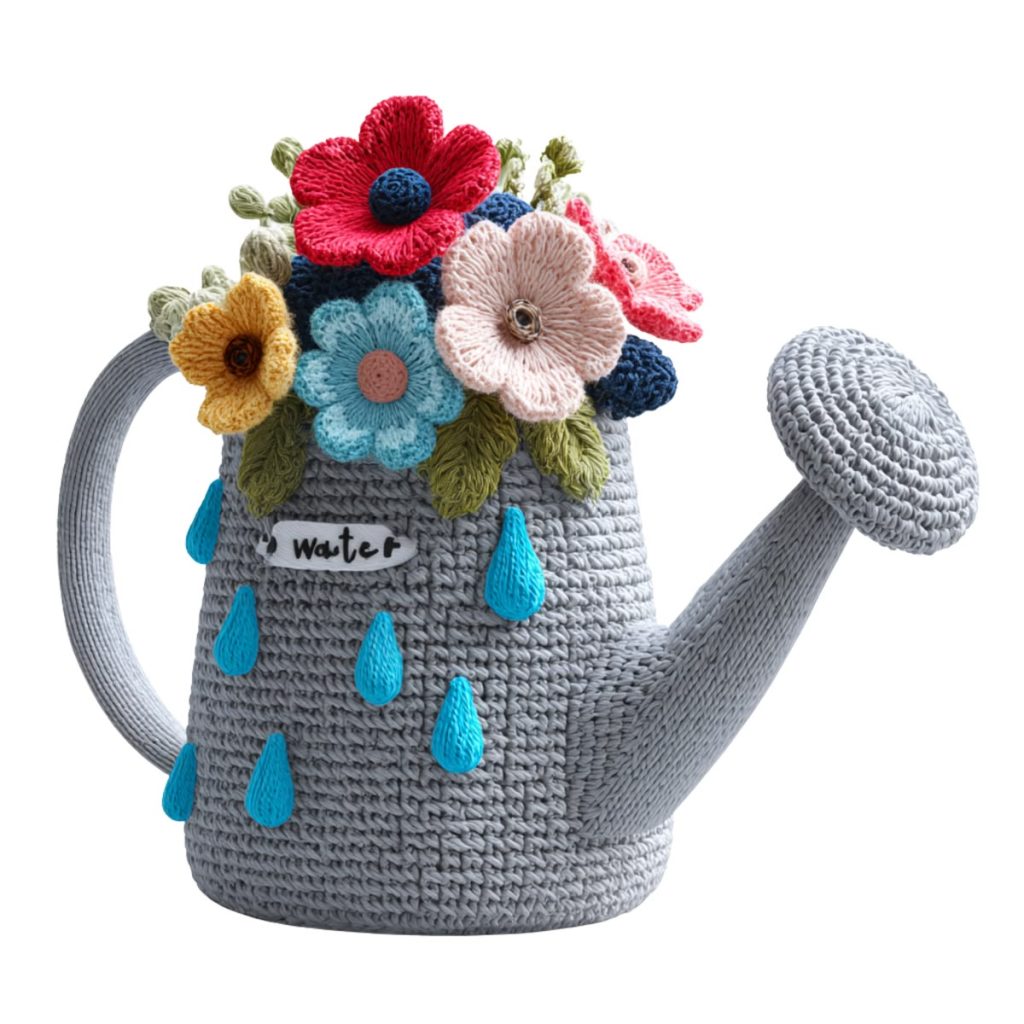
Crochet watering can pattern is a charming and creative project that brings together the beauty of handmade crafts and the delicate aesthetic of garden-inspired decor.
Whether you are a beginner or an experienced crocheter, exploring a crochet watering can pattern can open the door to endless possibilities in decorative art, gifting, and even functional storage ideas.
This project is especially popular among craft enthusiasts who enjoy combining practicality with whimsical design.Creating a crochet watering can pattern allows you to experiment with different yarn textures, colors, and stitch techniques while producing something truly unique. From pastel tones that evoke spring gardens to bold, vibrant hues that stand out as statement pieces, this pattern can be customized to match any personal style or home decor theme. The versatility of this project makes it ideal for seasonal decorations, nursery accents, or handmade gifts.
Another reason why the crochet watering can pattern is gaining popularity is its accessibility. Even if you are just starting your crochet journey, this project can be broken down into manageable steps. By following a structured approach and understanding basic stitches, you can successfully create a beautiful piece that looks intricate but is surprisingly simple to construct. With patience and creativity, anyone can master this delightful pattern.
The foundation of any successful crochet watering can pattern lies in understanding basic crochet techniques. Stitches such as single crochet, double crochet, and slip stitch are commonly used to build the structure of the watering can. These stitches form the body, spout, and handle, creating a cohesive and recognizable shape.
Choosing the right yarn is essential when working on a crochet watering can pattern. Medium-weight yarn is often recommended for beginners because it is easier to handle and provides good structure. Cotton yarn is particularly popular due to its durability and clean finish, making the final product look polished and professional.
Hook size also plays a crucial role in achieving the desired outcome. A smaller hook creates tighter stitches, resulting in a firmer structure, while a larger hook produces a softer, more flexible fabric. For a crochet watering can pattern, a medium hook size is typically ideal to maintain balance between structure and ease of stitching.
Color selection is another important aspect of this project. Traditional watering cans are often associated with soft greens, blues, and metallic tones, but in crochet, you have complete creative freedom. Experimenting with color combinations can make your crochet watering can pattern stand out and reflect your personality.
Understanding shaping techniques is key when constructing the watering can. Increasing and decreasing stitches help form the rounded body and tapered spout. These techniques may seem complex at first, but with practice, they become second nature and significantly enhance the final result.
Lastly, stuffing and assembly are crucial steps in completing the pattern. Using high-quality fiberfill ensures that your watering can maintains its shape over time. Proper assembly of the handle and spout adds stability and gives the piece a realistic appearance.
To begin your crochet watering can pattern, start by creating a magic ring. This technique allows you to form a tight, adjustable center, which is perfect for building the base of the watering can. From there, you will work in continuous rounds to gradually expand the shape.
The body of the watering can is typically formed by increasing stitches evenly across several rounds. This creates a smooth, rounded structure. Once the desired width is achieved, you will continue working without increases to build height, giving the watering can its recognizable form.
Next, shaping the top opening is an important step in the crochet watering can pattern. This is usually done by working a few rounds with minimal increases or even slight decreases to create a subtle inward curve. This detail adds realism and enhances the overall design.
The spout is often crocheted separately and then attached to the main body. It starts with a narrow base and gradually widens as you add stitches. Careful shaping ensures that the spout looks proportional and aesthetically pleasing.
Creating the handle involves chaining a specific number of stitches and then reinforcing it with additional rows. The handle should be sturdy enough to hold its shape while complementing the overall design of the crochet watering can pattern.
Finally, assembling all the components requires attention to detail. Sewing the spout and handle securely onto the body ensures durability. Adding small embellishments, such as embroidered details or decorative flowers, can elevate the finished piece.
One of the most delightful aspects of a crochet watering can pattern is its versatility. It can be used as a decorative piece in your home, adding a touch of handmade charm to shelves, tables, or windowsills. Its playful design makes it a conversation starter and a unique accent.
This pattern also works beautifully as a gift. A handmade crochet watering can pattern can be filled with artificial flowers, candies, or small surprises, making it a thoughtful and personalized present for birthdays, holidays, or special occasions.
For those who enjoy organizing, the watering can can double as a storage solution. It can hold crochet hooks, craft supplies, or even small household items. This functional twist makes the crochet watering can pattern both practical and stylish.
Seasonal decor is another great application. By adjusting colors and embellishments, you can create versions of the crochet watering can pattern that suit spring, summer, or even festive holidays. Adding themed decorations can make your piece adaptable throughout the year.
Children’s rooms can benefit from this pattern as well. A soft, crocheted watering can is a safe and charming decorative item that adds a playful touch. It can even be incorporated into imaginative play scenarios.
Lastly, the crochet watering can pattern is an excellent project for selling handmade items. Its unique appeal and customizable nature make it attractive to buyers looking for one-of-a-kind decor pieces.
Consistency in tension is one of the most important factors when working on a crochet watering can pattern. Uneven stitches can affect the overall shape and structure, so maintaining steady tension throughout the project is essential.
Taking time to count stitches regularly can prevent mistakes. Missing or adding stitches unintentionally can alter the shape, especially in a structured design like a watering can. Careful counting ensures accuracy and a polished finish.
Using stitch markers can greatly simplify the process. They help you keep track of rounds and important points in the pattern, making it easier to follow complex sections of the crochet watering can pattern.
Blocking your finished piece can enhance its appearance. This process involves shaping the item while it is slightly damp and allowing it to dry in the desired form. Blocking can smooth out irregularities and give your project a more professional look.
Experimenting with embellishments can take your project to the next level. Adding buttons, embroidery, or crocheted flowers can personalize your crochet watering can pattern and make it truly unique.
Practicing patience is key. Like any craft, crochet requires time and dedication. Taking breaks and approaching the project with a relaxed mindset can improve both the process and the final result.
What skill level is required for a crochet watering can pattern?
Most crochet watering can pattern designs are suitable for beginners with basic knowledge of stitches, but some advanced versions may include more complex shaping techniques.
What materials do I need for a crochet watering can pattern?
You will typically need yarn, a crochet hook, stuffing, a yarn needle, and scissors. Optional materials include embellishments like buttons or embroidery thread.
How long does it take to complete a crochet watering can pattern?
The time varies depending on your experience and the complexity of the design. Beginners may take several hours, while experienced crocheters can complete it more quickly.
Can I customize my crochet watering can pattern?
Yes, one of the best aspects of a crochet watering can pattern is its flexibility. You can change colors, sizes, and decorations to suit your preferences.
Is the crochet watering can pattern functional or decorative?
It can be both. While many people use it as decor, it can also serve as a small storage container for lightweight items.
What type of yarn works best for a crochet watering can pattern?
Cotton yarn is often recommended for its durability and clean finish, but other yarn types can also be used depending on the desired texture.
Can I sell items made from a crochet watering can pattern?
Yes, handmade items created from a crochet watering can pattern are popular in craft markets and online shops, provided the pattern allows for commercial use.
How do I keep my crochet watering can in shape?
Using proper stuffing and maintaining tight stitches will help your watering can hold its shape over time.
The crochet watering can pattern is a delightful and versatile project that combines creativity, skill, and functionality. Throughout this article, you learned about the basics, step-by-step construction, creative uses, and essential tips to perfect your work. This pattern is not only accessible for beginners but also offers endless customization options for more experienced crocheters.
By mastering the crochet watering can pattern, you can create beautiful handmade pieces that serve as decor, gifts, or practical storage solutions. The process itself is rewarding, allowing you to develop your crochet skills while expressing your artistic vision.
Now it’s your turn to try this charming project. Share your honest opinion about this guide and feel free to suggest improvements or ask questions. Your feedback helps make future tutorials even better and more inspiring for the crochet community.