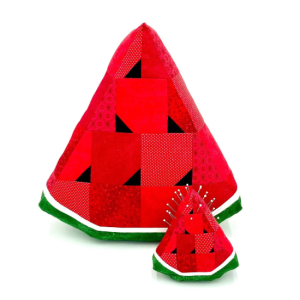
How to Make a Prairie Point Christmas Tree Quilt Pattern
How to make a Prairie Point Christmas Tree Quilt Pattern is a wonderful project for anyone who loves combining festive décor with traditional quilting techniques. This beautiful design creates a charming Christmas tree using folded prairie points that add texture, depth, and dimension to your quilt.
Whether you are making a decorative wall hanging, a table runner, or a cozy holiday quilt, learning How to make a Prairie Point Christmas Tree Quilt Pattern will help you create a handmade piece that can become a treasured family decoration for many Christmas seasons.
One of the reasons this project has become increasingly popular is its combination of simplicity and elegance. The folded prairie points create a realistic layered effect that resembles the branches of a Christmas tree, while still being beginner-friendly with a little patience. Unlike complicated pieced quilt blocks, this technique relies on folding fabric squares into neat triangles and arranging them carefully to achieve a stunning three-dimensional appearance.
If you have basic quilting experience, this tutorial will guide you through every stage of the process. Even if you are new to quilting, you can confidently complete this project by following each step carefully. Throughout this guide, you will learn how to choose fabrics, prepare your materials, fold prairie points correctly, assemble the Christmas tree, quilt the finished piece, and add beautiful finishing touches that will make your holiday quilt truly unique.
Before starting your How to make a Prairie Point Christmas Tree Quilt Pattern, gathering the correct supplies will make every step much easier. Quality materials help create crisp folds, accurate seams, and a polished final appearance.
Begin by selecting green fabrics in several shades. Mixing light, medium, and dark greens creates natural depth and gives your Christmas tree a realistic layered look. Small holiday prints, tone-on-tone fabrics, and subtle textures all work beautifully together.
For the tree trunk, choose rich brown fabrics with wood-like textures or simple solids. A neutral background fabric such as white, cream, beige, light gray, or soft blue allows the Christmas tree to stand out while maintaining a classic holiday appearance.
You will also need quilting cotton, batting, backing fabric, coordinating thread, quilting ruler, rotary cutter, cutting mat, sewing machine, pins or clips, and a hot iron. Having all your tools prepared before you begin helps maintain an enjoyable sewing experience.
Accurate cutting is extremely important. Carefully measure every fabric square used for the prairie points so they all fold into identical triangles. Consistency is the secret behind a professional-looking quilt.
Finally, plan your finished size before cutting any fabric. Whether you are creating a wall hanging, table topper, pillow cover, or full-size quilt, determining the final dimensions first will help you calculate exactly how many prairie points you need.
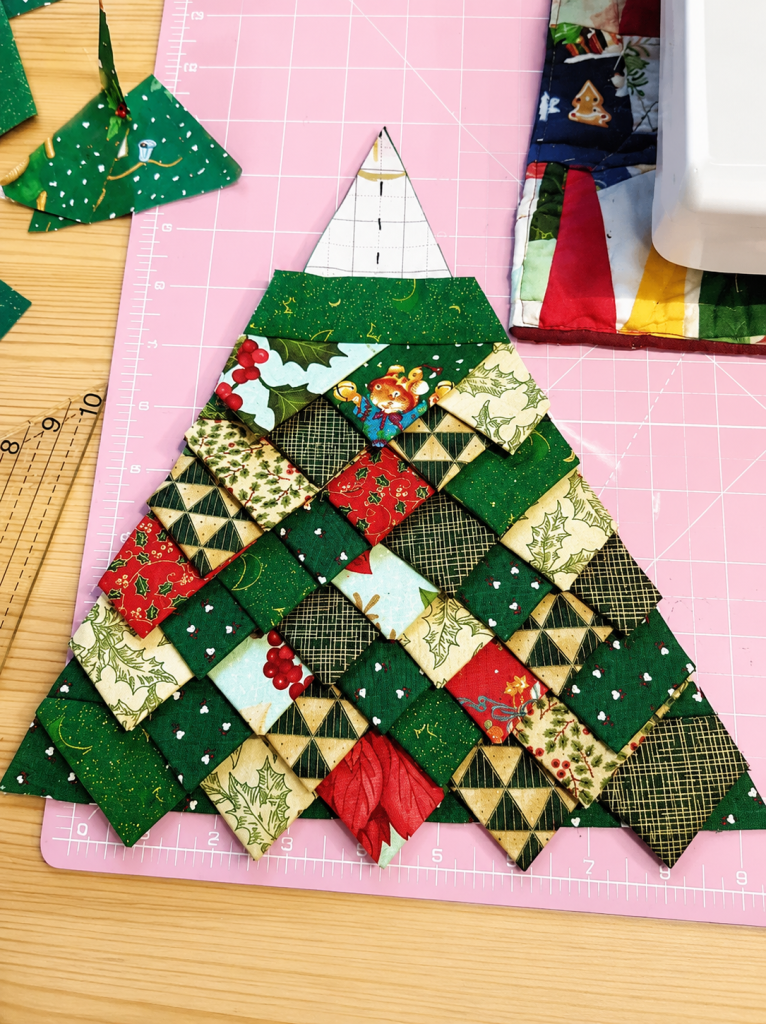
The most recognizable feature of How to make a Prairie Point Christmas Tree Quilt Pattern is the prairie point itself. These folded triangles create the dimensional branches that make this design so eye-catching.
Start by cutting identical fabric squares. Many quilters prefer 4-inch or 5-inch squares, although you can easily adjust the size depending on your project. Larger squares create fuller branches, while smaller ones produce a more delicate tree.
Fold each square in half diagonally to create a triangle. Press the fold firmly with a hot iron. Next, fold the triangle in half again to create a smaller layered triangle. Press once more to keep the folds crisp and stable.
Repeat this process for every square required for the tree. It may seem repetitive, but preparing all the prairie points before assembly allows the construction process to move much more smoothly.
Lay your background fabric flat and begin arranging the folded triangles from the bottom upward. The lowest row should contain the greatest number of prairie points, with each higher row gradually becoming shorter to form the classic Christmas tree silhouette.
Slightly overlap each prairie point so only the front triangle remains visible. This layering creates the realistic appearance of evergreen branches and gives the quilt beautiful texture.
Once you are satisfied with the arrangement, pin or clip each row in place before sewing. Taking your time during this stage ensures your tree remains symmetrical and balanced throughout the quilting process.
After arranging your prairie points, it is time to secure them permanently. This stage transforms your carefully planned layout into a sturdy quilt block that will remain beautiful for years.
Begin sewing from the bottom row upward. Stitch across the upper edge of each prairie point using a narrow seam allowance to secure the folded triangles without flattening their dimensional shape.
Work slowly and check your alignment after every row. Small adjustments made early prevent larger problems later, especially as the tree becomes taller.
As each row is attached, gently lift the folded edges to preserve the three-dimensional appearance. Avoid pressing directly on the prairie points after sewing, as excessive ironing can flatten the texture that makes this pattern so attractive.
Next, sew the tree trunk beneath the lowest row of branches. A simple rectangle works perfectly, although some quilters enjoy piecing the trunk using several brown fabrics for additional visual interest.
If desired, add decorative elements such as a fabric star, small appliqué ornaments, embroidered snowflakes, ribbon bows, or tiny buttons. These embellishments personalize your quilt while maintaining its festive charm.
Finally, place the quilt top over the batting and backing fabric. Baste all three layers carefully before quilting to prevent shifting during stitching.
Quilting adds strength, durability, and additional beauty to your How to make a Prairie Point Christmas Tree Quilt Pattern. The quilting design should complement the dimensional prairie points without overwhelming them.
Straight-line quilting is one of the easiest options. Vertical or diagonal stitching provides stability while allowing the prairie points to remain the visual centerpiece of the project.
Free-motion quilting offers another beautiful alternative. Swirling snowflakes, gentle loops, holly vines, stars, or flowing winter-inspired motifs create a magical holiday atmosphere around the Christmas tree.
Choose thread colors that blend well with the background. Neutral threads often disappear into the quilt, allowing the dimensional tree to receive full attention.
After quilting is complete, trim the edges evenly before attaching the binding. Double-fold binding provides excellent durability and creates a clean professional finish around the entire quilt.
Add a hanging sleeve if you plan to display your quilt on the wall during the Christmas season. A simple fabric sleeve sewn onto the back allows easy hanging while remaining hidden from view.
Before storing your finished quilt after the holidays, gently wash if needed according to fabric recommendations, allow it to dry completely, and fold it loosely in a breathable cotton storage bag. Proper storage helps preserve both the prairie points and the vibrant colors for many future celebrations.
Is the Prairie Point Christmas Tree Quilt suitable for beginners?
Yes. Beginners who already know basic sewing techniques can successfully complete this project by carefully following each step. The folding technique is simple to learn and becomes easier with practice.
What size fabric squares should I use?
Most quilters use 4-inch or 5-inch squares, but the size depends on the finished quilt. Smaller squares create a detailed tree, while larger squares produce fuller branches.
Do I need special quilting tools?
No. Standard quilting supplies such as a rotary cutter, ruler, cutting mat, sewing machine, pins, thread, batting, and quilting cotton are sufficient.
Can I use fabric scraps?
Absolutely. Scrap fabrics are perfect for creating multiple shades of green and adding extra visual interest to the tree.
How do I keep the prairie points from shifting?
Pin or clip each row securely before sewing, stitch carefully across the folded edges, and baste the quilt layers thoroughly before quilting.
Can I wash the finished quilt?
Yes. Wash gently using methods suitable for quilting cotton and dry completely before storing or displaying it again.
What can I use this quilt for?
This versatile pattern can be made into wall hangings, table runners, pillows, mini quilts, holiday centerpieces, Christmas gifts, or even larger bed quilts.
Can I decorate the tree?
Yes. Fabric stars, embroidered details, appliqué ornaments, decorative stitching, ribbons, beads, or small buttons can all enhance the finished design when securely attached.
Learning How to make a Prairie Point Christmas Tree Quilt Pattern is an enjoyable way to combine traditional quilting with festive creativity. From selecting harmonious fabrics and folding precise prairie points to arranging the layered branches, sewing each row, quilting the finished project, and adding personalized decorations, every step contributes to a beautiful handmade Christmas keepsake. The dimensional texture created by the prairie points gives this quilt a unique appearance that stands out among traditional holiday projects while remaining approachable for quilters of various skill levels.
With patience, careful measuring, and attention to detail, you can create a stunning quilt that brings warmth and holiday spirit to your home year after year. Whether you keep it as part of your own Christmas decorations or give it as a thoughtful handmade gift, this project is sure to become a cherished tradition. If you enjoyed this tutorial, please leave your honest opinion in the comments and share your suggestions or favorite tips. Your feedback helps inspire future quilting ideas and encourages other makers to begin their own How to make a Prairie Point Christmas Tree Quilt Pattern project.


