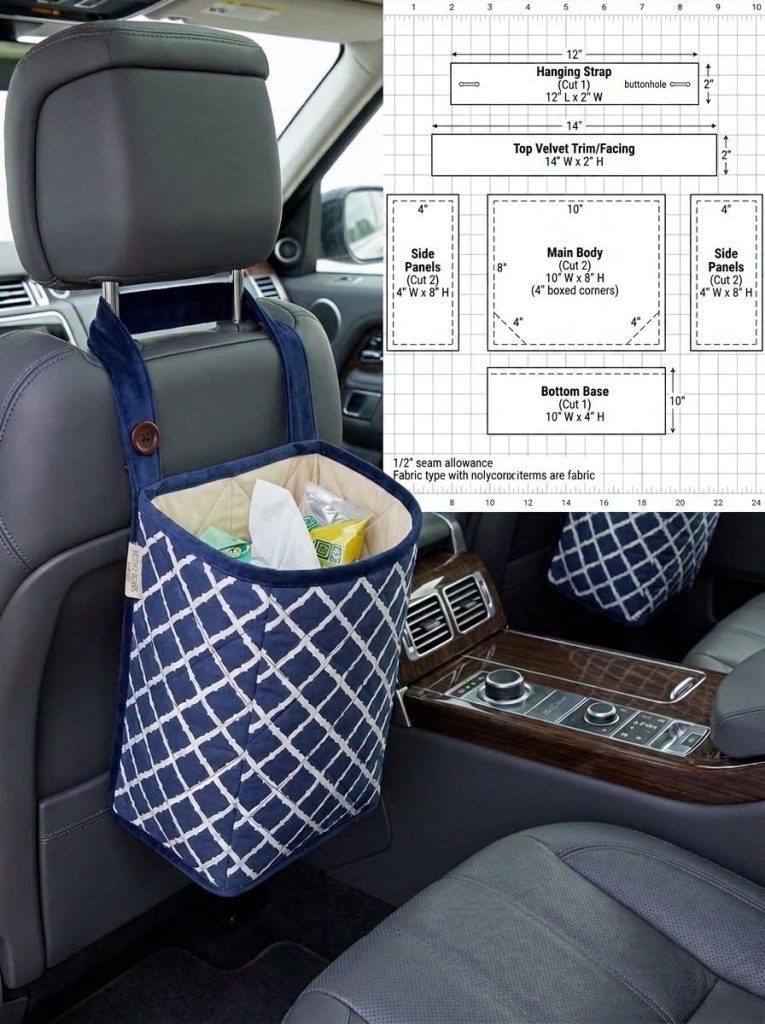
DIY Fabric Car Trash Bag Pattern
The DIY Fabric Car Trash Bag Pattern is one of the most practical sewing projects you can make for your vehicle. If you enjoy creating useful handmade accessories, this project combines functionality, style, and simplicity in a single design. A reusable fabric trash bag helps keep your car neat while adding a personalized touch that matches your favorite fabrics and colors.
Whether you are sewing for yourself, your family, or as a thoughtful handmade gift, this project is both rewarding and beginner-friendly.A handmade DIY Fabric Car Trash Bag Pattern is also an excellent way to use leftover quilting cotton, canvas, denim, or upholstery fabric.
Small fabric pieces that would otherwise remain unused can become an attractive and durable organizer for everyday travel. By combining sturdy fabric with batting or interfacing, you can create a trash bag that keeps its shape while remaining lightweight and easy to clean. This sewing project is suitable for beginners who want to practice straight seams and boxed corners, as well as experienced sewists looking for a quick afternoon project.
Besides being environmentally friendly, a reusable fabric trash bag encourages better organization during road trips, daily commutes, and family outings. Instead of disposable plastic bags hanging from the gear shift or door handles, a fabric version creates a cleaner and more organized appearance inside the vehicle. Throughout this guide, you will learn exactly how to sew a DIY Fabric Car Trash Bag Pattern step by step, including fabric preparation, cutting, assembly, finishing techniques, and practical tips that help you achieve professional-looking results.
Selecting the right materials is the foundation of a durable DIY Fabric Car Trash Bag Pattern. Medium-weight cotton canvas, quilting cotton with fusible fleece, denim, duck cloth, or lightweight upholstery fabric are all excellent choices. These fabrics resist everyday wear while maintaining enough flexibility for sewing.
For the lining, waterproof canvas, laminated cotton, nylon, or water-resistant fabric makes cleaning much easier. If waterproof fabric is unavailable, regular quilting cotton can still be used successfully, especially if paired with a removable liner.
Basic sewing supplies include matching thread, sewing clips or pins, fabric scissors, rotary cutter, quilting ruler, measuring tape, marking pencil, ironing board, and a sewing machine equipped with a universal needle suitable for medium-weight fabrics.
To give the bag additional structure, use fusible fleece, foam stabilizer, or medium-weight interfacing. These materials help the sides remain upright instead of collapsing when the bag is empty.
The hanging straps can be made from matching fabric, cotton webbing, or strong twill tape. Button closures, snaps, hook-and-loop tape, or adjustable buckles all provide reliable attachment options depending on your preferred style.
Choosing coordinating fabrics allows you to personalize the project. Floral prints, geometric patterns, solid colors, quilted panels, or patchwork blocks all create beautiful finished bags while making each project unique.
Before cutting any fabric, wash, dry, and press all materials. Prewashing removes excess dye and prevents future shrinkage, ensuring your finished DIY Fabric Car Trash Bag Pattern keeps its intended dimensions after cleaning.
Following the pattern measurements, cut the exterior body pieces, lining pieces, side panels, bottom panel, top facing, and hanging straps. Accurate cutting makes the entire assembly process much smoother and results in cleaner seams.
If using interfacing or fusible fleece, apply it to the wrong side of the exterior fabric before construction. Follow the manufacturer’s instructions carefully, pressing evenly without stretching the fabric.
Mark any important reference points such as boxed corners, strap placement, center lines, and seam allowances. Fabric markers or removable chalk make these markings easy to see without leaving permanent stains.
Press all fabric pieces thoroughly before sewing. Crisp, flat fabric improves sewing accuracy and produces straighter seams throughout the project.
Finally, organize every fabric piece into groups before beginning construction. Keeping similar pieces together reduces mistakes and speeds up the sewing process while helping maintain an efficient workflow.
Begin by placing each exterior side panel right sides together with the main body panel. Sew using a 1/2-inch seam allowance, backstitching at both ends to secure the stitches. Press every seam open or toward the side panel to reduce bulk and create a professional finish.
Next, attach the remaining side panel to the opposite edge of the main body. Repeat the same process with the lining pieces so you have two separate bag sections: one for the exterior and one for the interior. Keeping the seams aligned at this stage will make the remaining construction much easier.
With the side panels attached, sew the bottom base to the exterior body. Match the center marks first, then pin or clip outward toward each corner. Stitch slowly around the bottom, easing the fabric gently so every edge aligns evenly. Repeat this same process for the lining, leaving a 4 to 5-inch opening along one edge of the lining bottom to turn the bag right side out later.
Create the boxed corners if your pattern includes them. Fold each lower corner so the side seam meets the bottom seam, forming a triangle. Measure across the marked line, stitch directly on that line, and trim away the excess fabric, leaving approximately 1/4 inch beyond the seam. This technique creates depth so the finished trash bag stands upright inside the vehicle.
Prepare the top facing by folding the long edges inward about 1/2 inch, pressing carefully with a hot iron. Attach the facing around the upper edge of the exterior bag with right sides together, sew completely around, then fold it toward the inside. Topstitch close to the folded edge for a crisp, durable finish that will withstand daily use.
Now make the hanging straps. Fold each strap lengthwise with right sides together and sew along the long edge. Turn the straps right side out using a loop turner or safety pin, press flat, and topstitch both sides for added strength. Add buttonholes, snaps, or hook-and-loop closures according to your chosen design so the straps can wrap securely around the vehicle headrest posts.
Place the exterior bag inside the lining with right sides facing each other. Carefully align the side seams, corners, and upper edges before clipping everything securely into place. Sew completely around the top opening using a consistent seam allowance, ensuring the straps remain correctly positioned between both layers.
Turn the entire bag right side out through the opening left in the lining. Push each corner outward gently using a blunt turning tool or chopstick, taking care not to damage the fabric. Once the bag has been fully turned, fold the lining opening inward and stitch it closed using either a ladder stitch by hand or a narrow machine topstitch.
Insert the lining neatly into the exterior bag and press the top edge thoroughly. Topstitch around the entire upper opening approximately 1/8 inch from the edge. This final row of stitching secures the lining, prevents shifting during use, and gives the DIY Fabric Car Trash Bag Pattern a polished, store-quality appearance.
Personalization is one of the greatest advantages of this sewing project. Add quilted panels, decorative binding, embroidered initials, appliqué designs, colorful piping, or contrasting fabrics to create a custom accessory that perfectly matches your vehicle’s interior or your personal sewing style.
For additional functionality, consider sewing interior slip pockets to hold tissues, sanitizer, or wet wipes. An exterior pocket can conveniently store reusable shopping bags, napkins, or small travel essentials. Some sewists even include a removable waterproof liner that can be washed separately for easier maintenance.
Once completed, attach the finished DIY Fabric Car Trash Bag Pattern to the headrest using the adjustable straps. The compact design keeps small pieces of trash neatly contained during everyday driving while remaining easy to remove, empty, and wash whenever necessary. With quality materials and careful sewing, this practical organizer can provide years of dependable use while keeping your vehicle clean and organized.
Frequently Asked Questions About the DIY Fabric Car Trash Bag Pattern
Can beginners successfully sew a DIY Fabric Car Trash Bag Pattern?
Absolutely. The DIY Fabric Car Trash Bag Pattern is an excellent project for beginners because it primarily uses straight seams, simple construction techniques, and basic sewing skills. If you are comfortable operating a sewing machine and sewing accurate seam allowances, you can complete this project with confidence. More experienced sewists can easily customize the design with additional pockets, quilting, or decorative finishes.
What fabric works best for a DIY Fabric Car Trash Bag Pattern?
Durable fabrics provide the best results. Cotton canvas, duck cloth, quilting cotton reinforced with fusible fleece, denim, twill, and lightweight upholstery fabrics all work well for the exterior. For the lining, waterproof canvas, laminated cotton, nylon, or water-resistant fabrics make cleaning much easier and help protect the bag from moisture.
Can the trash bag be washed?
Yes. One of the advantages of making your own DIY Fabric Car Trash Bag Pattern is that it can be washed whenever necessary. Machine wash on a gentle cycle using mild detergent if the fabric allows, then air dry or tumble dry on low heat according to the fabric manufacturer’s recommendations. If your bag includes waterproof lining, follow the care instructions for that material to maximize its lifespan.
How can I keep the trash bag open while driving?
Using medium-weight interfacing, foam stabilizer, or fusible fleece helps the bag maintain its shape. Some sewists also sew a layer of batting into the exterior or insert a lightweight flexible plastic canvas between the lining and exterior to give the opening extra stability.
Can I change the size of the pattern?
Yes. One of the best features of a handmade DIY Fabric Car Trash Bag Pattern is its flexibility. Simply increase or decrease the dimensions of the body, side panels, and bottom panel while maintaining the same construction process. Larger versions work well for family vehicles or road trips, while smaller versions are ideal for compact cars.
What type of closure is best?
Several closure options work well depending on your preference. Buttons and buttonholes create a classic appearance, plastic snaps are quick and convenient, hook-and-loop tape offers adjustable fastening, and side-release buckles provide extra security. Choose the option that best fits your sewing style and the interior of your vehicle.
Can I add extra storage features?
Certainly. Many sewists personalize their DIY Fabric Car Trash Bag Pattern by adding exterior slip pockets, zippered compartments, mesh pockets, or divided interior sections. These additions allow the organizer to store tissues, wet wipes, hand sanitizer, reusable shopping bags, or other travel essentials.
How long does this sewing project usually take?
For most sewists, the project can be completed within two to four hours, depending on experience and the number of custom details added. Beginners may take a little longer, while experienced quilters and sewists can often finish the project in a single afternoon.
Video Tutorial:
Creating your own DIY Fabric Car Trash Bag Pattern is a practical sewing project that combines creativity with everyday convenience. Throughout this tutorial, you learned how to select suitable materials, prepare and cut each fabric piece accurately, reinforce the structure with interfacing or stabilizers, sew the exterior and lining, construct sturdy hanging straps, create professional boxed corners, assemble the entire organizer, and finish it with neat topstitching for a polished appearance.
This project is an excellent way to improve your sewing skills while making something that is both attractive and highly functional. Because it is fully customizable, you can experiment with different colors, quilting techniques, decorative stitching, appliqué, embroidery, or coordinating fabrics to create a unique organizer that reflects your personal style. Handmade projects like this also make thoughtful gifts for friends and family who appreciate useful, handcrafted accessories for their vehicles.
With patience, careful measuring, accurate cutting, and consistent stitching, your finished DIY Fabric Car Trash Bag Pattern will provide years of reliable use while helping keep your car clean and organized during daily commutes, errands, vacations, and road trips. Every project you complete also builds confidence and encourages you to explore even more creative sewing ideas.
Thank you for reading this tutorial. I sincerely hope this step-by-step guide has inspired you to create your own DIY Fabric Car Trash Bag Pattern. If you make one, please leave your honest opinion in the comments and share your experience. Your feedback, suggestions, and creative ideas may inspire other sewing enthusiasts and help improve future tutorials. Happy sewing!