DIY Fabric Basket Pattern

The DIY Fabric Basket Pattern is one of the most practical sewing projects for beginners and experienced makers alike. Whether you need an attractive organizer for your sewing room, office, bathroom, nursery, or craft space, this DIY Fabric Basket Pattern is a simple project that combines functionality with creativity.
By using cotton fabric, fusible fleece, and basic sewing techniques, you can create a sturdy fabric basket that looks professional and complements your home décor. One of the best things about this DIY Fabric Basket Pattern is how customizable it is.
You can choose playful prints for children’s rooms, elegant linen fabrics for living spaces, colorful quilting cotton for sewing studios, or seasonal fabrics for holiday decorations. Because the basket is fully reversible if desired, or lined with a coordinating fabric, it offers endless possibilities while helping organize everyday items in style. This project also makes an excellent handmade gift that is both beautiful and useful.
If you are looking for a sewing project that builds confidence while teaching valuable construction techniques, this DIY Fabric Basket Pattern is an excellent choice. Throughout this tutorial, you will learn how to prepare your materials, stabilize the fabric with fusible fleece, sew neat boxed corners, assemble the lining, and finish the basket with crisp edges. Every step is beginner-friendly, yet the finished basket has the polished appearance of a professionally sewn organizer.
Before starting your DIY Fabric Basket Pattern, gather all of your sewing supplies. Careful preparation always leads to a better finished project and helps avoid mistakes during assembly.
You will need two exterior fabric pieces, two lining fabric pieces, fusible fleece or lightweight foam stabilizer, matching thread, sewing clips or pins, fabric scissors or a rotary cutter, an iron, and a sewing machine. A quilting ruler is also helpful for accurate cutting.
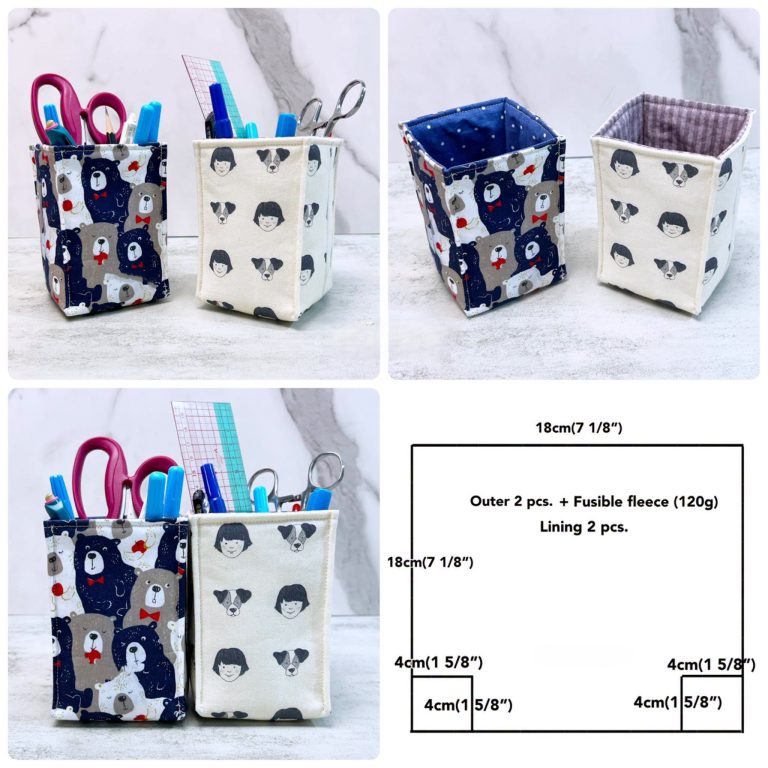
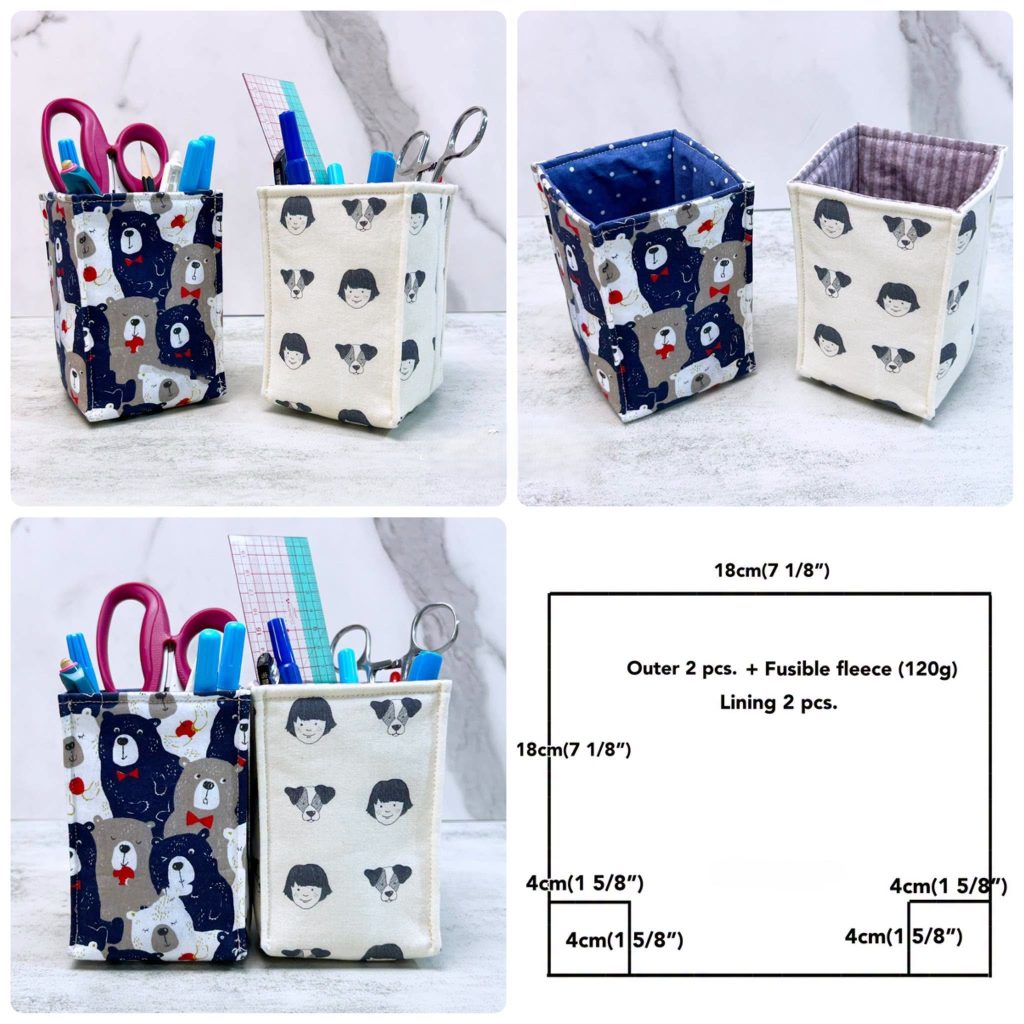
For the basket shown in this tutorial, cut two outer pieces measuring approximately 18 cm × 26 cm. Cut two matching lining pieces using the same dimensions. Fuse the fleece to the wrong side of each exterior fabric piece following the manufacturer’s instructions.
Next, mark a 4 cm × 4 cm square at both bottom corners of every fabric piece. These marked squares will later create the boxed corners that give the basket its three-dimensional shape.
Press all fabrics before sewing. Smooth, wrinkle-free fabric produces cleaner seams and more accurate construction. Pressing at every stage is one of the simplest ways to improve the overall quality of your sewing.
Choose coordinating fabrics that complement one another. A fun printed exterior paired with a subtle lining creates visual interest every time the basket is used.
Finally, organize your sewing space before beginning. Keeping scissors, clips, rulers, and thread within easy reach makes the sewing process more enjoyable and efficient.
Place the two exterior pieces right sides together. Pin or clip around the sides and bottom while leaving the top edge open. Stitch using a 1 cm seam allowance.
Repeat the same process with the lining pieces, but leave an opening of about 8–10 cm along the bottom seam. This opening will later allow the basket to be turned right side out.
Cut away each marked 4 cm × 4 cm corner square from both the exterior and lining sections. Be careful not to cut into the stitching line.
To create the boxed corners, open each corner so the side seam aligns perfectly with the bottom seam, forming a straight line. Clip in place and sew across the opening using a 1 cm seam allowance.
Repeat the boxed corner process for all four corners. These simple seams transform the flat fabric into a structured basket with depth and stability.
Turn the exterior basket right side out while leaving the lining inside out. Insert the exterior basket into the lining so that the right sides are facing each other. Match the side seams carefully and pin around the top edge before sewing all the way around.
After sewing around the top edge, carefully pull the basket through the opening left in the lining. Take your time to avoid stressing the seams.
Close the opening in the lining using a ladder stitch by hand or a narrow machine stitch close to the folded edges. Either method creates a clean finish.
Push the lining neatly inside the basket and gently shape all four corners using a blunt turning tool or chopstick. Avoid using anything sharp that could damage the fabric.
Press the top edge thoroughly. A well-pressed basket immediately appears more structured and professional.
For additional durability, sew a topstitch approximately 3–5 mm below the upper edge. This topstitch helps the lining stay securely inside while adding a decorative finish.
Your completed DIY Fabric Basket Pattern is now ready to organize sewing tools, cosmetics, office supplies, craft materials, toys, yarn, quilting clips, or countless other household items.
Experiment with different fabric collections to match your home’s decorating style. Neutral fabrics create timeless organizers, while bright prints add personality to creative spaces.
Try quilting the exterior fabric before assembling the basket. Simple straight-line quilting adds texture and makes the basket even sturdier.
Adjust the basket dimensions to create multiple storage sizes. Smaller baskets work well for sewing clips or jewelry, while larger versions can store yarn, towels, or folded fabric.
Add decorative labels, embroidered initials, or fabric appliqués for a personalized appearance. Handmade touches make each basket unique.
Consider using waterproof canvas or laminated cotton for bathroom storage or kitchen organization. These fabrics are easy to wipe clean and withstand everyday use.
Create coordinated basket sets using matching fabric collections. Displaying several baskets together creates an organized, cohesive look while maximizing storage throughout your home.
Medium-weight quilting cotton is one of the most popular choices because it is easy to sew, available in countless prints, and works beautifully with fusible fleece.
Fusible fleece adds body and stability without making the basket overly stiff. It helps the basket stand upright while maintaining soft fabric texture.
Yes. This project uses straight seams, boxed corners, and simple construction techniques, making it an excellent beginner sewing project.
Absolutely. Increase the dimensions of the main fabric pieces while maintaining proportional boxed corners. Larger baskets may benefit from heavier stabilizer.
The basket works well for sewing notions, quilting supplies, toys, baby products, cosmetics, office accessories, bathroom essentials, yarn, folded fabric, and many other household items.
Yes. If made with washable cotton fabric and fusible fleece, the basket can generally be machine washed on a gentle cycle and reshaped while damp. Always check the care instructions for your chosen stabilizer.
Use foam stabilizer instead of fusible fleece, add quilting lines to the exterior, or combine heavyweight interfacing with fusible fleece for additional structure.
Definitely. A handmade fabric basket is practical, attractive, and easy to personalize with different fabrics, embroidery, or decorative labels, making it an excellent gift for birthdays, holidays, baby showers, and housewarming celebrations.
Video Tutorial:
The DIY Fabric Basket Pattern is a rewarding sewing project that combines creativity, organization, and practical everyday use. Throughout this tutorial, you learned how to prepare your materials, apply fusible fleece, cut accurate pieces, sew boxed corners, assemble the lining, finish the basket neatly, and personalize the design to suit your own style. With just a few pieces of fabric and basic sewing techniques, you can create beautiful storage baskets that are durable, functional, and perfect for every room in your home.
Once you have mastered this pattern, you can easily adapt the size, fabrics, colors, and stabilizers to create an entire collection of coordinating organizers for your sewing room, office, kitchen, nursery, or craft studio. Handmade fabric baskets are enjoyable to sew, practical to use, and thoughtful to give as gifts.
If you enjoyed this DIY Fabric Basket Pattern, feel free to leave your honest opinion in the comments and share your experience making it. Your suggestions, creative ideas, and sewing tips may inspire other makers to create their own beautiful fabric baskets. Happy sewing!