DIY Hand Bag Pattern

DIY Hand Bag Pattern is a practical sewing project that transforms coordinated fabrics into a charming, structured handbag for everyday use. This design combines sturdy denim-style fabric with a delicate floral print, creating a beautiful contrast between casual texture and feminine detail.
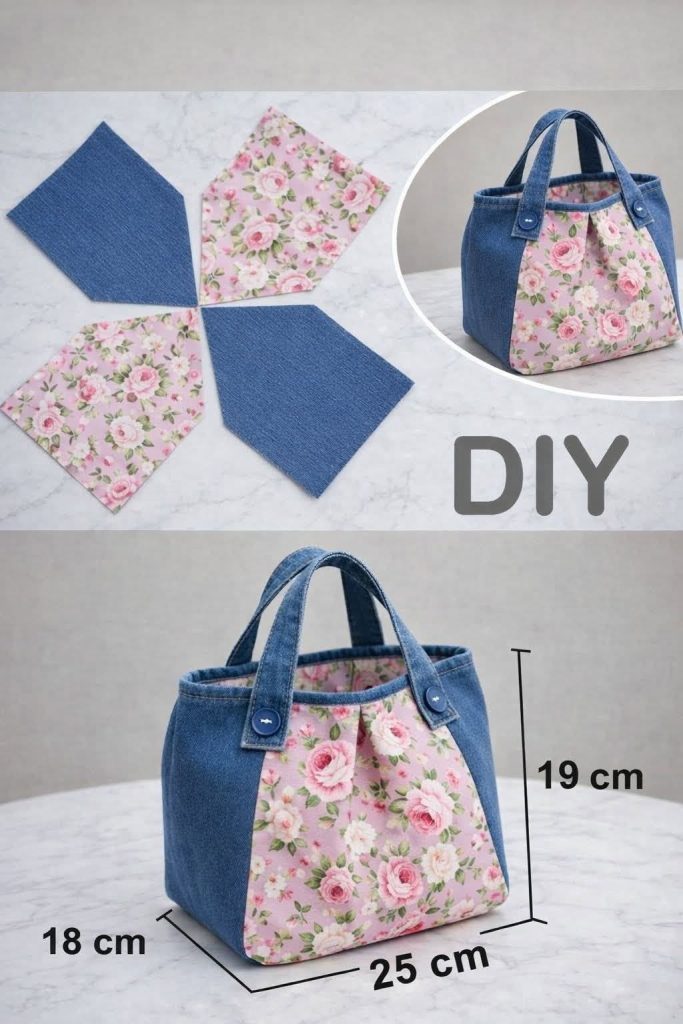
The finished bag measures approximately 25 cm wide, 19 cm high, and 18 cm deep, although the dimensions can be adjusted according to your preferences. Its roomy interior makes it suitable for carrying a wallet, keys, cosmetics, a small notebook, and other daily essentials. The compact handles keep the bag comfortable to carry by hand or over the forearm. Best of all, this project allows you to create a useful accessory while practicing valuable sewing techniques.
Making your own handbag gives you complete control over the fabric, size, structure, and finishing details. You can use new material, leftover cotton pieces, recycled denim, or fabric from an old pair of jeans that is still in good condition. The floral center panels bring personality to the design, while the solid side sections help the bag maintain a balanced and polished appearance. Adding interfacing or stabilizer gives the finished accessory enough body to stand upright without becoming excessively stiff. A lining keeps the inside neat and protects the raw seams from daily wear. With patient measuring and accurate stitching, even a developing sewist can achieve a professional-looking result.
This DIY Hand Bag Pattern is also easy to personalize for gifts, seasonal accessories, or handmade craft collections. The floral fabric can be replaced with geometric prints, patchwork, stripes, polka dots, or solid colors. Decorative buttons at the base of the handles provide an attractive finishing touch, but they are optional and do not need to support the weight of the bag. You may also add an interior pocket, magnetic snap, zipper closure, or longer shoulder strap. Before beginning, read through the complete tutorial and prepare all the pieces in advance. Careful preparation will make every stage of the sewing process smoother and more enjoyable.
For the exterior, choose one medium-weight fabric for the sides and another coordinating fabric for the front and back center panels. Denim, canvas, twill, upholstery cotton, and quilting cotton reinforced with interfacing are all suitable choices. For a result similar to the pictured handbag, use blue denim for the side sections and pink floral cotton for the central panels. You will also need lining fabric, fusible interfacing, thread, buttons, and basic sewing tools. Always prewash washable fabrics before cutting to prevent unexpected shrinking later.
The approximate finished measurements are 25 cm across the front, 19 cm high, and 18 cm deep. Add a seam allowance of approximately 1 cm to every edge when drafting the pattern pieces. Because the bag is three-dimensional, its paper templates will look larger than the final measurements suggest. The base depth is created by the shaped lower edges and the seams joining the front, back, and side sections. Marking all seam allowances clearly will help preserve the intended finished size.
Create one paper template for the floral center panel and another for the denim side panel. The center piece can begin as a rectangle approximately 17 cm wide and 21 cm high, including seam allowances. Gently angle the side edges so the top is slightly narrower than the lower portion, producing a soft trapezoid shape. The exact angle can be adjusted, but both sides must remain symmetrical. Fold the paper template vertically before trimming so the left and right edges match perfectly.
Draft the side pieces as broad pentagon-like shapes, similar to those shown in the reference design. Each piece should include a vertical outer edge, a lower edge, a diagonal upper section, and an inner edge that will connect to the floral panel. Cut four side pieces from the exterior fabric because you will need two for the front and two for the back. Flip the paper template when necessary so the pieces form mirrored pairs. Label the wrong side of every cut section to prevent assembly mistakes.
Cut two floral center panels for the outside of the bag and two corresponding pieces from interfacing. Cut four denim side sections and four matching interfacing pieces. For the lining, you may reproduce the completed front and back exterior shapes after they have been assembled, or cut the lining from the same templates used for the exterior. You will need two main lining panels. Cut additional fabric for a pocket when desired.
Prepare two handle strips measuring approximately 8 cm wide and 38 to 42 cm long. Once folded and sewn, each handle will be about 3 cm wide, depending on the method used. Cut matching strips of interfacing to reinforce them. Longer handles can be made for carrying the handbag over the shoulder, while shorter handles create the compact style shown in the image. Check both strips against each other before sewing because uneven handles are noticeable on the finished bag.
Apply the fusible interfacing to the wrong side of every exterior panel according to the manufacturer’s temperature recommendations. Use a pressing cloth to protect printed cotton and synthetic fibers from excessive heat. Press rather than sliding the iron continuously, as sliding may stretch or distort the pieces. Allow each fused section to cool on a flat surface before moving it. Properly attached fusible interfacing will provide stability and make the handbag easier to assemble.
Place one floral center panel and one denim side section with their right sides together. Align the edges carefully, pin or clip them, and sew using the chosen 1 cm seam allowance. Repeat on the opposite side of the floral panel with a mirrored denim piece. Press the seam allowances toward the darker fabric to reduce visible shadowing through the floral material. This completed unit forms one main exterior panel.
Repeat the same process to assemble the back of the handbag. Before continuing, place the two completed panels on top of each other with right sides facing inward. Check that the upper edges, side seams, and lower corners align. Small differences can be trimmed carefully, but avoid removing too much fabric. The front and back must remain identical for the bag to stand evenly.
To add a soft decorative detail, form one or two pleats near the top center of each floral panel. Mark the center and fold a small amount of fabric inward on both sides. Pin the folds securely and baste across the top edge within the seam allowance. The pleats should point in the same direction on the front and back. This technique gives the floral section a slightly gathered appearance without creating excessive bulk.
Place the finished front and back exterior panels right sides together. Sew around the side and bottom edges, leaving the entire top open. Reinforce the beginning and end of the seam with backstitching. Clip into curved or angled seam allowances where necessary, taking care not to cut through the stitching. Press the seams open where possible or press both allowances toward the back.
The bag depth may be established by the shaped pattern pieces, but boxed lower corners can provide additional structure. To create a boxed corner, match the side seam with the bottom seam and flatten the corner into a triangle. Mark a straight line at the desired depth, making sure the front and back corners are identical. Sew across each marked line and trim the excess fabric, leaving a small seam allowance. Turn the exterior right side out and check whether the base sits level.
Use the completed exterior as a guide for checking the lining dimensions. The lining should fit comfortably inside the handbag without excessive fabric gathering at the bottom. Cut two lining panels and place them right sides together. Sew around the sides and bottom, but leave an opening of approximately 10 cm along the bottom edge. This opening will later allow the entire handbag to be turned right side out.
Create the lining corners with the same method and measurements used for the exterior. Consistency is important because a lining with a different depth may pull awkwardly inside the bag. After sewing the corners, trim only the unnecessary excess. Press the lining seams carefully. Keep the lining wrong side out until it is joined to the bag.
An interior pocket makes the handmade handbag more practical. Cut a rectangle approximately 18 cm wide and 14 cm high, including seam allowances. Fold the upper edge to the wrong side twice and stitch it in place for a clean pocket opening. Fold the remaining edges inward, press them, and position the pocket on one lining panel. Stitch around the sides and bottom, leaving the top open.
To make each handle, fuse interfacing to the wrong side of a handle strip. Fold the strip lengthwise with wrong sides together and press to mark the center. Open it, fold both long raw edges toward the center crease, and press again. Fold the entire strip in half so the raw edges are enclosed. Topstitch close to both long edges for a firm and attractive finish.
Repeat the handle process with the second strip and confirm that both finished handles have equal lengths. Mark the handle positions symmetrically along the upper edge of the exterior bag. A spacing of approximately 10 to 12 cm between the two ends of each handle generally works well for a bag of this size. Place the raw handle ends against the bag’s top edge and baste them securely. Make certain that neither handle is twisted.
For the buttoned appearance shown in the example, extend the handle ends slightly below the top edge and add decorative buttons after construction. Sew the buttons through the handle and exterior layer with strong thread. These buttons are usually decorative rather than structural, so the handles should already be secured with machine stitching. You may also add small rectangular reinforcement tabs beneath the handle ends. This extra detail improves durability and creates a polished handmade finish.
Insert the exterior bag inside the lining so that their right sides are facing each other. The exterior should be right side out, while the lining remains wrong side out. Push the handles down between the two fabric layers so they stay away from the top seam. Match the side seams and upper edges carefully. Pin or clip around the complete opening.
Sew around the entire upper edge using an even seam allowance. Stitch slowly over the handle areas because these sections contain several fabric layers. Reinforce each handle position by sewing across it more than once. Check that the lining has not folded underneath the seam. Trim bulky seam allowances carefully and clip any curved sections to help the opening turn smoothly.
Reach through the gap left in the lining and pull the exterior bag through it gradually. Avoid pulling sharply on the handles or floral center panel. Continue turning until both the lining and exterior are fully right side out. Use a blunt point turner to shape the lower corners. Press the upper edge so the lining rolls slightly toward the inside and does not show unevenly.
Close the turning opening in the lining with a narrow machine stitch or an invisible ladder stitch by hand. Push the lining into the bag and smooth it into each corner. Pin around the upper opening to keep the layers aligned. Topstitch approximately 3 to 5 mm from the edge. This topstitching strengthens the opening and gives the bag a crisp, finished appearance.
Add a closure when desired. A magnetic snap should normally be installed on the lining before the lining panels are sewn together, while a fabric loop and button can be added during the final stage. A zipper requires additional preparation but offers greater security for personal belongings. A simple snap tab is another beginner-friendly choice. Select a closure that matches the intended use of the handbag.
Complete the DIY Hand Bag Pattern by removing loose threads and giving the finished project a careful final press. Use a pressing cloth over the exterior to protect the floral print and denim surface. Check every seam, handle attachment, corner, and topstitched edge. Place a few lightweight items inside to evaluate the bag’s shape before using it regularly. Your handmade accessory is now ready to carry, display, or give as a thoughtful gift.
Frequently Asked Questions About the DIY Hand Bag Pattern
Is this handbag suitable for a beginner?
Yes. The project uses basic skills such as straight stitching, attaching interfacing, sewing a lining, making handles, and turning a bag through an opening. A beginner should work slowly and test the seam allowance on scrap fabric first. The angled panel construction may require extra attention, but it is manageable with accurate pinning.
What is the best fabric for a handmade handbag?
Medium-weight denim, canvas, twill, and home décor cotton provide good stability. Quilting cotton can also be used when reinforced with fusible interfacing or bag stabilizer. Avoid extremely stretchy fabric unless it is fully stabilized because stretch can distort the bag shape.
Can old jeans be used for this pattern?
Yes, recycled denim is an excellent option. Choose sections without excessive wear, stains, or weakened fibers. Open the jeans along the seams and press the material flat before placing the templates. Existing pockets may even be reused as decorative or functional bag details.
Does the pattern include seam allowances?
The measurements in this tutorial suggest adding approximately 1 cm around the drafted templates. When creating your own paper pieces, clearly note whether seam allowance has already been included. Mixing templates with and without allowances can change the final dimensions and prevent the panels from aligning.
How can I make the handbag stand upright?
Use firm interfacing, foam stabilizer, or fleece depending on the desired structure. A removable base insert can also be added by covering a piece of heavy plastic canvas with lining fabric. Do not use ordinary cardboard if the bag may need washing because cardboard can absorb moisture and lose its shape.
Can I make the handles longer?
Yes. Increase the handle strips to the length required for shoulder or crossbody use. Remember that longer straps carry more stress, so reinforce their attachment points. For a crossbody design, adjustable hardware and stronger webbing may provide additional comfort and durability.
How can I wash the finished handbag?
Washing instructions depend on the fabrics, stabilizer, buttons, and closure used. Prewashing fabric before sewing reduces the risk of shrinkage. When all components are washable, gently hand-wash the bag in cool water and allow it to air-dry in shape. Avoid aggressive twisting that could wrinkle the stabilizer.
Why is my lining too large?
A lining may appear oversized when its seam allowance is slightly narrower than the exterior seam allowance. Sew the lining with a marginally larger allowance or trim it carefully after testing the fit. Also check that the boxed corners have the same dimensions as those on the exterior.
Can I add a zipper to the top?
Yes, but the zipper should be planned before joining the lining and exterior. It can be installed between fabric zipper panels and sewn into the upper opening. Measure the finished opening accurately before cutting the zipper panels. A zipper that is too short or too long may distort the bag.
How can the pattern be resized?
Enlarge or reduce all templates by the same percentage so the seams continue to match. Remember to resize the handle placement and pocket dimensions as well. The seam allowance may remain at 1 cm even when the main pattern is enlarged. Making a paper or inexpensive fabric sample is helpful before cutting valuable material.
Conclusion
Video Tutorial:
The DIY Hand Bag Pattern is a rewarding project that teaches how to combine exterior panels, apply interfacing, create depth, sew a neat lining, construct reinforced handles, and finish a structured opening. By following the measurements carefully and working one stage at a time, you can create a practical handbag measuring approximately 25 cm wide, 19 cm high, and 18 cm deep. The combination of denim and floral fabric produces an attractive design, while pockets, buttons, straps, and closures allow the project to reflect your personal style.
This handmade bag can be adapted for everyday use, gifts, fabric recycling, or creative sewing practice. Choose durable materials, reinforce the stress points, and take time to press each seam for the best result. Please leave your sincere opinion about this DIY Hand Bag Pattern, and share any suggestions, color combinations, or useful features that you would add to your own version.