DIY Fox Fabric Wall Organizer Pattern

DIY Fox Fabric Wall Organizer Pattern is a charming and practical sewing project that combines adorable woodland-inspired décor with functional storage. Whether you want to organize colored pencils, craft tools, paintbrushes, scissors, or children’s art supplies, this delightful wall organizer adds personality while keeping everything neatly within reach.
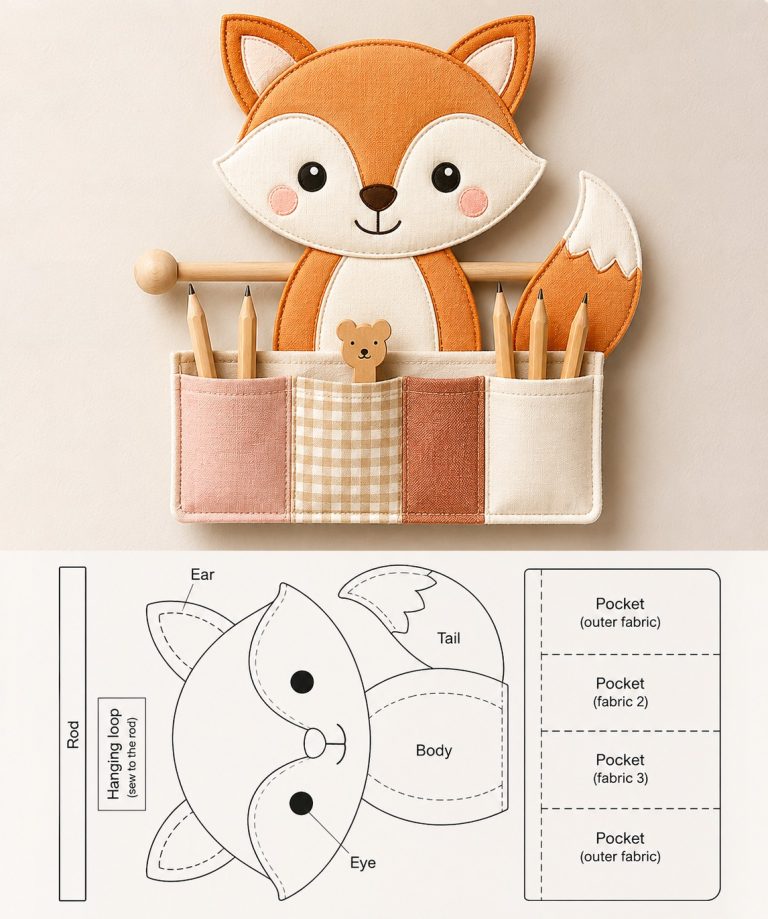
The fox design features a friendly face, soft fabric appliqué details, multiple storage pockets, and a wooden hanging rod that creates both stability and visual appeal.Creating your own DIY Fox Fabric Wall Organizer Pattern is a rewarding project for sewists of many skill levels.
It offers an excellent opportunity to practice appliqué techniques, accurate cutting, topstitching, pocket construction, and simple quilting methods while producing something that is both decorative and useful. Since the organizer hangs on the wall, it also helps maximize storage space without taking up room on desks or shelves.
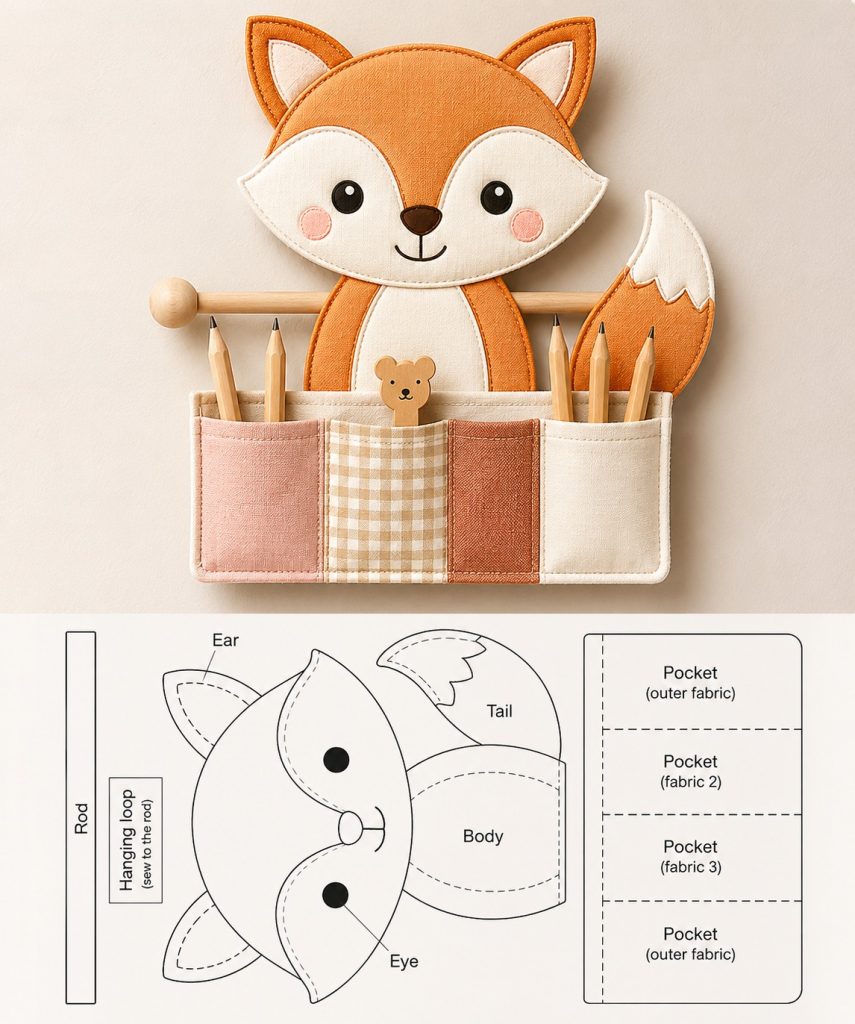
Another wonderful advantage of making this project yourself is the freedom to personalize every detail. You can select different cotton prints, linen fabrics, canvas, felt, embroidery details, or quilting cotton to perfectly match a nursery, sewing room, classroom, or children’s bedroom. Throughout this tutorial, you will learn every stage of constructing the project using easy-to-follow sewing instructions, making it possible for anyone to recreate this adorable fox organizer from beginning to end.
Before starting the sewing process, gather all the necessary materials. Medium-weight cotton fabric, quilting cotton, linen, canvas, fusible interfacing, lightweight batting, embroidery thread, matching sewing thread, pins, fabric clips, scissors, rotary cutter, ruler, washable fabric marker, and a wooden dowel rod will all be useful for this project.
Print or trace the DIY Fox Fabric Wall Organizer Pattern pieces at full size. The template includes the fox head, ears, face patches, body, tail, hanging loop, and four rectangular pocket sections. Carefully transfer every piece onto your chosen fabrics while observing seam allowances. Label each piece to avoid confusion during assembly.
Cut the fox body from sturdy outer fabric and fuse interfacing to the wrong side to provide extra support. Since the organizer will hold supplies, reinforcement is essential for preventing stretching over time. If desired, add a layer of thin batting to create a slightly padded appearance.
Prepare the face pieces by cutting the orange head, white muzzle, ears, inner ears, body belly, and tail tip. These contrasting fabrics create the recognizable fox appearance while giving the finished organizer a professional look.
Using fabric-safe markers, transfer placement lines from the template. Mark where the eyes, nose, cheeks, body, pockets, and hanging rod will be positioned. Accurate markings help maintain symmetry throughout construction.
Finally, organize every fabric piece before moving to the sewing machine. Taking a few extra minutes during preparation greatly improves sewing accuracy and reduces mistakes during assembly.
Begin by sewing the inner ear pieces onto the outer ears using a narrow edge stitch or decorative appliqué stitch. Press each ear carefully to achieve crisp edges before attaching them to the back of the fox head.
Position both ears between the front and back head layers according to the markings. Pin securely and baste them temporarily to prevent shifting while assembling the rest of the head.
Next, place the white face panels onto the orange head fabric. Use a narrow zigzag stitch, satin stitch, blanket stitch, or decorative appliqué stitch around every curved edge. Sew slowly to maintain smooth curves that define the fox’s friendly expression.
Attach the embroidered or appliquéd nose to the center of the muzzle. The mouth can be stitched using black embroidery floss with a simple backstitch or machine embroidery. Add safety eyes only if the organizer is intended solely as decoration; embroidered eyes are the safest option for children’s rooms.
Sew the body belly panel onto the orange body section using the same appliqué method. Press all seams thoroughly after stitching to keep the project flat and professional looking.
Complete the fox by sewing the tail sections together, attaching the white tail tip first before joining the tail to the body. Once every appliqué element is finished, lightly press the entire front panel and trim any loose threads.
The storage pockets are what transform this cute fox into a functional wall organizer. Cut four pocket rectangles according to your pattern dimensions using coordinating fabrics that complement the fox’s colors.
Finish the upper edge of every pocket by folding the fabric twice toward the wrong side and topstitching neatly. This creates a durable finished edge that withstands repeated use without fraying.
Arrange the pockets across the lower body section of the organizer. Mix solid fabrics with gingham, floral prints, stripes, or textured cotton to create visual interest while maintaining a balanced color palette.
Sew the side and bottom edges of the pocket panel onto the body using a reinforced straight stitch. Leave the upper edges open. Add vertical stitching lines wherever individual compartments are needed for pencils, markers, scissors, rulers, or crochet hooks.
To improve durability, sew a second line of stitching around every pocket section. Areas that receive daily use benefit greatly from additional reinforcement.
Create the hanging channel by folding the top edge around a wooden dowel rod or sewing a fabric sleeve according to your pattern. The dowel helps distribute weight evenly while keeping the organizer straight when displayed on the wall.
Place the completed front panel and backing fabric with right sides together. If adding batting, position it behind the front layer before stitching around the outer edge.
Leave a turning opening along one side or bottom. Carefully sew around the fox silhouette, pivoting slowly around curves such as the ears and tail to maintain smooth, rounded shapes.
Trim seam allowances, clip inside curves where necessary, and carefully turn the organizer right side out. Use a blunt turning tool to gently push out the ears, tail, and rounded edges without damaging the seams.
Press the entire project thoroughly using steam if your chosen fabrics allow it. Crisp pressing significantly improves the final appearance and makes the organizer look professionally finished.
Topstitch around the entire outer edge approximately 3–5 mm from the edge. This reinforces the seams, closes the turning opening, and adds a decorative finishing touch.
Insert the wooden dowel into the hanging sleeve, attach the fabric hanging loop, and hang your completed DIY Fox Fabric Wall Organizer Pattern on the wall. Fill the pockets with craft supplies, stationery, art materials, sewing notions, children’s coloring tools, or small everyday essentials to enjoy a beautiful handmade storage solution.
Yes. Beginners with basic sewing knowledge can successfully complete this project by working slowly and following each construction step carefully.
Quilting cotton, cotton canvas, linen blends, and medium-weight home décor fabrics all provide excellent durability while remaining easy to sew.
Absolutely. Fusible interfacing helps the organizer maintain its shape and prevents sagging when the pockets are filled.
Yes. Light quilting adds texture, stability, and a beautiful handcrafted appearance.
Certainly. Simply enlarge or reduce the pattern proportionally while adjusting the pocket dimensions to maintain balanced proportions.
It works perfectly for colored pencils, crayons, markers, rulers, scissors, crochet hooks, knitting needles, sewing tools, small notebooks, mail, remote controls, or children’s art supplies.
Spot cleaning is usually recommended. If washable materials were used throughout the project, gentle hand washing followed by air drying is generally suitable.
Yes. You can embroider a name, change the facial expression, add bows, flowers, different pocket prints, decorative buttons, or machine embroidery to create a completely unique organizer.
This DIY Fox Fabric Wall Organizer Pattern demonstrates how a simple sewing project can combine creativity, organization, and charming home décor in one practical design. Throughout this tutorial, you learned how to prepare the materials, cut the pattern pieces accurately, reinforce the fabric with interfacing, create detailed appliqué features, construct durable storage pockets, assemble the fox body, install the hanging rod, and complete the organizer with professional finishing techniques.
By following these step-by-step instructions, you can confidently create a functional handmade organizer that is both decorative and useful for organizing art supplies, sewing tools, or everyday essentials.
I hope this tutorial has inspired you to start your own DIY Fox Fabric Wall Organizer Pattern and customize it with your favorite fabrics and creative details. If you make this project, I would love to hear your honest opinion about the tutorial. Please share your experience, tell us what you enjoyed most, and leave your suggestions or creative ideas for future sewing projects. Happy sewing!