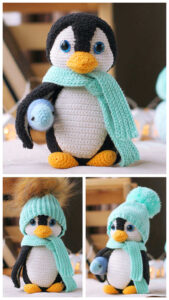
If you are looking for a fun and rewarding crochet project, creating a penguin amigurumi is a great choice! Penguin Amigurumi is a popular crochet pattern that allows you to create a cute little penguin using simple crochet techniques. Whether you are a seasoned crocheter or a beginner, this step-by-step guide will help you create your very own penguin amigurumi.
In this Penguin Amigurumi Tutorial, we will cover everything from choosing the right yarn and hooks to assembling the body parts. This guide will give you detailed instructions, along with crochet patterns that will help you make your penguin look adorable and lifelike. So grab your yarn, hook, and let’s get started!
Amigurumi is the Japanese art of crocheting small, stuffed toys, and it has gained immense popularity among crafters all over the world. The word amigurumi comes from the Japanese words “ami,” meaning “crochet,” and “nuigurumi,” meaning “stuffed doll.”

By following a few basic crochet techniques, you can create all kinds of animals, characters, and objects. In this case, we’ll be creating a charming little penguin that will make a perfect gift or a cute addition to your collection.
Before you begin your penguin amigurumi tutorial, it’s essential to gather all the materials you will need. To create this adorable crochet penguin, you will need yarn, a crochet hook, and a few other supplies. Let’s go over what you need to get started.
First, choose the right yarn for your penguin project. For a soft and cuddly amigurumi, we recommend using a medium weight yarn (4-ply) in colors like black, white, orange, and yellow.
You will need approximately 100g of black yarn, 50g of white yarn, and small amounts of orange and yellow yarn for the beak and feet. Make sure the yarn is soft enough for the best texture when crocheting amigurumi.
Next, you will need a crochet hook. A 3.5mm or 4mm hook works well for most medium-weight yarns. This hook size is perfect for making tight stitches that will prevent the stuffing from showing through the stitches.
You will also need a yarn needle for sewing the pieces together, fiberfill stuffing to give your penguin its soft and cuddly shape, and safety eyes to add personality to your penguin. Finally, don’t forget a pair of scissors for trimming excess yarn.
Now that you have all your materials ready, it’s time to start crocheting your penguin! In this section, we will walk you through each step of the process, from creating the body to adding the finishing touches.
To begin, we will crochet the main part of the penguin’s body. Using black yarn, make a magic ring to start. You will crochet in rounds, using a series of single crochet stitches (sc) to form a spiral. This technique helps create a seamless, smooth body for your penguin.
Start with 6 single crochet stitches in the magic ring. Pull the ring tight and continue working in rounds, increasing the number of stitches by 6 every round until you reach 24 stitches. The body should start to form into a small oval shape. Keep working until you achieve the desired size.
As you crochet, make sure the stitches are tight enough so that the stuffing won’t show through. You can always check the shape and size by gently stuffing the body as you go. Once you have reached the appropriate size, finish off the body and leave a long tail of yarn to sew it closed.
Now it’s time to create the penguin’s adorable white belly. For this part of the penguin, switch to white yarn. To begin, create a magic ring with 6 single crochet stitches, and work in rounds, increasing by 6 stitches until you reach 18 stitches. This will form a small, round shape.
After completing the white belly, attach it to the black body by sewing it into place. Be sure to center the white part in the middle of the black body, as this will form the penguin’s characteristic color pattern. Secure the yarn tightly, but be careful not to pull too hard so you don’t distort the body shape.
Next, we’ll crochet the penguin’s flippers. These are simple to make and add an extra layer of charm to the penguin. Using black yarn, start by chaining 7 stitches. Then, single crochet in the second chain from the hook and continue across the chain until you reach the end.
Once you finish the first row, work in rounds, crocheting in a spiral to shape the flipper. Increase a few stitches as needed to give the flipper a more rounded look. After completing the flipper, crochet a second one to match. Attach both flippers to the sides of the penguin’s body using the yarn needle.
The penguin’s beak is small but adds a lot of character to the amigurumi. To crochet the beak, use orange yarn. Start by chaining 4 stitches, and then crochet 3 single crochet stitches across. In the next row, decrease the stitches to create a triangular shape. After completing the beak, attach it to the penguin’s face just above the white belly.
Make sure the beak is centered between the flippers. The small, triangular shape will give your penguin its signature look. You can also add a few small stitches for additional details around the beak if desired.
The feet are another essential part of the penguin’s appearance. Use orange yarn for this part of the project. To make the feet, chain 6 stitches, then work in a spiral, single crocheting across the chain. Continue working in rounds until the feet are small and rounded, making sure they’re large enough to support the penguin’s body.
Once both feet are completed, attach them securely to the bottom of the penguin’s body. This will allow your penguin to stand upright, adding a realistic touch to your amigurumi.
Once the main parts of the penguin are assembled, it’s time to add the finishing touches. Attach safety eyes to the face, positioning them just above the beak. These eyes will give your penguin a lifelike expression.
You can also add some additional details, such as sewing on a small patch of black yarn to create wings or a little scarf for extra personality. Once everything is in place, trim any excess yarn and give your penguin a good fluffing with fiberfill stuffing to make it look extra cute and cuddly.
Creating a penguin amigurumi can be a fun and rewarding experience. Here are a few tips to ensure your finished penguin looks as adorable as possible.
In this Penguin Amigurumi Tutorial, we’ve walked through the process of creating a cute crochet penguin from start to finish. Whether you are a beginner or an experienced crocheter, this project is a great way to practice your skills while making a charming little penguin to enjoy or share with loved ones.
Remember to use crochet patterns and techniques that work best for you, and take your time to create each part of the penguin carefully. The final result will be a cuddly and cute penguin that you’ll be proud to show off. Happy crocheting!
