
Easter Bunny Basket - Crochet Pattern
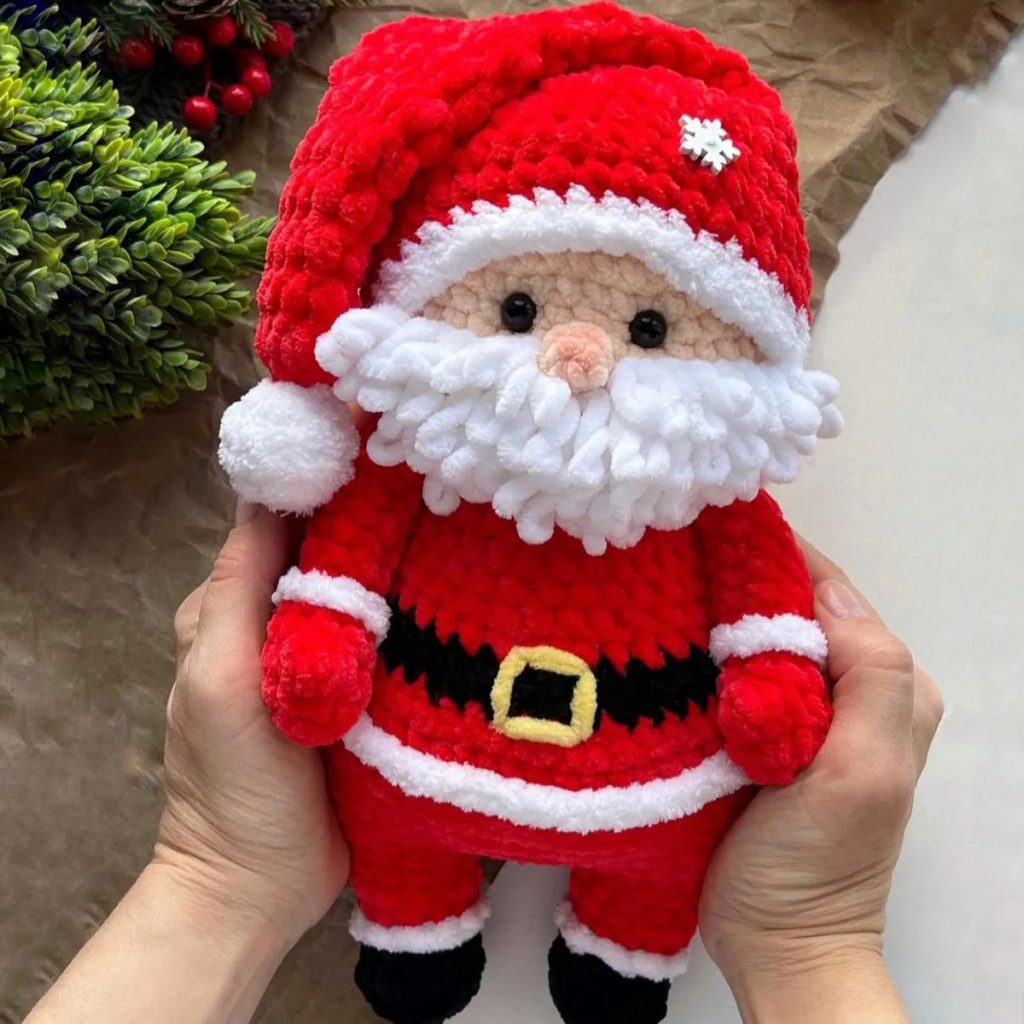
Creating a Santa Claus Amigurumi – Crochet Pattern is the perfect way to bring holiday cheer into your handmade decorations or gift ideas. This adorable crochet project blends the charm of amigurumi with the beloved image of Santa Claus, making it a favorite among crafters during the Christmas season. Whether you are a beginner exploring crochet or an experienced maker, this project will offer both fun and creativity while producing a keepsake that can be treasured for years.
The Santa Claus Amigurumi style follows the Japanese art of amigurumi, where yarn is used to create small, stuffed figures. By following a well-written crochet pattern, you can replicate Santa’s classic features – the fluffy white beard, the iconic red suit, and the twinkling eyes – all in soft yarn. This not only makes the project enjoyable to work on but also creates a safe and cuddly decoration or toy for the festive period.
When working with a Santa Claus Amigurumi – Crochet Pattern, you will find it easy to customize your Santa’s look. You can adjust the size, experiment with different yarn textures, or even add little accessories like a mini sack of gifts. The process involves simple stitches, shaping techniques, and assembly steps that are easy to follow once you understand the basic structure of amigurumi crochet.
When starting a Santa Claus Amigurumi – Crochet Pattern, the first important step is selecting the correct materials. The yarn you choose plays a major role in how your finished Santa looks and feels. Many crafters prefer soft acrylic yarn because it is lightweight, affordable, and available in a variety of colors. A rich red for Santa’s suit, bright white for his beard, and a touch of black for his boots are essential colors to have.
For the stuffing, polyester fiberfill is a popular option as it gives your Santa Claus Amigurumi a plump and huggable appearance. Make sure to use enough stuffing to keep the figure’s shape, especially in the head and body areas. A good stuffing technique can make the difference between a floppy toy and a beautifully shaped crochet figure.
The crochet hook size will also affect the final look of your amigurumi. A smaller hook helps create tight stitches, preventing the stuffing from showing through. Most crochet patterns for Santa Claus recommend a hook size that is one step smaller than the standard for your chosen yarn thickness.
Safety eyes or small black buttons are ideal for adding Santa’s eyes. These can be securely fastened to prevent any choking hazards if the amigurumi is intended for children. Alternatively, you can crochet or embroider the eyes for an even safer option.
Don’t forget about additional accessories such as a yarn needle for sewing the parts together, stitch markers to keep track of your rows, and scissors for trimming excess yarn. Each of these tools contributes to a smooth crocheting process and a professional finish.
Finally, consider the durability of your materials. If your Santa Claus Amigurumi will be handled frequently, choose yarn and accessories that can withstand gentle washing and wear over time. This will ensure your festive creation lasts for many holiday seasons.
To make a Santa Claus Amigurumi – Crochet Pattern, begin with the head, which is typically worked in continuous rounds using single crochet stitches. Starting with a magic ring is essential for creating a neat, closed top. Gradually increase the stitches to form a smooth, rounded head shape.
Once the head is complete, the body is created in a similar fashion but with slightly different shaping. Santa’s body is usually cone-shaped, which gives the illusion of his long coat. You will switch yarn colors from flesh tone to red as you progress to the coat section.
The arms and legs are made separately and then sewn onto the body. Arms are usually short and stubby to match the amigurumi style, while the legs may be slightly longer, with black boots crocheted as part of the design. The crochet pattern will guide you on where to switch colors and how to maintain even stitches.
Santa’s beard and mustache are key features. Using white yarn, you can crochet small loops or use a special stitch pattern to create a fluffy texture. These pieces are then sewn carefully onto the face. Adding a small pink blush to the cheeks with yarn or fabric paint can give your Santa a cheerful expression.
The hat is another fun element. Crochet it in red yarn, finishing with a white brim and pompom. This piece is often made separately and then stitched onto Santa’s head for a secure fit. You can even tilt it slightly for extra charm.
Once all the parts are complete, it’s time to assemble your Santa Claus Amigurumi. Sew each piece together securely, making sure the proportions look balanced. This final step brings your crochet Santa to life and marks the completion of your handmade holiday friend.
When following a Santa Claus Amigurumi – Crochet Pattern, keeping your stitches consistent is essential for a polished look. Uneven stitches can affect the shape and make the final product look lumpy. Practicing your tension before starting the main project can help you avoid this.
Using stitch markers is a simple but effective way to track your rounds, especially in amigurumi where counting stitches is crucial. This helps prevent mistakes and ensures all parts are the correct size.
If you want your Santa Claus Amigurumi to have extra character, consider adding small details like a belt buckle made of gold yarn or a tiny crochet sack filled with miniature gifts. These details make your creation unique and memorable.
Another tip is to work in good lighting and take breaks to avoid hand strain. Crocheting amigurumi involves small, repetitive movements, so resting your hands will make the experience more enjoyable.
Blocking isn’t always necessary for amigurumi, but lightly shaping your finished pieces before assembly can help them fit together more neatly. For example, gently shaping the hat before attaching it ensures it sits perfectly on Santa’s head.
Finally, store your Santa Claus Amigurumi in a safe, dry place when not in use. If you’re gifting it, consider packaging it in a festive box or wrapping it in tissue paper for a professional touch.
While the classic Santa Claus Amigurumi – Crochet Pattern uses traditional colors, you can experiment with different styles. A pastel Santa with soft pinks and creams can create a modern, whimsical look.
For a vintage feel, choose muted reds and off-whites instead of bright colors. This gives your amigurumi an old-fashioned charm that pairs beautifully with rustic holiday decor.
You can also create themed versions, such as a “Beach Santa” wearing sunglasses and a Hawaiian shirt, or a “Winter Wonderland Santa” dressed in icy blues and silvers. These variations are fun to make and can match different holiday themes.
Mini versions of Santa Claus Amigurumi work great as tree ornaments or stocking stuffers. They require less yarn and can be completed quickly, making them perfect for last-minute gifts.
For larger display pieces, simply scale up the pattern by using thicker yarn and a bigger hook. This will create a bigger, more huggable Santa that can be placed as a centerpiece in your holiday decorations.
Mixing and matching accessories can also add personality. A candy cane, a gift sack, or even a small crochet reindeer companion can make your Santa truly one of a kind.
Q: Is a Santa Claus Amigurumi difficult for beginners?
A: Not at all. With a clear crochet pattern and some basic stitch knowledge, beginners can successfully make one.
Q: How long does it take to complete a Santa Claus Amigurumi?
A: It depends on your speed, but most crafters finish within a few days, working a few hours each day.
Q: Can I wash my Santa Claus Amigurumi?
A: Yes, but it’s best to hand wash gently and air dry to keep the shape intact.
Q: What is the best stuffing for amigurumi?
A: Polyester fiberfill is lightweight, holds its shape, and is widely used for amigurumi projects.
Q: Can I use cotton yarn instead of acrylic?
A: Yes, but cotton yarn has less stretch, so it may affect the softness and flexibility of the figure.
Q: Do I need special tools for this project?
A: Basic crochet tools like hooks, yarn, a needle, scissors, and stuffing are enough.
The Santa Claus Amigurumi – Crochet Pattern is a wonderful holiday project that combines creativity, tradition, and fun. By choosing the right materials, following step-by-step instructions, and adding your personal touches, you can create a Santa that’s both charming and meaningful.
Whether it’s for your own holiday decor or as a heartfelt handmade gift, this crochet Santa will bring joy for years to come. We hope this guide has inspired you to try making your own festive amigurumi. Share your honest opinion and suggestions—we’d love to hear how your Santa Claus creation turns out.


