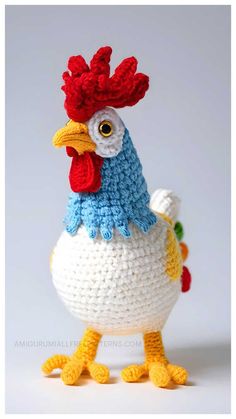
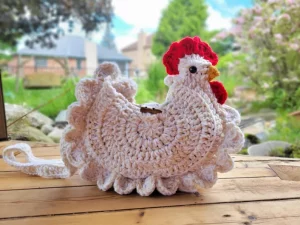
Creating a Rooster Amigurumi Crochet piece is a delightful and rewarding project, perfect for both beginners and experienced crafters. This tutorial will guide you step by step through the process, ensuring that you achieve a beautifully crafted rooster using the art of crochet. With the right techniques and materials, you can create an adorable and decorative amigurumi that makes a wonderful gift or home decor piece.
Crochet amigurumi has become increasingly popular due to its versatility and the ability to bring charming characters to life. This tutorial will cover essential aspects such as selecting the best materials, understanding the basic stitches, assembling the different parts, and adding final details to give your rooster a unique personality.
Advertising
By following this structured guide, you will be able to crochet your own rooster amigurumi with confidence. Whether you’re making it for yourself or as a thoughtful handmade gift, this tutorial ensures an enjoyable and fulfilling experience. Let’s dive into the process and start crafting your adorable crochet rooster!
Cotton or Acrylic Yarn: Soft and durable yarn works best for amigurumi.
Color Selection: Typical rooster colors include red, yellow, orange, white, and brown.
Yarn Weight: Medium-weight yarn (DK or worsted) is ideal for a sturdy structure.
Texture Considerations: Smooth yarns help define stitches better than fuzzy or textured ones.
Sustainability: Consider eco-friendly or recycled yarn options.
Consistency: Stick to the same yarn type throughout the project.
Essential Crochet Hooks and Accessories
Hook Size: Use a hook slightly smaller than recommended for the yarn to create tight stitches.
Tapestry Needle: Essential for sewing parts together neatly.
Stuffing Material: Polyester fiberfill works best for maintaining shape.
Stitch Markers: Help track stitch count and placement.
Scissors: Sharp, small scissors are ideal for clean cuts.
Safety Eyes or Embroidery Thread: For facial features, depending on preference.
Step-by-Step Rooster Amigurumi Pattern
Crocheting the Rooster’s Body
Start with a Magic Ring: This ensures a tight, seamless start.
Increase Rounds: Gradually increase stitches to form a round body shape.
Maintain Stitch Count: Crochet evenly to achieve the desired height.
Decreasing Rounds: Start decreasing stitches to shape the body.
Stuffing the Body: Firmly fill the body before completely closing it.
Final Closure: Use a needle to neatly close the last stitches.
Creating the Head and Beak
Magic Ring for Head: Similar to the body, but in a smaller size.
Shaping the Head: Increase stitches gradually to form a rounded shape.
Adding the Beak: Use yellow or orange yarn to crochet a tiny triangle.
Sewing the Beak: Attach it securely to the front of the head.
Safety Eyes Placement: Position them symmetrically for a cute expression.
Stuffing and Closing the Head: Fill and stitch the head securely.
Adding the Wings, Tail, and Comb
Crocheting the Wings
Make Two Identical Wings: Follow the same pattern for both sides.
Shaping with Increases and Decreases: Create a slightly curved wing structure.
Keeping Wings Flat: Avoid overstuffing to maintain a realistic look.
Placement Matters: Sew wings symmetrically on each side.
Secure Stitching: Ensure strong attachment to prevent loosening.
Optional Feather Details: Use different yarn shades for extra texture.
Designing the Tail and Comb
Color Selection for Tail Feathers: Use a mix of bright colors for vibrancy.
Creating Long, Curved Feathers: Chain and single crochet for structure.
Attaching the Tail: Sew each feather individually for fullness.
Shaping the Comb: Crochet small loops to mimic a rooster’s comb.
Placement of the Comb: Attach it securely on top of the head.
Final Adjustments: Trim any loose threads and shape feathers.
FAQ
1. What is the best yarn for amigurumi?
Cotton or acrylic yarn is ideal for amigurumi because of its durability and stitch definition. Medium-weight yarn works best for a structured rooster.
2. How do I ensure my stitches are tight?
Using a crochet hook smaller than the recommended size for your yarn helps create tight stitches. Additionally, maintaining consistent tension is crucial.
3. Can I make the rooster bigger or smaller?
Yes! Adjusting the yarn weight and hook size will alter the overall size of your amigurumi.
4. How do I attach safety eyes securely?
Place the eyes before closing the head, ensuring they snap firmly into place. You can also add a dab of fabric glue for extra security.
Advertising
5. What if I don’t have safety eyes?
You can embroider eyes using black thread or use small black beads as an alternative.
6. How do I keep the stuffing from showing through the stitches?
Using tight stitches and choosing a hook size that ensures minimal gaps will prevent stuffing from peeking through.
Congratulations! You have completed your Rooster Amigurumi Crochet project. This step-by-step guide covered everything from selecting the best materials to assembling and adding finishing touches. With patience and practice, you’ll be able to craft even more detailed amigurumi figures in the future.
If you found this tutorial helpful, leave a comment below with your thoughts and suggestions. Happy crocheting!

