
Crochet Star Blanket Pattern
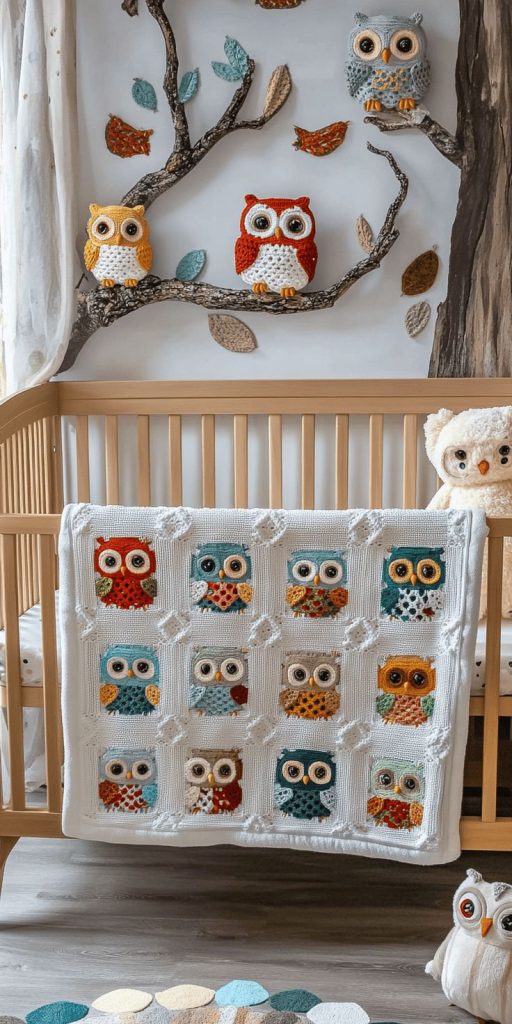
The owl blanket / owl square is a charming crochet project that brings together comfort and creativity. Whether you’re making a baby blanket, a throw for your couch, or a unique wall hanging, this pattern adds a touch of woodland magic to any space. With its playful design and textured details, each owl square can be personalized with different colors, expressions, and stitches to reflect your style.
This project is perfect for crocheters who love working with motifs and assembling patchwork-style blankets. Each owl square is crafted individually, making it a manageable project you can complete in parts. It’s also a great opportunity to use leftover yarn from other projects, turning scraps into something adorable and meaningful.
In this guide, you’ll learn how to crochet your own owl blanket / owl square, from fabric cuts and stitch types to full step-by-step instructions. We’ll cover essential techniques, tips for assembling the squares into a blanket, and everything you need to bring your owl-themed crochet vision to life.

Before you begin, it’s essential to gather your materials and prepare the necessary cuts for your owl blanket / owl square. Choosing the right yarn and tools will ensure your project is both durable and soft to the touch.
Start with worsted weight yarn in at least four different colors: one for the owl’s body, one for the eyes and beak, a background color, and an accent color for embellishments. Recommended yarns include cotton or acrylic blends that hold their shape and wash well.
You’ll need a 5.0 mm crochet hook or the hook size that matches your yarn gauge. Don’t forget a yarn needle for weaving in ends and stitch markers if you want to keep track of rounds or changes in color.
Each owl square will measure approximately 6 inches by 6 inches (15 cm x 15 cm) when finished. To make a lap-size blanket of 40 x 60 inches (100 cm x 150 cm), you’ll need about 70 owl squares. That means preparing cuts or yarn lengths of approximately 20 yards per square, totaling around 1,400 yards of yarn for the full blanket.
The eyes and beak of the owl can be created with small fabric or felt appliqués, measuring 1.5 inches (4 cm) for each eye and 1 inch (2.5 cm) for the beak. These can be sewn or glued on after the crochet is finished.
For joining, cut fabric strips or crochet borders to join the squares. You’ll need enough material to create connecting strips of 2 inches wide (5 cm) between each square, and a border strip of 3 inches (7.5 cm) around the entire blanket.
Making the owl square begins with a simple circular motif that evolves into a square. This modular design makes it easy to repeat for a full owl blanket.
Begin with the magic ring and work 12 double crochets (dc) into the ring. Pull tight and join with a slip stitch. This forms the owl’s head and body center. Switch to a contrasting yarn color for the next round to give the owl dimension.
Round 2 involves making 2 double crochets in each stitch around for a total of 24 stitches. This helps the motif lie flat and build out the owl’s rounded shape. Chain 2 at the beginning of each round to keep your edges clean and even.
In Round 3, you’ll create the eye sockets using chain spaces. Start by crocheting 3 double crochets, chain 2, skip a stitch, and repeat. This forms open areas for adding fabric or crocheted eyes later. Continue this round with the same number of stitches, ensuring symmetry.
Round 4 is where you square the circle. In the corners, work 3 double crochets, chain 2, 3 double crochets to form a square edge. Fill the sides with regular double crochets to transition the circle into a neat square shape.
To make the owl’s face, crochet two small white circles (6 single crochets in the round) for the eyes and add black buttons or crochet a small black center. The beak is a triangle made with 3 half-double crochets in the same stitch, then fastened off and sewn between the eyes.
Finish each owl square with a border of single crochets in your background color to frame the owl design. This ensures all squares are uniform in size and easier to join together in the final owl blanket.
Once your owl squares are completed, it’s time to assemble them into a stunning owl blanket. Planning the layout before joining is essential to get a balanced and pleasing design.
Lay out all your owl squares on a flat surface. Arrange them by color or expression to add visual interest. You might choose to alternate background colors or create a gradient effect across the blanket.
Use the join-as-you-go method or crochet them together using slip stitches or whipstitch. If you’re using fabric strips instead of crochet joins, sew them using a quarter-inch seam allowance, ensuring the owl designs remain centered.
After all rows are joined, add a border around the entire blanket. A simple shell stitch border or scalloped edge adds a whimsical touch that complements the owl theme beautifully. Aim for a 3-inch-wide border to frame the blanket and balance the inner design.
Weave in all yarn tails carefully and secure any fabric appliqués with a few extra stitches to prevent wear and tear during washing. Double-check each owl square for secure embellishments and stitching before final use.
Blocking your finished owl blanket helps straighten the edges and unify the shape. Use steam or pin blocking to flatten the entire blanket, depending on your yarn’s fiber content.
The finished owl blanket / owl square project will not only be a delightful display of your crochet skills but also a cherished keepsake that brings warmth and charm to any room or gift recipient.
One of the joys of the owl blanket / owl square pattern is its versatility. You can adapt the pattern to suit various color schemes, occasions, or personal preferences, making each version unique.
Try using seasonal color palettes like pastels for spring, warm browns and oranges for autumn, or even red and green for a holiday-themed version. Each owl can reflect the personality or season with simple yarn changes.
Incorporate different stitch textures, such as puff stitches for the owl’s wings or bobble stitches for added dimension around the eyes. This variation gives each square a special character and tactile appeal.
For a baby-themed owl blanket, add soft fleece backing or line it with flannel for extra warmth and comfort. Safety eyes can be replaced with embroidered stitches to ensure baby-friendly use.
You can personalize each owl square by giving them unique expressions. Slight changes in the eye placement or eyelid embroidery can make some owls sleepy, others surprised, or even winking.
Add name embroidery or a small label to the corner of the blanket if you’re giving it as a gift. This gives your owl blanket a handmade, sentimental touch that recipients will treasure.
Finally, don’t be afraid to mix and match your owl squares with other motifs. Pair them with granny squares, hearts, or flowers to make a truly eclectic and artistic blanket.
Q: Can beginners make the owl blanket / owl square?
A: Yes! This project is perfect for adventurous beginners. As long as you’re comfortable with basic stitches like single and double crochet, you can follow the pattern step by step.
Q: How do I wash the owl blanket?
A: Hand wash or machine wash on a gentle cycle using cold water. Lay flat to dry, especially if you’ve added fabric or felt pieces.
Q: How many owl squares do I need for a full-size blanket?
A: For a throw blanket measuring about 40×60 inches, you’ll need around 70 owl squares. Adjust based on your desired final size.
Q: Can I sell items made with this pattern?
A: Yes, as long as it’s your handmade creation. Always credit the original pattern source if you’re following one, especially when selling online.
Q: Is it okay to mix yarn brands?
A: Absolutely. Just make sure the yarns are similar in weight and fiber content to maintain a uniform texture and size.
Q: What’s the best way to join the owl squares?
A: You can use a whipstitch, slip stitch join, or continuous join-as-you-go technique, depending on your preference and desired look.
The owl blanket / owl square is more than just a crochet project—it’s an opportunity to play with color, texture, and personality. Each square is like a tiny canvas where you bring whimsical owls to life, stitch by stitch. Whether you’re crafting it as a cozy gift or a treasured family heirloom, this blanket is sure to be loved for years to come.
We hope this guide inspired you to start your own owl blanket / owl square project! If you’ve made your own version, we’d love to hear from you. Share your experience, suggestions, or photos in the comments below!

