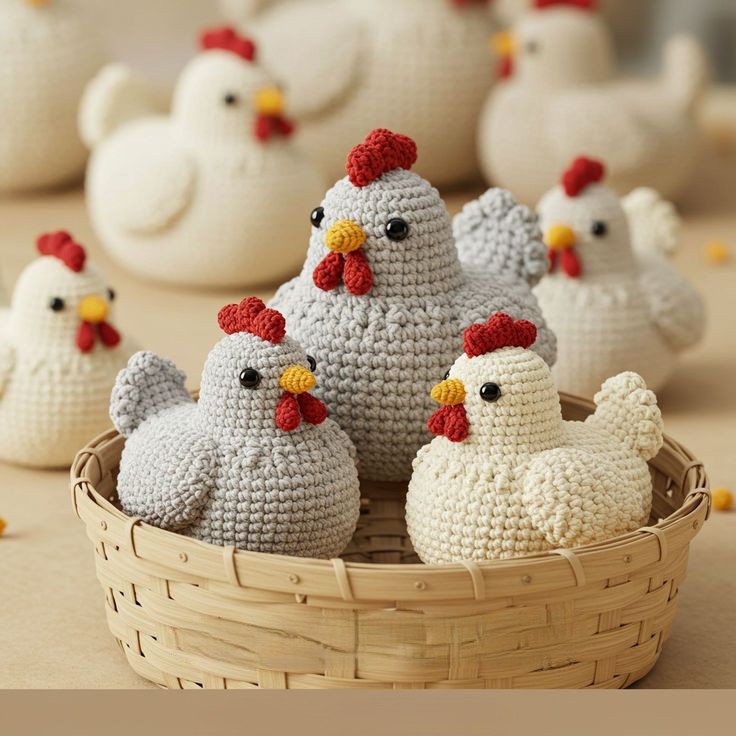
Crochet Amigurumi Chicken Pattern
Crochet Amigurumi Chicken Pattern is a delightful and creative way to bring yarn to life through the art of handmade toys. If you love crafting cute plush figures, this charming project combines imagination, technique, and relaxation into one rewarding experience.
Whether you are a beginner exploring the world of crochet or an experienced artisan looking for a new inspiration, creating a soft chicken amigurumi can be both fun and fulfilling. The beauty of this project lies in its versatility, allowing you to personalize colors, textures, and expressions.
The term Crochet Amigurumi Chicken Pattern refers to a structured set of instructions that guide you in making a small stuffed chicken using crochet techniques. Amigurumi is a Japanese art form focused on crafting small, stuffed yarn creatures, and it has become increasingly popular worldwide. This type of project is ideal for gifts, nursery decorations, seasonal ornaments, or even small handmade business ventures. By following a detailed pattern, you can create consistent and professional-looking results every time.
In this comprehensive guide, you will learn everything you need to know about the Crochet Amigurumi Chicken Pattern, from understanding materials to mastering shaping techniques. We will explore essential stitches, assembly methods, customization ideas, and finishing details that elevate your final piece. The goal is not only to teach you how to follow a pattern but also to help you understand the creative possibilities behind amigurumi design. Let’s dive into the world of crochet and discover how to craft your very own adorable chicken.
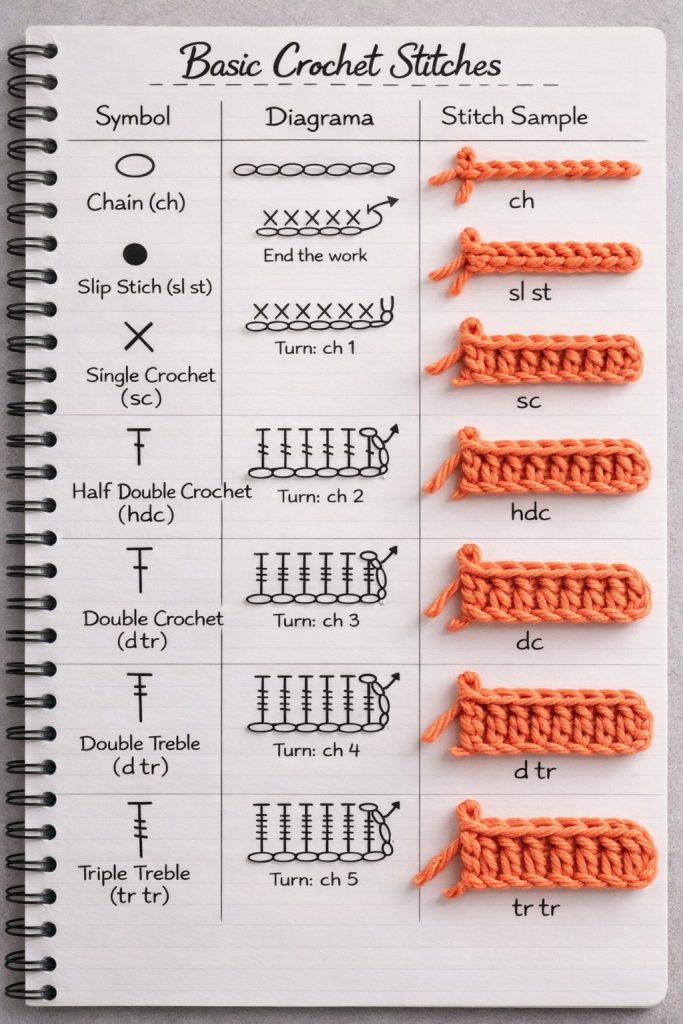
The foundation of a successful Crochet Amigurumi Chicken Pattern starts with understanding the basic stitches used in amigurumi. Most patterns rely heavily on single crochet stitches worked in continuous rounds. This technique creates a dense fabric that prevents stuffing from showing through. Mastering tension control is essential to ensure your chicken maintains a smooth and professional appearance.
Another important element of the Crochet Amigurumi Chicken Pattern is the magic ring, also known as the adjustable loop. This technique allows you to start crocheting in the round without leaving a hole at the center. It creates a tight, clean beginning that is ideal for forming the head or body of the chicken. Practicing this step will significantly improve your amigurumi projects.
Increasing and decreasing stitches play a crucial role in shaping the chicken. Increases help expand the round to form the body and head, while decreases allow you to taper and close sections neatly. The invisible decrease method is especially popular in amigurumi because it creates a smooth finish without noticeable gaps.
Choosing the right yarn is another essential consideration in any Crochet Amigurumi Chicken Pattern. Cotton yarn is often recommended because it holds its shape well and produces a clean stitch definition. However, acrylic yarn can also work beautifully, especially for softer textures. Selecting light yellow, white, or pastel shades gives your chicken a classic appearance.
The crochet hook size should match your yarn but often one size smaller than recommended on the yarn label. This ensures tight stitches and prevents stuffing from peeking through. A 2.5 mm to 3.5 mm hook is commonly used for small amigurumi projects. The correct hook size makes a significant difference in the final result.
Finally, understanding pattern terminology is key when working with a Crochet Amigurumi Chicken Pattern. Abbreviations such as sc (single crochet), inc (increase), dec (decrease), and sl st (slip stitch) are standard. Becoming comfortable with these abbreviations will help you read patterns smoothly and confidently.
Selecting high-quality materials is essential when working on a Crochet Amigurumi Chicken Pattern. The most important material is yarn, and choosing a medium or lightweight yarn ensures your chicken remains small and structured. Cotton yarn is preferred for its durability and stitch clarity, but premium acrylic blends can also provide excellent results.
Stuffing material significantly impacts the final appearance of your amigurumi. Polyester fiberfill is the most commonly used option because it is lightweight, washable, and hypoallergenic. When stuffing your chicken, add small amounts gradually to maintain even shaping and avoid lumps.
Safety eyes are often used in a Crochet Amigurumi Chicken Pattern to give the chicken a lively and expressive look. They come in various sizes, typically between 6 mm and 10 mm for small projects. If the toy is intended for very young children, embroidered eyes are a safer alternative.
You will also need a yarn needle for sewing the parts together. Amigurumi chickens are usually constructed in separate pieces, such as the body, wings, beak, and comb. Carefully stitching these parts ensures durability and a neat finish. Using the same yarn color for assembly creates seamless joins.
Stitch markers are extremely helpful when crocheting in continuous rounds. Since most Crochet Amigurumi Chicken Pattern instructions do not require joining rounds, marking the first stitch helps you keep track of progress. This simple tool prevents mistakes and saves time.
Small embroidery scissors are useful for trimming yarn ends neatly. Clean finishing touches contribute to a professional appearance. Having all tools prepared before starting your project makes the entire crafting process smoother and more enjoyable.
The construction of a Crochet Amigurumi Chicken Pattern usually begins with the body. Using a magic ring, you start with six single crochets and gradually increase each round to form a rounded base. Maintaining consistent tension during these rounds ensures symmetrical shaping.
After forming the widest part of the body, you continue working even rounds without increases. This builds height and gives your chicken a plump shape. The balance between increases and straight rounds determines the overall proportions of your amigurumi.
As you reach the top of the body, decreases are introduced to taper the shape. Stuffing should be added before the opening becomes too small. Gently pressing the fiberfill into corners helps create a firm but soft structure. Avoid overstuffing, as it may stretch the stitches.
The wings in a Crochet Amigurumi Chicken Pattern are typically made separately using small oval shapes. They are lightly stuffed or left flat depending on the design. Attaching them symmetrically on each side of the body enhances the visual balance of the finished piece.
The beak and comb add personality to your chicken. These small details are often created using bright orange and red yarn. Some patterns use simple triangles for the beak and small scalloped shapes for the comb. Careful stitching ensures these features stay secure.
Finally, facial details bring your project to life. Position the eyes evenly and check alignment before fastening them. If embroidering features, use small, controlled stitches for a polished result. These finishing touches transform a simple crochet piece into a charming handmade character.
One of the most enjoyable aspects of a Crochet Amigurumi Chicken Pattern is customization. You can experiment with different yarn colors to create unique chickens. Soft pastel shades produce a delicate appearance, while vibrant tones add a playful touch.
Adding accessories is another creative way to personalize your project. A tiny crocheted hat, scarf, or bow can give your chicken extra charm. These small additions require minimal extra yarn but significantly enhance the overall design.
You can also modify the size of your chicken by adjusting yarn weight and hook size. Thicker yarn and a larger hook will create a bigger plush, while thinner yarn results in a miniature version. This flexibility makes the Crochet Amigurumi Chicken Pattern suitable for various purposes.
Seasonal variations are particularly popular. For spring, pastel chickens symbolize renewal and joy. During holiday seasons, adding themed colors can transform your chicken into festive décor. Handmade decorations often add warmth and personality to celebrations.
Texture experimentation can also elevate your amigurumi. Using boucle or fuzzy yarn creates a fluffy appearance, mimicking real feathers. However, beginners may prefer smooth yarn for easier stitch visibility.
Finally, consider creating a small collection of chickens in different poses or expressions. By adjusting wing placement or facial features, you can design an entire handmade farm set. The creative possibilities within a single Crochet Amigurumi Chicken Pattern are virtually endless.
What skill level is required for a Crochet Amigurumi Chicken Pattern?
Most patterns are beginner-friendly, especially if you are comfortable with single crochet, increases, and decreases. Intermediate crafters can explore more detailed designs.
How long does it take to complete a Crochet Amigurumi Chicken Pattern?
On average, a small chicken can be completed within three to five hours, depending on experience and complexity.
What is the best yarn type for a Crochet Amigurumi Chicken Pattern?
Cotton yarn is highly recommended for durability and stitch definition, but acrylic yarn also works well for softer textures.
Can I wash an amigurumi chicken?
Yes, most can be gently hand-washed if made with washable yarn and polyester stuffing. Always check your yarn label for care instructions.
How do I prevent gaps in my stitches?
Using a slightly smaller hook than recommended and maintaining consistent tension will help create tight stitches.
Is it safe for babies?
If intended for babies, avoid plastic safety eyes and use embroidered features instead for added safety.
Can I sell items made from a Crochet Amigurumi Chicken Pattern?
In many cases, yes, but always check the pattern designer’s terms regarding commercial use.
What size hook should I use?
Typically, a 2.5 mm to 3.5 mm hook works well for small amigurumi projects, depending on yarn thickness.
How do I make my chicken stand upright?
Ensure even stuffing at the base and slightly flatten the bottom while shaping to improve balance.
Can beginners successfully complete this project?
Absolutely. With patience and practice, beginners can create beautiful results using a well-written Crochet Amigurumi Chicken Pattern.
Throughout this article, we explored every essential aspect of creating a Crochet Amigurumi Chicken Pattern, from understanding basic stitches and selecting materials to constructing and customizing your finished piece. You learned how increases and decreases shape the body, how proper stuffing enhances structure, and how small details like eyes and comb bring personality to your handmade chicken. By mastering these techniques, you can confidently create charming amigurumi projects that reflect your creativity and dedication.
The Crochet Amigurumi Chicken Pattern is more than just a set of instructions—it is an opportunity to express artistry, relax through crafting, and produce something meaningful by hand. Whether you are making a gift, decorating your home, or starting a small handmade business, this project offers endless possibilities for customization and joy.
Now it’s your turn to pick up your hook and start creating. I would love to hear your honest opinion about this guide. Did it help you feel more confident about starting your amigurumi journey? Share your thoughts, suggestions, and creative ideas—your feedback makes all the difference and inspires future projects.


