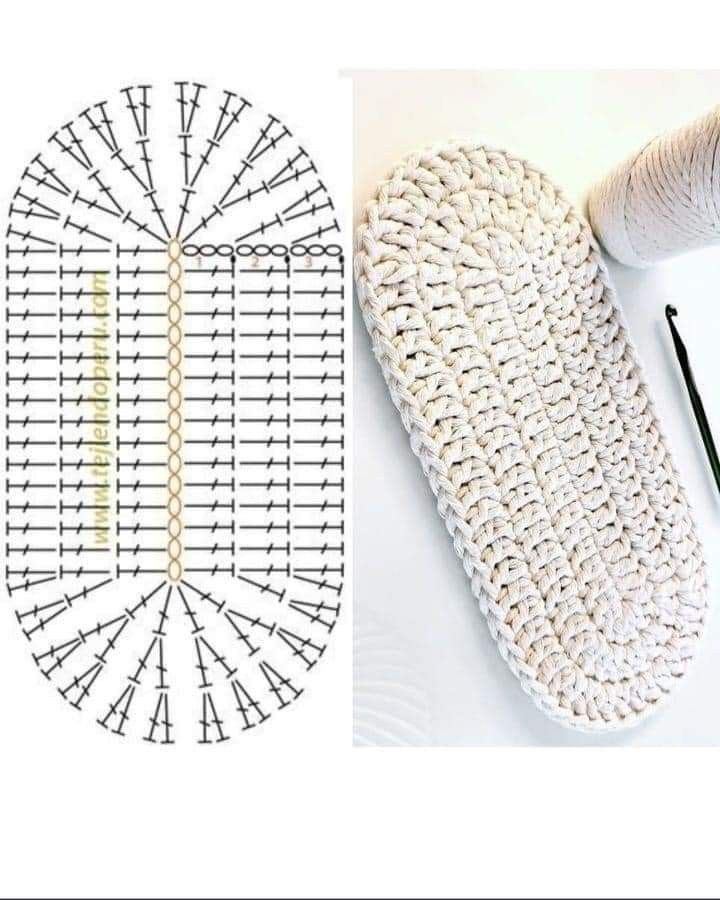
Crochet Oval Rug Base for Beginners Tutorial
If you are searching for the perfect handmade gift or a unique project for your little one, a Crochet Baby Diaper Cover is an excellent choice. This adorable accessory is not only practical but also stylish and customizable to any color or theme. Whether you’re an experienced crocheter or a beginner, creating a Crochet Baby Diaper Cover is a fun and rewarding project.
The beauty of a Crochet Baby Diaper Cover lies in its versatility. You can choose soft, baby-friendly yarn, customize sizes, and even add embellishments like buttons, bows, or animal ears. This project requires basic crochet techniques, making it accessible for most crafters.
In this detailed guide, you’ll learn everything you need to know about how to make a Crochet Baby Diaper Cover, including exact measurements, material lists, and a step-by-step pattern. Let’s dive in and create something adorable together!

Before starting your Crochet Baby Diaper Cover, it’s important to gather all necessary materials and prepare your yarn cuts correctly to ensure a perfect fit.
To begin, choose a soft, hypoallergenic yarn suitable for babies. Cotton or bamboo yarn is ideal because it’s breathable and gentle on the skin. A medium weight (worsted weight) yarn works perfectly for this project.
You will need a 4.0mm (G-6) crochet hook, a yarn needle for weaving in ends, and two buttons (about 1 inch in diameter) for fastening the diaper cover. Stitch markers are also helpful to keep track of your rows.
For fabric cuts and sizing, the following measurements are recommended for a newborn to 3-month size Crochet Baby Diaper Cover: width 14 inches, length 7 inches before folding. This will give a snug yet comfortable fit for babies.
If you are adjusting the size, simply increase the foundation chain and add rows accordingly. For a 3-6 month size, aim for 16 inches wide and 8 inches long. Always check the baby’s measurements for the best fit.
Before you start crocheting, double-check that your tension is even. Make a small swatch to test your gauge. For this pattern, the gauge is 16 stitches and 8 rows = 4 inches in single crochet.
Follow this easy-to-understand pattern to create your own Crochet Baby Diaper Cover. This pattern is beginner-friendly but also rewarding for advanced crocheters looking for a quick project.
Start by making the foundation chain. For a newborn size, chain 48. This forms the width of the diaper cover. Make sure the chain is not twisted.
Row 1: Single crochet (SC) into the second chain from the hook and across. You should have 47 stitches. Turn your work.
Row 2 to 16: Chain 1, single crochet across the row, turn. Repeat this until you have 16 rows total. This forms the rectangular body of your Crochet Baby Diaper Cover.
To shape the leg openings, fold the rectangle in half lengthwise. Count 10 stitches from each edge and place stitch markers. These marked sections will become the side flaps.
Work SC rows only between the markers for 6 rows to create the middle crotch section. This narrows the center of the diaper cover.
After completing the crotch section, reattach your yarn to one of the side sections. SC around the entire piece to create a clean edge. This step gives a professional look to your Crochet Baby Diaper Cover.
Once the main body is finished, it’s time to assemble the Crochet Baby Diaper Cover and add functional buttons for a snug fit. This step is quick but essential.
Fold the diaper cover by bringing the bottom (where the crotch section is) upward to meet the top edge. The side flaps should overlap slightly on the front.
Use a yarn needle to sew the crotch section to the back of the diaper cover. Make sure your stitches are secure but invisible from the outside for a clean finish.
Mark the position for the buttons on the front flaps. Generally, placing them about 1.5 inches from each corner works well. Sew the buttons securely with yarn or matching thread.
Create buttonholes by chaining 3-4 stitches at the edge of the flap during your edging round, then skip 3-4 stitches before continuing with SC. This forms neat and sturdy buttonholes.
Test the button placement by folding the cover and securing it. Adjust if necessary to ensure the Crochet Baby Diaper Cover fits snugly but comfortably.
Add any additional embellishments if desired. Cute options include crocheted flowers, bows, or animal ears to make the diaper cover even more adorable.
The beauty of a Crochet Baby Diaper Cover is how easy it is to personalize. Here are some creative tips to make each cover unique and special.
Change up the yarn colors to match themes, holidays, or baby showers. Striped patterns, pastel tones, or bold colors all work beautifully.
Add cute appliqués like hearts, stars, or tiny animals. These can be crocheted separately and sewn onto the finished diaper cover for an extra touch.
For a more textured look, switch from single crochet to half double crochet (HDC) or double crochet (DC) stitches. This will also slightly change the size, so adjust accordingly.
You can create matching accessories like baby booties, a beanie, or even a crochet baby bib using the same yarn to make a complete set.
If making diaper covers for summer, use lightweight cotton yarn. For cooler seasons, try blending cotton with soft acrylic for added warmth while keeping it baby-safe.
Consider making the Crochet Baby Diaper Cover reversible by using a different color for the inside edges, giving parents two looks in one.
Can beginners make a Crochet Baby Diaper Cover?
Yes! This project is beginner-friendly and uses basic stitches like single crochet. The simple rectangle shape makes it easy to follow.
What type of yarn is best for a Crochet Baby Diaper Cover?
Soft, breathable, hypoallergenic yarn like cotton or bamboo is best. Make sure it’s machine washable for convenience.
How do I adjust the size of the diaper cover?
Increase the foundation chain and number of rows proportionally. You can also use thicker yarn and a larger hook for bigger sizes.
Is the Crochet Baby Diaper Cover safe for babies?
Yes, as long as you use baby-safe materials and secure all buttons and embellishments tightly to avoid choking hazards.
How long does it take to crochet a baby diaper cover?
Typically, it takes 2 to 4 hours depending on your skill level and the size you’re making. It’s a quick and satisfying project.
Can I sell the Crochet Baby Diaper Covers I make?
Absolutely! Handmade diaper covers are popular at craft fairs and online shops. Just be sure to credit the pattern if required.
Creating a Crochet Baby Diaper Cover is a delightful and practical project that brings joy both to the maker and the recipient. With simple stitches, soft yarn, and a touch of creativity, you can craft a beautiful, functional piece perfect for any baby.
This pattern is highly customizable, allowing you to adjust sizes, colors, and add unique embellishments. Whether you’re making it for your own baby, as a baby shower gift, or to sell in your handmade shop, a Crochet Baby Diaper Cover is always a charming choice.
Did you enjoy this step-by-step guide? Share your thoughts, experiences, or ask any questions in the comments below. Happy crocheting!


