
Easter Bunny Basket - Crochet Pattern
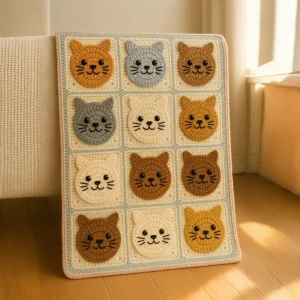
If you’ve been searching for the perfect Crochet Cat Face Tutorial, you’ve just found it! This complete guide shows you exactly how to crochet an adorable cat face step by step. Whether you’re planning to decorate a pillow, design an appliqué for bags, or make a fun wall hanging, this tutorial will walk you through every detail.
In this Crochet Cat Face Tutorial, you’ll discover which yarns and hooks work best, learn fabric cutting measurements, and understand how to stitch your cat’s eyes, whiskers, and sweet nose. With easy-to-follow instructions and practical tips, even beginners can confidently complete this charming project.
This article not only helps you master the Crochet Cat Face Tutorial pattern but also shows you how to personalize your design, ensuring your crochet project stands out. Ready to get started? Let’s dive in!

Before we jump into the Crochet Cat Face Tutorial, it’s important to select the right materials. Using the correct yarn and hook size makes all the difference in the final look and feel of your crochet cat face.
First, choose a soft cotton yarn in the colors of your choice. A light gray, cream, or even classic black is perfect for the main cat face, while pink and white yarn can highlight the ears and nose. This step ensures your Crochet Cat Face Tutorial creates a cozy and durable piece.
Next, select a 3.5 mm crochet hook, ideal for detailed work without making the stitches too tight. It keeps your stitches even and smooth. Always keep an extra hook nearby in case of breakage.
Now, let’s prepare the fabric pieces to give your crochet cat face a neat background. Cut a square fabric piece measuring 20 cm x 20 cm (approximately 8 inches x 8 inches). This square will serve as the base to attach your crochet work, creating a professional finish.
Additionally, prepare two smaller fabric rectangles measuring 5 cm x 8 cm (about 2 inches x 3 inches) each. These rectangles can help reinforce the ears or be used as backing patches for extra strength.
Finally, keep some felt pieces ready. Cut two small felt circles of 2 cm diameter each for the eyes and a triangle felt piece measuring about 2 cm on each side for the nose. These will be sewn or glued later to add character to your crochet cat face.
Before moving to the next step in this Crochet Cat Face Tutorial, check your materials: yarn, hooks, fabric squares and rectangles, and felt shapes. Organizing your workspace makes crocheting more relaxing and enjoyable.
Now comes the heart of our Crochet Cat Face Tutorial: crocheting the actual cat face! This part may look detailed, but take it slow and you’ll create a beautiful pattern.
Start by making a magic ring and crochet 6 single crochets (SC) into the ring. Pull tight and join with a slip stitch. This forms the center of the cat’s face.
In the next round, crochet 2 SC into each stitch around. You’ll have 12 stitches. This increases the circle gently, giving the face a balanced shape.
For round three, crochet 1 SC, then 2 SC into the next stitch and repeat all the way around. By the end, you’ll have 18 stitches. This keeps the circle flat, which is important for the face shape.
Continue increasing gradually in each round: in round four, make 2 SC, then 2 SC into the next stitch, and so on. Stop when your circle measures about 10–12 cm in diameter (about 4–5 inches), matching the fabric base size prepared earlier.
Once your base circle is complete, crochet two small triangles separately for the ears. Each starts with 4 chains, turning back to make 3 SC, then 2 SC, then 1 SC in the following rows to shape a neat triangle. Make two identical ears.
Finally, sew or crochet the ears to the top sides of the cat face circle. Make sure they are evenly placed and symmetrical. This step makes the cat face instantly recognizable and adorable.
This part of the Crochet Cat Face Tutorial might take some time, but it’s worth it! Take breaks if needed and enjoy watching your cat’s face take shape.
Your cat’s face wouldn’t be complete without charming details. In this part of the Crochet Cat Face Tutorial, we’ll add eyes, nose, and whiskers to bring your crochet cat to life.
Start by placing the felt circles you cut earlier as eyes. Position them evenly, about 3 cm apart in the center of the face. Sew them securely with matching thread or use fabric glue for faster work.
For the nose, take the small felt triangle and sew it about 1–2 cm below the eyes, centered on the face. This triangle gives the cat its friendly, curious look.
Next, use black embroidery thread or a thin black yarn to stitch the mouth and whiskers. For the mouth, start below the nose and curve the thread gently to form a soft “W” shape. Keep your stitches tight to avoid loose threads.
To add whiskers, stitch three short lines on each side of the cat’s face, starting about 1–2 cm from the nose. Make them around 2–3 cm long for balance. These details add personality to your cat face.
Optionally, you can use small black beads or safety eyes instead of felt circles for the eyes. They add a realistic shine, but be careful if your project is for a child to ensure everything is secure.
This section of the Crochet Cat Face Tutorial is where your creativity really shines! You can adjust colors, add blush with pink yarn, or even stitch eyelashes to personalize your cat.
We’ve reached the final stage of the Crochet Cat Face Tutorial: assembling your project and deciding how to use it! This part transforms your crochet piece into a functional or decorative item.
Start by positioning your crochet cat face onto the 20 cm x 20 cm fabric square prepared earlier. Pin it in place to keep it centered and flat.
Sew around the edges using small, invisible stitches or use fabric glue if you prefer a no-sew finish. Make sure it is securely attached, especially around the ears.
Once attached, fold the fabric edges inward by about 1 cm (½ inch) and press them flat. This creates a clean edge. Sew or glue these folded edges to the backing fabric or pillow base.
Now your crochet cat face can become part of a pillow cover, tote bag decoration, wall hanging, or even a cute coaster. It’s a versatile pattern you can use in countless ways.
For an extra touch, stitch your name or initials on the back, making it a special handmade gift. Handmade projects like this Crochet Cat Face Tutorial piece are always loved by family and friends.
Finally, take good care of your crochet work: wash gently by hand with mild soap and lay flat to dry. This keeps your cat face looking fresh and beautiful for years to come.
Congratulations! You’ve completed your own Crochet Cat Face Tutorial pattern from start to finish. By following these steps, you’ve learned to crochet a cute cat face, add detailed features, and assemble it beautifully.
Remember, the secret to a great Crochet Cat Face Tutorial is patience and creativity. Don’t worry if your first attempt isn’t perfect. Each time you try, your skills improve.
Use this pattern as inspiration to create cats in different colors, add fun accessories like bows, or even turn your design into keychains and appliqués.
If you enjoyed this tutorial, share it with fellow crochet lovers or in your favorite crafting groups. Spreading creativity makes our community even stronger.
Finally, tell us in the comments: how did your Crochet Cat Face Tutorial turn out? Do you plan to make more? We’d love to hear your thoughts and see your photos!


