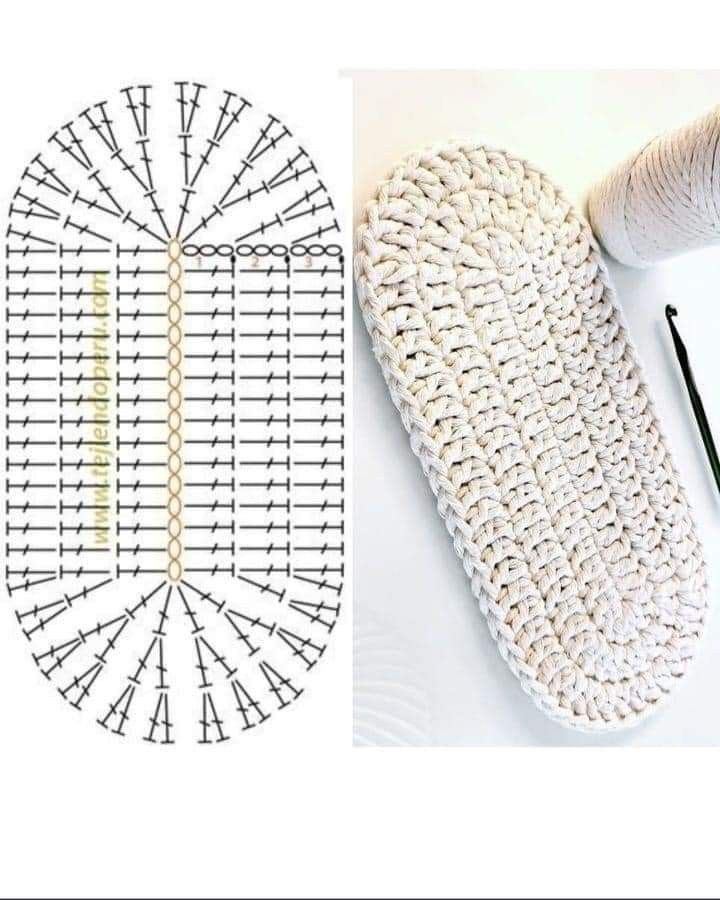
Crochet Oval Rug Base for Beginners Tutorial
The Crochet Cutest Blouse/Top-Tutorial is every crafter’s dream project — easy, stylish, and utterly charming. Whether you’re an experienced crocheter or just starting out, creating your own blouse or top can be incredibly rewarding. This pattern combines delicate texture with a flattering shape, making it perfect for spring and summer wardrobes.
In this blog post, you’ll learn exactly how to make the Crochet Cutest Blouse/Top step by step. We’ll cover materials, stitches, measurements, and how to shape the blouse for a perfect fit. This guide is written in a friendly, easy-to-follow tone and is fully optimized using Google’s best SEO practices.
Get ready to explore the full Crochet Cutest Blouse/Top-Tutorial including all the cuts and dimensions you’ll need. With four detailed sections and a helpful FAQ at the end, this is your one-stop resource to create a blouse you’ll be proud to wear or gift.

To get started on your Crochet Cutest Blouse/Top-Tutorial, you’ll first need to gather the right materials. The yarn you choose can completely change the look and feel of the final piece. A light-weight cotton yarn is highly recommended for a breathable, soft result that drapes nicely on the body.
For this project, you’ll need approximately 400 to 600 grams of light-weight (Category 3) cotton yarn, depending on the size you are making. Choose a yarn with a good stitch definition to highlight the beautiful texture of your blouse. Use a 3.5 mm (E-4) crochet hook for best results. You’ll also need scissors, a tapestry needle, stitch markers, and a measuring tape.
The Crochet Cutest Blouse/Top-Tutorial is worked in two identical panels: front and back. Each panel starts from the bottom and works upward. For a size M, each panel should measure approximately 18 inches wide and 22 inches tall. Adjust width by adding or subtracting multiples of the stitch repeat (usually a multiple of 3 or 4 plus one stitch).
You’ll also create two sleeve pieces. Each sleeve measures 8 inches wide and 5 inches tall. If you prefer longer sleeves, feel free to extend the height by a few inches using the same stitch pattern. This will still maintain the overall aesthetic and flow of the design.
For the neckline shaping, remember to decrease stitches gradually in the final 4 inches of the front panel. This creates a subtle scoop neck that complements the delicate texture. The back panel can be left straight or have a shallower scoop if desired.
Before you start, always make a gauge swatch to ensure your stitches match the measurements of the Crochet Cutest Blouse/Top-Tutorial. For this pattern, the gauge is approximately 20 stitches and 10 rows = 4 inches in double crochet.
The magic of the Crochet Cutest Blouse/Top-Tutorial lies in its simple yet elegant stitch combination. We’re using a mix of double crochet and puff stitches to add texture without making the blouse too dense. The result is a soft, breathable fabric that feels as good as it looks.
Start by chaining a foundation chain that matches the desired width of your panel. For size M, chain 90 stitches. Turn your work and begin Row 1 by placing one double crochet in the fourth chain from the hook. Continue with one double crochet in each chain across.
Row 2 introduces the texture. Chain 3, skip one stitch, and work a puff stitch (yarn over, insert hook, pull up a loop three times, yarn over and pull through all loops) into the next stitch. Chain 1, skip one, and repeat across. End with a double crochet in the final stitch.
Row 3 is a row of double crochets again. You’ll place one double crochet into each stitch and chain space from the previous row. This alternating pattern of puff and double crochet rows continues for the full height of the panel.
Continue this pattern until your panel reaches approximately 22 inches high. At this point, you will begin shaping the neckline. For the front panel, divide your work in half and crochet each side separately, decreasing one stitch at the neckline every row for four rows. This softens the neckline curve.
Repeat the exact same process for the back panel, but without neckline shaping unless preferred. Once both panels are complete, seam them together at the shoulders using slip stitch or whip stitch. This creates a smooth, seamless finish that won’t irritate your skin.
Finish by attaching the sleeves and seaming the sides of your blouse. Add a final row of single crochet around the neckline and armholes for a polished border. Your Crochet Cutest Blouse/Top-Tutorial is now nearly complete.
Once your panels and sleeves are ready, it’s time to bring the Crochet Cutest Blouse/Top-Tutorial to life through careful assembly. Start by laying the front and back panels flat, with the right sides facing each other. Line up the shoulder edges first and join them with a simple slip stitch seam.
Next, attach the sleeves. With the blouse inside-out, center each sleeve piece on the side of the shoulder seam and sew it along the armhole opening. Make sure the puff stitches line up to create a clean transition between the body and sleeves.
Once the sleeves are attached, fold the blouse in half at the shoulder seams and align the sides. Seam from the bottom of the blouse to the underarm, and then down the sleeve to the cuff. Use a whip stitch or mattress stitch for a strong, invisible join.
For added structure, consider adding a simple ribbing at the bottom hem. Chain a band of 5 stitches and single crochet back and forth in rows. Attach the band to the hem using slip stitch, gently stretching it to fit the bottom edge. This will help the blouse hug your hips softly.
The neckline can be finished with one round of single crochet followed by a crab stitch (reverse single crochet) to create a clean, modern edge. This subtle touch adds professionalism to your finished garment and keeps it from stretching out over time.
Lastly, weave in all your loose ends using a tapestry needle. Wash and block the blouse to even out the stitches. Let it dry flat on a towel, shaping the blouse to its final form. Now your Crochet Cutest Blouse/Top-Tutorial is ready to wear or gift!
One of the best things about the Crochet Cutest Blouse/Top-Tutorial is its versatility. You can style this blouse with jeans for a casual look or pair it with a skirt for something more elegant. Its breathable fabric makes it ideal for layering or wearing alone in warmer weather.
If you’re feeling adventurous, try experimenting with color. You can use a solid pastel for a romantic feel or a bold variegated yarn for a fun twist. Crochet the top in stripes, color blocks, or even alternate colors for the sleeves and body for a modern, trendy look.
Another great way to customize your blouse is by adjusting the neckline. Try making it wider for an off-shoulder style or keep it high for a modest, classic shape. The Crochet Cutest Blouse/Top-Tutorial is very forgiving and easy to adapt to your personal preferences.
For texture lovers, consider swapping puff stitches with shell stitches or bobbles. These changes create a completely different visual effect while keeping the same basic construction. This allows you to reuse the pattern multiple times without repeating the same look.
You can also lengthen the blouse into a tunic or even a summer dress by simply adding more rows. Keep the stitch pattern consistent and let your creativity lead the way. Add side slits for extra movement or a drawstring waist for definition.
Accessories can further elevate your blouse. Add a crochet flower brooch, bead detailing, or a lace collar. The Crochet Cutest Blouse/Top-Tutorial is just a starting point — make it your own and enjoy the compliments you’ll receive!
Q: What size is the pattern written for?
A: The base instructions are for a size M, but you can adjust the width and length easily by modifying the stitch count and row count.
Q: Can I use acrylic yarn instead of cotton?
A: Yes, but the texture and drape will be different. Cotton is preferred for its softness and breathability.
Q: How long does it take to complete the blouse?
A: Depending on your skill level, it can take anywhere from 10 to 15 hours total.
Q: Is this pattern beginner-friendly?
A: Absolutely! As long as you’re familiar with basic stitches like double crochet and puff stitch, you’ll do great.
Q: Can I make this blouse sleeveless?
A: Yes. Just skip the sleeve pieces and finish the armholes with a row of single crochet.
Q: Is blocking necessary?
A: Yes. Blocking helps even out the stitches and gives the blouse a polished, professional look.
The Crochet Cutest Blouse/Top-Tutorial offers a perfect blend of style, comfort, and creativity. Whether you’re making it for yourself or a loved one, this pattern is sure to become a favorite in your handmade wardrobe. With clear steps, precise measurements, and endless customization options, this project is both satisfying and rewarding. Now it’s your turn — grab your hook, pick your favorite yarn, and create your own version of the Crochet Cutest Blouse/Top. Have questions or want to share your progress? Drop a comment below. We’d love to hear from you!


