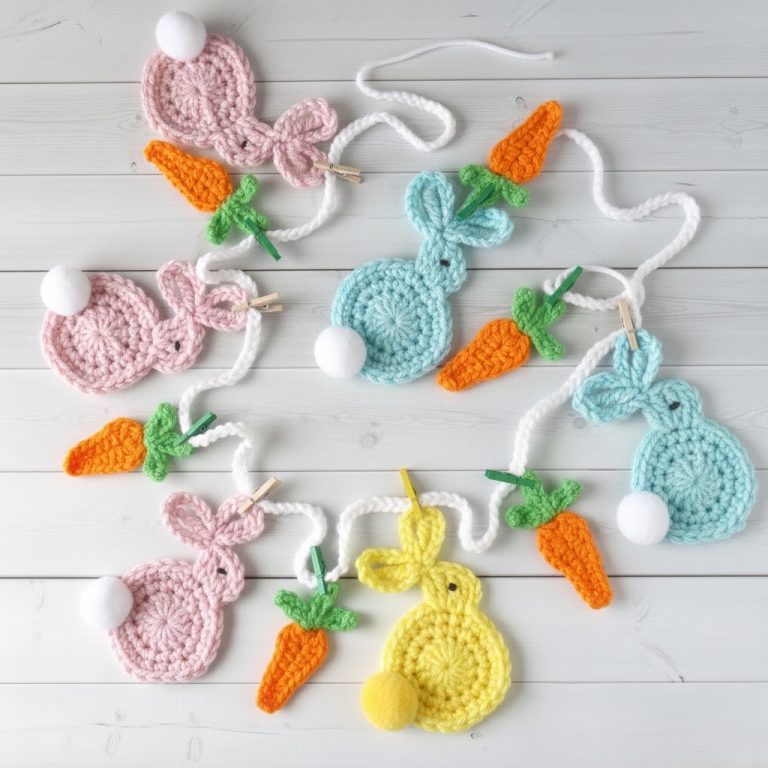
Crochet Easter Garland Tutorial
Crochet Easter garland Tutorial is the perfect seasonal project for crafters who want to add a handmade touch to their spring décor while practicing creativity and mindful stitching.
This charming decoration combines pastel colors, playful motifs, and delicate textures to create a festive atmosphere that feels both warm and welcoming. Whether you are decorating your living room, preparing for an Easter brunch, or simply looking for a relaxing weekend craft, this project offers the ideal balance between simplicity and elegance. Throughout this complete guide, you will learn everything you need to confidently create your own beautiful garland.
Creating a Crochet Easter garland Tutorial project is not only about decorating a space; it is also about celebrating handmade artistry. Crochet allows you to transform simple yarn into delicate shapes such as eggs, bunnies, flowers, and carrots. Each stitch builds texture and personality, and the repetitive rhythm of crocheting can be calming and rewarding. Even beginners can achieve impressive results by following clear steps, understanding basic stitches, and choosing harmonious color palettes that reflect the joy of the Easter season.

In this detailed Crochet Easter garland Tutorial, we will explore essential materials, fundamental crochet techniques, design variations, and finishing touches that make your garland stand out. You will also discover helpful SEO-friendly crafting insights, practical tips for beginners, and creative ways to personalize your decoration. By the end of this article, you will feel confident enough to design a stunning Easter garland that brings warmth and charm into your home.
A successful Crochet Easter garland Tutorial begins with understanding the core concept of a garland. A garland is a decorative strand composed of multiple crochet motifs attached to a single chain or cord. These motifs can include Easter eggs, small bunny silhouettes, mini flowers, or carrots. The key to a cohesive look is maintaining consistent sizing and spacing between each element. Planning your design before starting helps ensure a balanced and visually appealing result.
The most common stitches used in a Crochet Easter garland Tutorial include chain stitch, single crochet, double crochet, and slip stitch. These foundational stitches allow you to build simple yet detailed shapes. Beginners should practice tension control to maintain uniformity throughout the motifs. Consistent tension ensures that each decorative piece lies flat and looks professional once assembled into the garland.
Yarn selection plays a crucial role in the overall appearance of your Crochet Easter garland Tutorial. Lightweight cotton yarn is often preferred because it holds shape well and provides crisp stitch definition. Pastel tones such as soft pink, baby blue, mint green, pale yellow, and lavender are popular choices for Easter decorations. However, you can customize the palette according to your home décor style.
Hook size also impacts the final result of your Crochet Easter garland Tutorial. A smaller hook creates tighter stitches and firmer shapes, while a slightly larger hook produces softer and more flexible motifs. Always check your yarn label recommendations and test a small swatch before committing to the full project. This simple preparation step prevents uneven sizing and frustration later.
Another important aspect of a Crochet Easter garland Tutorial is motif consistency. If you are creating multiple identical shapes, such as eggs or flowers, count your stitches carefully in each round. Small miscounts may alter the shape and cause noticeable size differences. Using stitch markers can help maintain accuracy, especially when working in the round.
Finally, understanding assembly techniques is essential in any Crochet Easter garland Tutorial. Once your motifs are complete, you will attach them to a long crochet chain or a separate cord. Even spacing creates a polished look. You may sew motifs directly onto the chain using a yarn needle or crochet them together with slip stitches for a seamless finish.
Preparation is a fundamental step in a well-executed Crochet Easter garland Tutorial. Gathering all materials before beginning ensures a smooth crafting experience. You will need cotton yarn in various pastel colors, a crochet hook suitable for your yarn weight, scissors, a yarn needle, and stitch markers. Having everything within reach minimizes interruptions and keeps your creative flow steady.
When planning your Crochet Easter garland Tutorial, consider the length of the final decoration. Measure the area where you intend to hang the garland, whether it is a mantelpiece, window frame, or wall. This measurement helps determine how many motifs you need to crochet. A standard decorative garland often ranges between 1.5 to 2 meters in length, depending on placement.
Color coordination is a design element that elevates any Crochet Easter garland Tutorial. Choosing two or three complementary shades can create a harmonious and elegant result. Alternatively, mixing multiple pastel hues produces a playful and vibrant aesthetic. Try laying out your yarn colors together before starting to visualize the final effect.
Blocking is another helpful technique in a Crochet Easter garland Tutorial. After completing your motifs, lightly dampen and shape them on a flat surface to dry. Blocking enhances stitch definition and ensures that each piece maintains its intended form. This step is especially important for flat motifs like eggs or flowers.
Durability matters when crafting a reusable decoration in your Crochet Easter garland Tutorial. Secure all ends properly by weaving them in tightly with a yarn needle. Trim excess yarn carefully to avoid unraveling. Well-finished edges and secure stitches will allow you to store and reuse your garland year after year.
Time management can also improve your crafting experience during the Crochet Easter garland Tutorial. Breaking the project into smaller sessions makes it more enjoyable and less overwhelming. For example, crochet all motifs first, then dedicate a separate session to assembly and finishing details.
To begin your Crochet Easter garland Tutorial, start by crocheting simple egg shapes. Create a magic ring, then work single crochet stitches evenly in rounds to form an oval shape. Gradually increase and decrease stitches to achieve a smooth egg contour. Keep each egg approximately the same size for a cohesive look.
Next in your Crochet Easter garland Tutorial, experiment with decorative surface details. You can add small stripes, polka dots, or embroidered flowers using contrasting yarn. These subtle embellishments make each motif unique while maintaining a unified theme. Decorative stitching adds texture and visual interest.
If you want to include bunny shapes in your Crochet Easter garland Tutorial, begin with a small oval base and attach two elongated ear shapes. Keep the design minimal to maintain clarity at a small scale. Adding tiny stitched eyes or a simple nose can enhance the charm without overwhelming the piece.
Floral motifs are another popular addition in a Crochet Easter garland Tutorial. Crochet small five-petal flowers using chain stitches and slip stitches in the round. These flowers can be layered or paired with tiny leaf shapes to create a fresh spring-inspired design that complements eggs and bunnies beautifully.
Once all motifs are complete in your Crochet Easter garland Tutorial, create a long foundation chain for assembly. Ensure the chain is sturdy but not too tight. Leave extra length at both ends to tie or hang the garland securely. Even spacing between motifs typically ranges from 5 to 10 centimeters, depending on your preference.
Finally, attach the motifs carefully in your Crochet Easter garland Tutorial. Use a yarn needle to sew them onto the chain or crochet them directly into place with slip stitches. Check alignment frequently to maintain straight positioning. Once assembled, gently stretch the garland to ensure balance and symmetry.
One of the joys of a Crochet Easter garland Tutorial is the opportunity to personalize the design. You can incorporate letters spelling “Happy Easter” by crocheting simple block shapes. This customization adds a festive message while keeping the handcrafted aesthetic intact.
Another creative idea in your Crochet Easter garland Tutorial is incorporating texture through puff stitches or bobble stitches. These raised elements add dimension and make the decoration visually dynamic. Use them sparingly to maintain elegance while enhancing tactile appeal.
You may also experiment with themed color palettes in your Crochet Easter garland Tutorial. For a rustic look, opt for neutral tones like cream, beige, and soft sage. For a modern twist, consider muted pastels paired with white. The color scheme greatly influences the mood of your decoration.
Seasonal embellishments can elevate your Crochet Easter garland Tutorial further. Small wooden beads placed between motifs or tiny satin bows attached to eggs create a refined finish. Ensure embellishments are securely fastened and lightweight to maintain balance.
Storage considerations are often overlooked in a Crochet Easter garland Tutorial. After the holiday season, gently fold the garland and store it in a breathable fabric bag. Avoid plastic containers that trap moisture. Proper storage keeps the yarn fresh and prevents deformation.
Lastly, consider gifting a handmade decoration created through your Crochet Easter garland Tutorial. Handmade items carry sentimental value and showcase craftsmanship. A thoughtfully crafted garland can become a cherished seasonal keepsake for friends or family members.
What skill level is required for a Crochet Easter garland Tutorial?
A Crochet Easter garland Tutorial is suitable for beginners who understand basic stitches such as chain and single crochet. More advanced embellishments can be added as skills improve.
How long does it take to complete a Crochet Easter garland Tutorial?
The time required depends on the number of motifs and complexity of the design. On average, a simple Crochet Easter garland Tutorial can be completed over a weekend.
What type of yarn is best for a Crochet Easter garland Tutorial?
Cotton yarn is recommended for a Crochet Easter garland Tutorial because it provides structure and durability while maintaining vibrant color definition.
Can I wash my Crochet Easter garland Tutorial decoration?
Yes, gently hand wash your Crochet Easter garland Tutorial using mild detergent and lay it flat to dry. Avoid machine washing to preserve shape.
How do I prevent my motifs from curling in a Crochet Easter garland Tutorial?
Proper tension and blocking are key steps in a successful Crochet Easter garland Tutorial. Blocking helps motifs maintain flatness and symmetry.
Can I sell items made from a Crochet Easter garland Tutorial?
Handmade items created from your own Crochet Easter garland Tutorial design can typically be sold, but always ensure originality and avoid copying protected patterns.
In this comprehensive Crochet Easter garland Tutorial, we explored the essential materials, foundational techniques, step-by-step instructions, and creative variations needed to craft a charming seasonal decoration. From selecting the right yarn and hook to assembling evenly spaced motifs, every detail contributes to a polished and festive result. By applying consistent tension, thoughtful color coordination, and careful finishing techniques, you can create a garland that enhances your Easter décor with warmth and personality.
Now it is your turn to bring this Crochet Easter garland Tutorial to life. I would love to hear your honest opinion about this guide. Did it help you feel confident about starting your project? Do you have suggestions or creative ideas to share? Leave your sincere feedback and inspiration, and let’s continue celebrating the beauty of handmade crochet together.


