
Easter Bunny Basket - Crochet Pattern
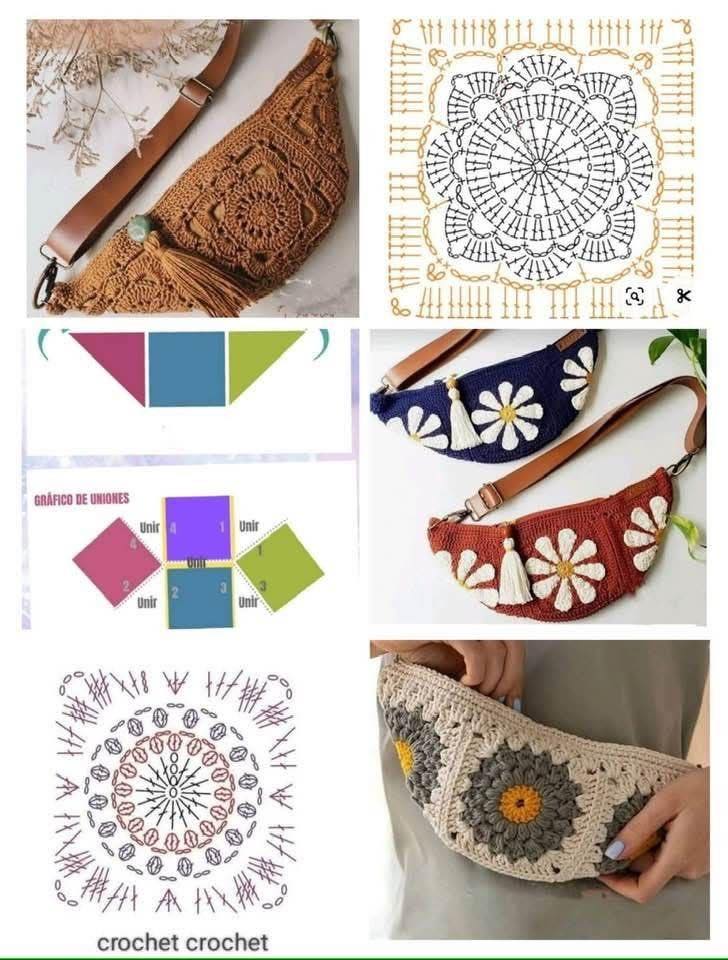
The crochet fanny pack granny square trend is making a huge comeback, blending vintage charm with modern-day practicality. This handmade accessory is both fashionable and functional, perfect for carrying your essentials while keeping your hands free. With its colorful motifs and nostalgic appeal, the granny square design gives this fanny pack a unique and personalized touch.
Whether you’re heading to a music festival, going on a casual outing, or just want a convenient way to carry your phone and wallet, a crochet fanny pack granny square is the perfect DIY project. It allows you to showcase your crochet skills while creating something useful and trendy. Plus, it’s a fun way to use up leftover yarn and experiment with different color combinations.
In this article, you’ll learn how to make your own crochet fanny pack granny square from scratch. We’ll guide you through the entire process—from creating the granny squares, to assembling the pack, adding the lining, and finishing with a belt. We’ve also included all fabric cuts and measurements to ensure your fanny pack is durable and well-constructed.
The first step to making a crochet fanny pack granny square is gathering the right materials. This ensures that your project will be sturdy, functional, and visually appealing.
Start by choosing a medium-weight (worsted weight) cotton or cotton-blend yarn. Cotton yarn is perfect for a crochet fanny pack granny square because it’s durable, breathable, and holds its shape well. Pick at least 3 to 5 colors that complement each other for a vibrant, eye-catching design.
You’ll need a 4.0 mm crochet hook for working your granny squares. This size creates tight, sturdy stitches which are ideal for a bag. Be sure to have scissors, a yarn needle for weaving in ends, and a stitch marker to help you count rows if needed.
For the lining, choose a medium-weight cotton fabric. You’ll cut two pieces measuring 9″ x 6″ (23cm x 15cm) for the inside of the pouch. This will add strength and structure to your crochet fanny pack granny square.
You’ll also need a zipper or magnetic snap for the closure. A 7-inch (18cm) zipper is ideal. Finally, for the belt, you can use a crocheted strap, a store-bought adjustable strap, or a thick ribbon—each should measure about 38″ to 45″ (96cm to 114cm), depending on waist size.
Now let’s dive into creating the granny squares that form the core of your crochet fanny pack granny square. These classic motifs are easy to make and customizable.
Start by creating a basic granny square. Chain (ch) 4, and join with a slip stitch to form a ring. Then work Round 1: ch 3 (counts as 1 double crochet), 2 double crochets (dc) into the ring, ch 2, 3 dc into the ring, ch 2 repeat from * to * twice more, join with a slip stitch.
For Round 2, slip stitch to the next ch-2 space, ch 3, 2 dc in the same space, ch 2, 3 dc again in the same space (this forms a corner). Ch 1, in next corner space work 3 dc, ch 2, 3 dc repeat around, join with a slip stitch.
Repeat for Round 3 and optionally Round 4 if you want slightly larger squares. You’ll need 4 granny squares measuring approximately 4.5″ x 4.5″ (11.5cm x 11.5cm) each to form the front and back of the pouch.
Weave in all ends and block the squares if necessary. Blocking helps straighten the edges and gives a polished look to your crochet fanny pack granny square.
Lay out your squares and choose how you’d like them arranged. This is the fun part where your color choices come to life.
Once your granny squares are ready, it’s time to assemble the pouch portion of your crochet fanny pack granny square. Begin by joining the squares together using slip stitch or whip stitch along the edges, creating a rectangle 2 squares wide by 2 squares high.
Fold the rectangle in half with the right sides facing each other. Sew the side seams using the same yarn and a yarn needle or continue crocheting with a single crochet seam for added texture.
Turn the pouch inside out so the right side is now facing. You’ll now have a small envelope-shaped bag made from your granny squares.
To add the lining, sew the two 9″ x 6″ cotton fabric pieces along three sides (right sides together), then turn it inside out. Insert the lining into the crochet pouch and hand stitch it along the top edge, just below where your zipper or closure will go.
Attach the zipper or magnetic snap carefully. For a zipper, pin or baste it in place before sewing to prevent puckering. You can hand stitch or use a sewing machine, depending on your tools and skills.
Your crochet fanny pack granny square is nearly complete! All that’s left is the strap.
The final step in your crochet fanny pack granny square project is adding the belt or strap. This determines how the pack will be worn—around the waist or across the chest.
If crocheting a strap, chain a length of approximately 38″ to 45″ (96cm to 114cm), then work in half double crochet (hdc) across for 4 to 5 rows to create a sturdy band. Alternatively, you can use webbing, a belt, or a thick ribbon as your strap.
Sew the strap ends securely to the back of the pouch. Place them about 1″ (2.5cm) from the side edges for balance and comfort.
If you want an adjustable strap, consider adding D-rings or a slider buckle. This adds functionality and helps your crochet fanny pack granny square fit different waist sizes.
Now’s the time to add any decorative elements. Small tassels, buttons, or embroidered initials give your fanny pack a custom flair. Just make sure everything is securely fastened.
Give your fanny pack a final inspection. Check that all seams are tight, the zipper moves smoothly, and the strap is secure. Your handmade accessory is now ready to use or gift.
The crochet fanny pack granny square isn’t just a nostalgic throwback—it’s a versatile and stylish addition to your wardrobe. It’s perfect for crafters of all skill levels and offers endless ways to personalize your design.
These fanny packs are lightweight, eco-friendly, and ideal for minimalist lifestyles. You’ll love the satisfaction of creating something beautiful and functional with your own hands.
They also make excellent gifts! Whether for birthdays, holidays, or craft markets, a crochet fanny pack granny square is always a hit. Its retro charm appeals to all ages.
Moreover, this project is a great stash-buster. You can use leftover yarn to create colorful, one-of-a-kind pieces that reduce waste and save money.
It’s also a relaxing, creative outlet. The repetitive motion of crocheting granny squares can be meditative, helping to reduce stress and improve focus.
Best of all, making a crochet fanny pack granny square teaches you valuable techniques you can apply to other accessories and garments. It’s a perfect stepping stone to more advanced crochet projects.
Q: How long does it take to make a crochet fanny pack granny square?
A: On average, it takes about 4–6 hours depending on your skill level and speed.
Q: Can I use acrylic yarn for this project?
A: Yes, but cotton yarn is recommended for structure and durability.
Q: Is it beginner-friendly?
A: Absolutely! Basic granny squares and simple assembly make this a great project for beginners.
Q: How can I make my fanny pack waterproof?
A: Use a water-resistant fabric for the lining or apply fabric waterproofing spray.
Q: Can I add extra pockets?
A: Yes! You can stitch small pockets inside the lining or crochet an external pocket.
Q: What other closures can I use besides a zipper?
A: Magnetic snaps, buttons, or Velcro strips also work well.
Creating a crochet fanny pack granny square is more than just a crafting project—it’s an opportunity to mix style, function, and handmade charm. With its nostalgic design and practical use, this accessory is both trendy and timeless. Whether you’re crocheting for yourself or gifting someone special, this DIY fanny pack is sure to be a favorite. Give it a try and share your creations—your creativity deserves to be worn proudly!


