Crochet Dragon Scarf Pattern
Crochet granny square Mini Bag Purse Keychain is more than just a small craft project; it’s a charming blend of classic crochet tradition and modern-day functionality. By turning timeless granny squares into an adorable mini bag purse keychain, you create a piece that is practical, stylish, and perfect as a gift or personal accessory.
In this tutorial, we’ll guide you through every step to create your own Crochet granny square Mini Bag Purse Keychain. You’ll learn about choosing the right yarn, measuring and cutting your fabric lining, assembling the pieces, and finishing the mini bag so it looks polished and professional.
Whether you’re a beginner eager to explore your creativity or an experienced crocheter looking for a quick yet satisfying project, this Crochet granny square Mini Bag Purse Keychain tutorial is made to be easy to follow and fun. Get your hook ready, pick your favorite yarn colors, and let’s begin!

To start your Crochet granny square Mini Bag Purse Keychain, gather your essential materials. You’ll need medium-weight cotton yarn in at least two contrasting colors to highlight the granny square pattern. A 3.5mm crochet hook works perfectly for this project to keep the stitches tight and the mini bag sturdy.
Cut two small squares of fabric for the lining, measuring approximately 8 cm x 8 cm (3.1 x 3.1 inches) each. This size will match your finished granny squares while leaving space for seaming. Use a light cotton fabric to keep the purse lightweight.
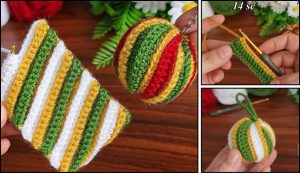
The charm of the Crochet granny square Mini Bag Purse Keychain comes from the classic granny square motif. Start by chaining four and slip-stitching to form a ring. Next, chain three (counts as the first double crochet), and crochet two double crochets into the center. Continue following the standard granny square pattern until you reach a square of about 8 cm x 8 cm. Make two identical granny squares.
Choose contrasting yarn colors for your granny squares, like white and mustard or navy and beige. This contrast adds visual interest and makes the mini bag look unique. Remember, the small size of the Crochet granny square Mini Bag Purse Keychain makes it perfect for using leftover yarn scraps.
Once your granny squares are complete, steam them lightly or block them overnight to make them flat and even. This step ensures your mini bag will have clean edges and look professionally finished.
Before moving on to sewing, check that your fabric squares align with your crochet squares. Adjust the fabric size if necessary, but keep it close to 8 cm x 8 cm to prevent bulkiness. This preparation helps your Crochet granny square Mini Bag Purse Keychain keep its cute square shape.
Place the two granny squares with the right sides facing out. Join them by crocheting around three sides using single crochet stitches, keeping the top open. This step forms the pocket of your Crochet granny square Mini Bag Purse Keychain.
Make sure your stitches are tight and even. Since this is a small item, neatness is key for the finished look. Using a matching color for this seam helps keep the design cohesive.
Once joined, insert the fabric lining squares inside the granny square pocket. Fold the raw edges of the fabric inward by about 0.5 cm and hand-stitch them to the crochet edges using a fine needle and thread. This lining keeps coins or small items from slipping through the crochet holes.
To reinforce the top edge, add a single crochet border around the open side of your mini bag. This not only strengthens the opening but also adds a clean finishing touch. Consider using your contrasting yarn color for this step to highlight the edge.
At this point, your Crochet granny square Mini Bag Purse Keychain is starting to take shape! Test the lining and seams gently to make sure everything is secure. A little extra time spent here prevents unraveling later.
For extra charm, crochet a small flap by chaining 8–10 stitches and attaching it to the back side of the mini bag. This flap can fold over the opening and close with a snap or small button sewn to the front. It keeps your items safe inside.
Now it’s time to transform your mini bag into a functional Crochet granny square Mini Bag Purse Keychain. Use a metal jump ring to attach the top of the mini bag to a sturdy keychain ring. Slip the jump ring through the top stitches at the center back of your mini bag.
If you’d like, crochet a short strap to connect the mini bag to the keychain ring instead. Chain around 6–8 stitches, then attach both ends securely to the top corners of the bag. This soft strap adds flexibility and a handmade touch.
Decorate your Crochet granny square Mini Bag Purse Keychain with small embellishments. Try adding a tassel, tiny crochet flower, or bead for a playful and personalized look. These details make your mini bag stand out and show your creativity.
Make sure all decorations are sewn or fastened securely. Since this is a keychain, it might be tossed into bags or pockets, so durability matters.
Your mini bag is now ready to carry small items like coins, lip balm, or even tiny earbuds. It’s a charming accessory that combines classic crochet style with everyday functionality.
Remember to test the final product: pull gently on the keychain ring, open and close the flap, and make sure your Crochet granny square Mini Bag Purse Keychain is sturdy and secure. A little final quality check keeps it looking new for longer.
After you’ve completed your Crochet granny square Mini Bag Purse Keychain, consider making more in different color themes. Pastel shades, bold rainbow stripes, or elegant neutrals all bring unique styles to the same pattern.
You can also change the granny square design slightly: use a flower center, a heart motif, or textured stitches to create new looks. The versatility of the granny square means endless design options.
Try making a slightly larger version by adding an extra round to your granny squares, bringing them to about 10 cm x 10 cm (4 x 4 inches). This size can hold more items but still works as a cute mini purse keychain.
If you’re comfortable with sewing, add a small zipper to the top edge instead of the crochet flap. This makes the Crochet granny square Mini Bag Purse Keychain even more secure for storing tiny valuables.
Use leftover yarn wisely. Since the mini bag uses very little yarn, it’s perfect for reducing waste and turning scraps into something beautiful and practical.
Finally, consider gifting your creations! These mini bags make perfect handmade gifts for birthdays, holidays, or craft fairs. Attach a small tag with care instructions and your name to make them feel extra special.
Creating a Crochet granny square Mini Bag Purse Keychain is more than just following a pattern – it’s about expressing your creativity, using your favorite yarn colors, and transforming a simple granny square into a functional and stylish accessory.
This project is small but filled with thoughtful details: the fabric lining to keep items secure, the keychain attachment for practical use, and the option to add your personal flair through decorations.
By following this tutorial, you’ll not only learn how to crochet and assemble a mini bag but also discover how easy it is to make beautiful, handcrafted pieces.
Whether you make one for yourself, for friends, or to sell at craft fairs, each Crochet granny square Mini Bag Purse Keychain carries your creativity and care.
We hope this guide inspired you to start your own project today. Share your finished mini bags with us, and let’s keep the art of crochet alive and colorful!

