Crochet Oval Rug Base for Beginners Tutorial
Crochet Oval Rug Base for Beginners Tutorial is the perfect starting point for anyone who wants to create a beautiful, functional, and handmade rug from scratch. If you are new to crochet and looking for a project that combines simplicity with impressive results, learning how to make an oval rug base is a wonderful choice.
This guide was carefully designed to walk you step by step through the process, while helping you understand the essential techniques behind a strong and well-shaped base. By the end of this complete Oval Rug Base for Beginners Tutorial, you will feel confident enough to continue experimenting with your own designs.
Creating an oval rug base is not only about following instructions. It is about understanding how stitches grow, how increases work, and how tension affects the overall structure. When beginners jump directly into complex patterns, frustration often follows. That is why this Crochet Oval Rug Base for Beginners Tutorial focuses on clarity, patience, and structure. You will learn how to build a balanced oval shape that lays flat and looks professional, even if this is your very first rug project.
The beauty of mastering an Oval Rug Base for Beginners Tutorial is that it opens the door to countless variations. Once you understand the base, you can change yarn types, textures, colors, and sizes. You can turn the base into a bathroom rug, a nursery decoration, a kitchen accent piece, or even a decorative mat. The strong foundation you learn here will serve as the starting point for many future crochet creations.
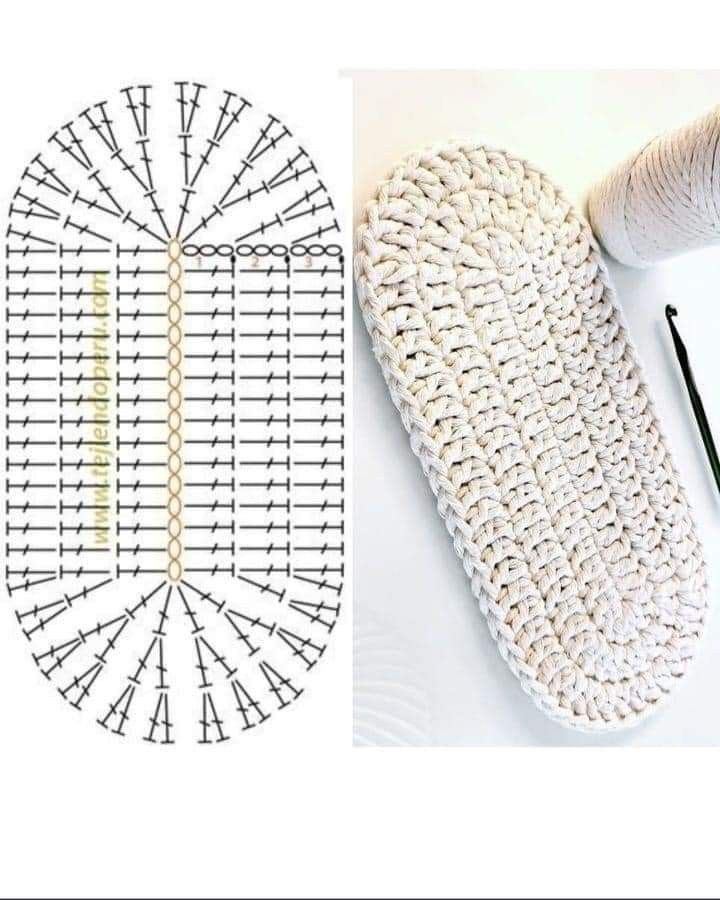
Before diving into stitches, it is important to understand what makes an oval rug base different from a circular one. In a circular rug, increases are distributed evenly around the entire round. In an oval rug, increases are concentrated at the two curved ends. This is the key principle explained in every good Oval Rug Base for Beginners Tutorial, and it is essential for achieving the correct shape.
The base of an oval rug usually begins with a foundation chain. This chain determines the length of your rug. The longer the chain, the longer your oval will be. In this Crochet Oval Rug Base for Beginners Tutorial, beginners are encouraged to start with a moderate chain length, so it is easier to manage and count stitches accurately.
After completing the foundation chain, you will work along one side of the chain, then create multiple stitches in the last chain to form the rounded end. This increase at the end is what allows the oval to curve naturally. Understanding how many stitches to place at each end is crucial in any Oval Rug Base for Beginners Tutorial.
Once you reach the other side of the chain, you will crochet along the opposite side, effectively working in an oval around the foundation. At the final chain, you will again create several stitches in the same space to form the second rounded end. These increases must mirror each other to maintain symmetry.
Another important element in an Oval Rug Base for Beginners Tutorial is stitch consistency. Beginners often pull yarn too tightly or too loosely. Maintaining even tension ensures that your rug lies flat instead of curling upward or forming waves. Practice and patience are essential here.
Finally, understanding stitch markers can make your learning process smoother. Placing markers at the curved ends helps you track where increases happen. This simple habit can prevent counting mistakes and make your Crochet Oval Rug Base for Beginners Tutorial experience far less stressful.
Choosing the right materials is a fundamental part of a successful Oval Rug Base for Beginners Tutorial. While crochet can be done with almost any yarn, rugs require thicker and more durable fibers. Cotton yarn or t-shirt yarn are popular choices because they create sturdy and washable rugs.
The crochet hook size should match your yarn type. Most yarn labels recommend a hook size, but for rugs, many crocheters prefer using a slightly smaller hook to create tighter stitches. This makes the rug more compact and durable, which is especially important in high-traffic areas.
Scissors and a yarn needle are basic tools you will need. The yarn needle is used to weave in ends neatly once your rug base is complete. A clean finish is part of what makes a beginner project look polished and professional in any Crochet Oval Rug Base for Beginners Tutorial.
Stitch markers, as mentioned earlier, are highly recommended. They help identify the start of each round and the increase points at the ends of the oval. For beginners, this small tool can dramatically reduce confusion and counting errors.
It is also helpful to have a flat surface where you can lay your work down regularly. Checking that your rug base lies flat is one of the most important quality checks in an Oval Rug Base for Beginners Tutorial. If you notice curling, you may need more increases. If you notice ruffling, you may have added too many.
Lastly, patience is an invisible but essential tool. Beginners sometimes rush through stitches, but taking your time ensures accuracy. Remember that this Crochet Oval Rug Base for Beginners Tutorial is about building skills, not just finishing quickly.
To begin your Crochet Oval Rug Base for Beginners Tutorial, start by making a foundation chain. For practice, you might chain 21 stitches. This number can vary depending on your desired rug length, but keeping it manageable helps beginners focus on technique.
In the second chain from the hook, work a single crochet stitch. Continue placing one single crochet in each chain across until you reach the final chain. This forms the first straight side of your oval base.
In the last chain, place three single crochet stitches in the same stitch. These multiple stitches create the rounded end of the oval. This increase technique is one of the central lessons in any Oval Rug Base for Beginners Tutorial.
Now, rotate your work slightly and begin crocheting along the opposite side of the foundation chain. Place one single crochet in each stitch as you move back toward the starting point. This forms the second straight side of the oval.
When you reach the first chain where you began, place two additional single crochet stitches in the same space. This completes the second rounded end. Join with a slip stitch to the first stitch of the round if you are working in joined rounds.
For the next round, continue placing one stitch in each regular stitch and increase by placing two stitches in each of the increase stitches from the previous round. Keep your increases focused at the curved ends. As explained throughout this Crochet Oval Rug Base for Beginners Tutorial, balanced increases are the secret to a flat, smooth oval.
One common issue in an Oval Rug Base for Beginners Tutorial is curling edges. If your rug base starts to curl upward like a bowl, it usually means you need more increases at the curved ends. Adding one extra increase in each rounded section can often solve the problem.
On the other hand, if your rug begins to ripple or look wavy, you may have too many increases. In this case, try reducing the number of stitches added at each end. Balance is essential when following a Crochet Oval Rug Base for Beginners Tutorial.
Another frequent mistake is losing track of stitch count. Beginners sometimes forget where the increase section begins and ends. Using stitch markers to mark the first and last increase stitches can make your progress much clearer.
Uneven tension can also affect the final result. If some sections look tighter than others, practice maintaining consistent hand pressure. A relaxed grip and steady rhythm help improve stitch uniformity throughout your Crochet Oval Rug Base for Beginners Tutorial.
Twisting the foundation chain at the start can create an uneven base. Always double-check that your chain is straight before crocheting into it. This small detail makes a big difference in the overall structure of the rug.
Finally, do not be discouraged by imperfections. Every beginner makes mistakes. The goal of this Oval Rug Base for Beginners Tutorial is learning and improvement. With each attempt, your confidence and skill level will grow.
What is the best yarn for an oval rug base?
Cotton yarn and t-shirt yarn are excellent choices because they are durable, washable, and provide structure. They are especially suitable for beginners following an Oval Rug Base for Beginners Tutorial.
How do I keep my oval rug flat?
Ensure that increases are placed correctly at both curved ends. If the rug curls, add increases. If it ripples, reduce increases. Consistent tension also plays a major role.
Can beginners really make a crochet rug?
Yes, absolutely. A Crochet Oval Rug Base for Beginners Tutorial is specifically designed to simplify the process. By focusing on basic stitches and gradual increases, even first-time crocheters can succeed.
How long does it take to finish an oval rug base?
The time depends on the size and your experience level. A small practice rug can be completed in a few hours, while larger rugs may take several days.
Do I need to block my crochet rug?
Blocking is optional but can help improve shape and stitch definition. For thicker yarn rugs, laying the piece flat and gently shaping it by hand is often enough.
What stitch is best for beginners?
Single crochet is highly recommended for any Oval Rug Base for Beginners Tutorial because it creates tight, sturdy stitches that are ideal for rugs.
In this complete Crochet Oval Rug Base for Beginners Tutorial, you learned how to build a strong and balanced oval foundation step by step. We explored the importance of correct increases, consistent tension, proper materials, and common mistake prevention. By understanding the structure behind the oval shape, you now have the skills needed to create a rug base that lays flat and looks beautiful.
Mastering this Oval Rug Base for Beginners Tutorial is more than just finishing one project. It is about building confidence and opening the door to many creative possibilities in crochet. With practice, you can experiment with different stitches, textures, and sizes to create unique rugs for your home.
I would love to hear your honest opinion about this tutorial. Did it help you understand the process more clearly? Do you have suggestions or questions you would like answered in future guides? Share your thoughts and let’s continue learning and growing together in the world of crochet.


