
Easter Bunny Basket - Crochet Pattern
The crochet pine tree is a charming and creative way to bring the warmth of handmade crafts into your holiday decor. Whether you’re new to crocheting or already an experienced maker, creating your own crochet pine tree adds a special touch that feels both personal and timeless. These delightful trees can be small enough to hang as ornaments or large enough to decorate a mantel or table centerpiece.
Working on a crochet pine tree project lets you combine creativity with practicality, using leftover yarns and small fabric scraps. The best part? Each tree you create can reflect your unique style, from classic green to bold, festive colors. This makes them perfect gifts, too!
In this article, we’ll walk you through a detailed crochet pine tree pattern, from choosing your materials to step-by-step instructions, complete with fabric cuts and measurements. Let’s get started and turn yarn and fabric into a beautiful holiday decoration you’ll love for years to come.

Creating a crochet pine tree might seem complex, but it’s truly a fun and rewarding process when broken down into simple steps. Before you start, gather your materials: green worsted-weight yarn, a 3.5mm crochet hook, stuffing (like polyester fiberfill), and a few fabric scraps for the base.
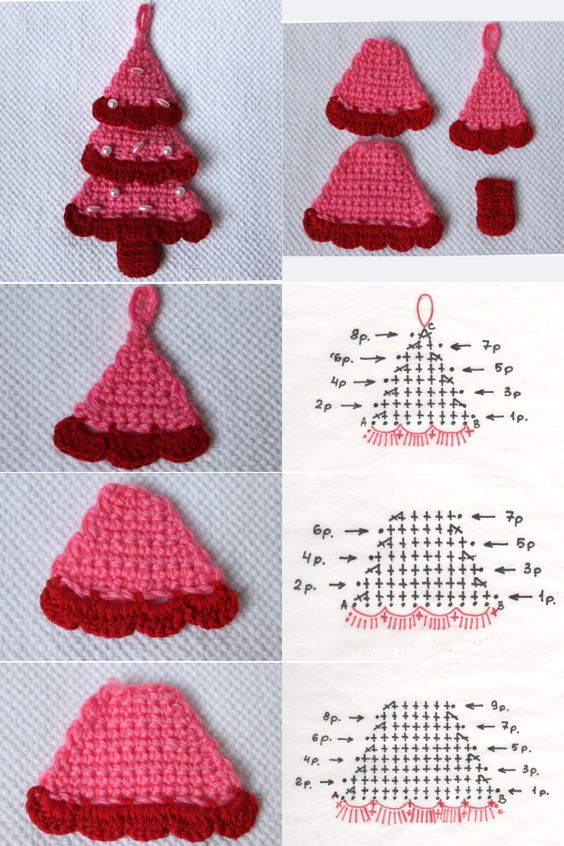
Start with a magic ring and crochet 6 single crochets (sc) into the ring. Pull the ring tight to close. In the next round, make 2 sc into each stitch around, increasing to 12 stitches. This forms the tip of your crochet pine tree.
Continue building your tree by working in rounds. For round 3, crochet 1 sc in the first stitch, 2 sc in the next, repeating until you have 18 stitches. For round 4, crochet 1 sc in each of the next 2 stitches, 2 sc in the next, repeating until you have 24 stitches. Keep increasing until your crochet pine tree base is the size you’d like.
To shape the tree, stop increasing and work even in sc rounds until your piece measures around 6 inches tall. Stuff lightly as you go to keep the shape firm. Finish by decreasing: 1 sc in the next stitch, sc2tog, repeating until the top is closed.
For the trunk, cut a 3×3 inch square of brown fabric, roll it tightly, and sew to the bottom of your crochet pine tree. This adds a realistic and rustic touch to your design.
To make your crochet pine tree look balanced and professional, carefully cut and prepare your fabrics before assembly. Start with a piece of cotton or felt in green measuring about 8×8 inches for each tree, depending on your chosen size.
Cut the green fabric into a triangular shape to match the finished height of your crochet pine tree (for example, a triangle with a 6-inch base and 6-inch height). This helps give extra structure inside the crochet stitches.
For the base, cut a circle of brown felt or fabric about 2 inches in diameter. This will cover the bottom opening of the crochet pine tree and hide the stuffing. It’s a small detail that makes a big difference.
If you’d like to add a star to the top, cut a small 1×1 inch yellow felt star. You can sew or glue this to the tip of your crochet pine tree after finishing the crochet work.
Gather your yarn: use worsted-weight green yarn for the body of the tree and brown yarn or fabric for the trunk. Make sure your yarn is smooth and even to keep the stitches neat.
You’ll also need a 3.5mm crochet hook, scissors, a yarn needle for sewing pieces together, and polyester stuffing. Having all your materials ready makes the crochet process smoother and more enjoyable.
Lastly, prepare some small buttons or beads if you’d like to decorate your crochet pine tree with ornaments. Sew them securely so they won’t come loose over time.
Adding extra details can turn your crochet pine tree into a truly special piece. Consider crocheting small circles in red or gold yarn to create miniature ornaments. Attach them evenly around the tree with a few stitches.
If you prefer, you can add a garland by crocheting a thin chain in metallic yarn. Wrap it around your crochet pine tree loosely, securing it in a few spots to keep it in place.
For texture, use the bobble stitch in some of the rounds to create a pinecone effect. This stitch adds dimension and makes your crochet pine tree look fuller and more realistic.
Another lovely detail is to lightly brush the tips of your finished tree with white fabric paint or glue and sprinkle with fine glitter. This gives the appearance of fresh snow and makes the crochet pine tree sparkle under holiday lights.
Add a star or pom-pom to the top for a classic finishing touch. You can crochet the star separately and sew it on or simply glue a small felt star.
Lastly, think about adding a sturdy cardboard or felt circle to the bottom of your tree before closing it. This helps the crochet pine tree stand upright on a shelf or mantel.
Your handmade crochet pine tree is versatile and can be used in many creative ways around your home. Place several sizes together on a shelf to create a charming mini forest.
Make smaller crochet pine tree ornaments by reducing the number of stitches and rounds in your pattern. Attach a loop of yarn or ribbon to hang them on the Christmas tree.
For gifts, consider making a set of three crochet pine tree decorations in different shades of green. Wrap them in kraft paper with twine for a rustic, handmade presentation.
You could also use your crochet pine tree as part of a centerpiece. Arrange them with candles, pinecones, and holiday lights on a tray to create a festive table display.
Teachers, neighbors, and family members will appreciate receiving a crochet pine tree as a thoughtful, handcrafted gift. It shows you put time and care into something unique.
Lastly, think about donating a few of your finished crochet pine tree projects to local craft fairs, charity sales, or community events. Handmade items often bring warmth and smiles wherever they go.
Making your own crochet pine tree isn’t just about the final decoration—it’s about enjoying each step of the creative process. From carefully choosing fabrics and yarns to adding tiny details like stars or beads, each decision helps make your tree unique.
With a little time and patience, you can crochet trees in all sizes and colors, perfect for decorating your home or gifting to loved ones. Plus, it’s a sustainable way to use leftover yarn and fabric scraps.
Follow the detailed pattern and tips shared in this article, and don’t be afraid to add your own creative twists. Whether you make one or an entire forest, your crochet pine tree creations will surely become cherished holiday treasures.
If you try this pattern, share your finished trees with friends or on social media. Handmade crafts inspire others and help keep traditional skills alive. Happy crocheting!


