
Easter Bunny Basket - Crochet Pattern
Looking to add a rustic and cheerful accent to your handmade decor? The Crochet Rooster Ornaments Pattern is a delightful choice for crafters of all levels. With bright colors and a touch of whimsy, these ornaments are perfect for country kitchens, festive holiday trees, or even as thoughtful handmade gifts. This article will guide you through creating your own charming rooster ornaments with simple steps and a detailed explanation.
The Crochet Rooster Ornaments Pattern combines practicality and fun. Whether you’re a seasoned crocheter or a curious beginner, this pattern offers a manageable and satisfying project. You’ll be working with basic stitches, a few color changes, and light shaping to create adorable rooster figures that capture attention and bring a smile to anyone’s face.
This blog post includes a complete Crochet Rooster Ornaments Pattern, a list of required materials, precise measurements, and expert tips to ensure you create a successful finished product. Let’s dive into this cozy crochet adventure and bring these feathery friends to life, one stitch at a time.

To begin your Crochet Rooster Ornaments Pattern, gather all necessary materials and prepare your fabric cuts carefully. Having everything ready will make the process smoother and more enjoyable.
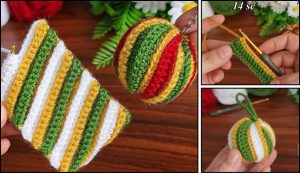
You’ll need worsted weight yarn in multiple colors: red, white, yellow, brown, orange, and black. Red and yellow will be used for the comb and beak, white for the body, brown or orange for the wings, and black for the eyes. Cotton yarn works best for crisp stitches and a firm finish.
Choose a 3.5 mm crochet hook (E/4), perfect for tight, small ornament work. You’ll also need a yarn needle for sewing parts together, scissors, and a bit of stuffing material like polyester fiberfill to add shape to the body.
For each rooster ornament, plan on small yarn cuts:
– White yarn: 15g for the body
– Red yarn: 5g for the comb and wattle
– Yellow yarn: 3g for the beak
– Brown or orange yarn: 6g for wings and tail
– Black yarn: small amount for eyes
Cut a 4″ x 4″ square of felt (optional) for the bottom base if you prefer a firmer structure. You can also use fabric scraps to line the inside or reinforce the tail.
If you want to hang your Crochet Rooster Ornaments, prepare a 6″ strand of jute or ribbon for each piece. Secure this in the top section before closing the body.
Have your stitch markers ready to help track rows or mark shaping points. With all your supplies cut and sorted, you’re ready to move on to the creative fun!
The base of the Crochet Rooster Ornaments Pattern is the body, which is worked in the round. You’ll use simple stitches and easy increases to form an egg-like shape that gives your rooster its charming form.
Start with white yarn and make a magic ring. Work 6 single crochets (sc) into the ring. Pull tight to close and slip stitch (sl st) to join. This forms the top of the rooster’s head.
In Round 2, work 2 sc into each stitch around (12). In Round 3, alternate 1 sc and 2 sc in next stitch (18). Continue increasing in this pattern until you reach 30 stitches around by Round 5.
From Round 6 to Round 10, work even in sc, maintaining the round’s stitch count. This builds the height of the rooster’s body. For a more chubby look, you can add one or two extra rounds here.
Begin decreasing in Round 11 by working sc2tog every 4 stitches (24). Round 12: sc2tog every 3 stitches (18). Stuff the body with fiberfill while the opening is still wide.
In Round 13, continue decreasing: sc2tog every 2 stitches (12), and in Round 14: sc2tog every stitch (6). Fasten off, weave in the end. Your rooster body is now complete.
Once your rooster body is ready, it’s time to add personality with fun crochet details. Each small part brings your Crochet Rooster Ornaments Pattern to life and adds character to the ornament.
Comb: Use red yarn. Chain 7, then work 1 sc in second chain from hook, 1 hdc in next, 1 dc in next 3 stitches, and sl st in the last. This forms a curved crest. Sew it onto the top of the rooster’s head with red yarn.
Beak: With yellow yarn, chain 3. Work 1 single crochet, 1 half double crochet, and 1 double crochet. Fold into a cone shape and stitch onto the front center of the head.
Wings: Make two small half circles in orange or brown. Chain 5, sc in second chain from hook, hdc, dc, and tr (treble). Fasten off and sew to the sides. Adjust the position slightly upward for a more dynamic pose.
Tail Feathers: Chain 8, work back with sc, hdc, dc, tr, dc, hdc, sc. Repeat three times in different colors. Sew all pieces at the lower back part, fanning them out for flair.
Eyes: Use black yarn and embroider two small circles, or use tiny safety eyes for a polished finish. You can place them just above the beak for a classic cute rooster look.
These fine details are what make each Crochet Rooster Ornament unique. Don’t be afraid to experiment with color combinations to give your flock distinct personalities!
Once you’ve completed your Crochet Rooster Ornaments Pattern, you’ll want to find creative ways to display your finished roosters. These mini crafts are versatile, colorful, and great for seasonal or year-round decor.
Hang them on a rustic twig or branch as a wall or window decoration. Grouping several roosters together creates a vibrant, farmhouse-style visual that brings warmth to any space.
Use them as part of your holiday decorations. Roosters are symbols of awakening and positivity, making them meaningful additions to Christmas trees, Easter baskets, or springtime garlands.
Attach your crochet roosters to gift bags or wrapping as reusable handmade gift tags. It’s a thoughtful way to add personality and make your presents stand out.
Create a set of Crochet Rooster Ornaments in matching or complementary colors and display them in a wooden bowl or basket as part of a kitchen centerpiece or shelf arrangement.
They also make fantastic party favors or craft fair items. Lightweight and charming, they appeal to those who love rustic decor and handmade touches.
Don’t forget to photograph your finished rooster ornaments! Share your work on social media or in crafting communities to inspire others and showcase your crochet talent.
The beauty of the Crochet Rooster Ornaments Pattern is in its flexibility. With a few changes, you can customize your roosters to match any theme, style, or color scheme.
Try using variegated yarn for the tail feathers to give your rooster a more dynamic and colorful look without having to change yarns repeatedly.
Add little accessories like a miniature bow tie, scarf, or even a crochet egg for themed holiday versions—perfect for Easter or Thanksgiving crafts.
Adjust the size of your rooster by switching yarn weights and hook sizes. For tiny miniatures, use lace weight yarn and a 2.25 mm hook. For jumbo rooster plushies, opt for bulky yarn and a 5 mm hook.
If you’re making a set for kids, consider using safety eyes and ensuring all parts are securely stitched. You can also replace the stuffing with cotton for a softer, squishier feel.
Want to turn your ornament into a fridge magnet or pin? Just attach a magnet or pin backing using strong glue. These make cute and useful handmade gifts!
Lastly, always block your pieces gently with steam or a damp towel to shape the wings and tail before assembling. This finishing touch makes a big difference in the final appearance.
Crochet Rooster Ornaments Pattern projects offer not only fun but also a rewarding sense of accomplishment. Whether you’re gifting them or keeping them, these charming creations will bring joy wherever they go.
What skill level is required for this pattern?
The Crochet Rooster Ornaments Pattern is beginner-friendly. It uses basic stitches like single crochet, double crochet, and simple shaping techniques.
How long does it take to make one ornament?
Each rooster takes about 1.5 to 2 hours to complete, depending on your crochet speed and experience level.
Can I sell items made from this pattern?
Yes! Feel free to sell finished products you make using this pattern. Just avoid selling or distributing the written pattern itself.
What type of yarn is best for this project?
Cotton yarn is highly recommended for its structure and stitch definition. Acrylic can also work if that’s what you have available.
Can I machine wash these ornaments?
It’s better to hand wash these handmade items to preserve the stitching and detailing.
Can I scale the pattern for a larger version?
Yes, simply increase your hook and yarn size proportionally to make a bigger rooster.
The Crochet Rooster Ornaments Pattern is a charming, simple, and customizable project that brings warmth and creativity to any space. With easy-to-follow steps, minimal materials, and plenty of room for personalization, these ornaments make perfect gifts, decorations, or market items.
Whether you’re decorating a holiday tree, looking for a farmhouse vibe, or wanting to create a flock of cheerful handmade animals, this pattern offers all the inspiration you need. Don’t forget to have fun with color combinations and experiment with different textures!
We’d love to hear from you—have you tried the Crochet Rooster Ornaments Pattern? Share your thoughts, tips, or finished creations in the comments below!


