
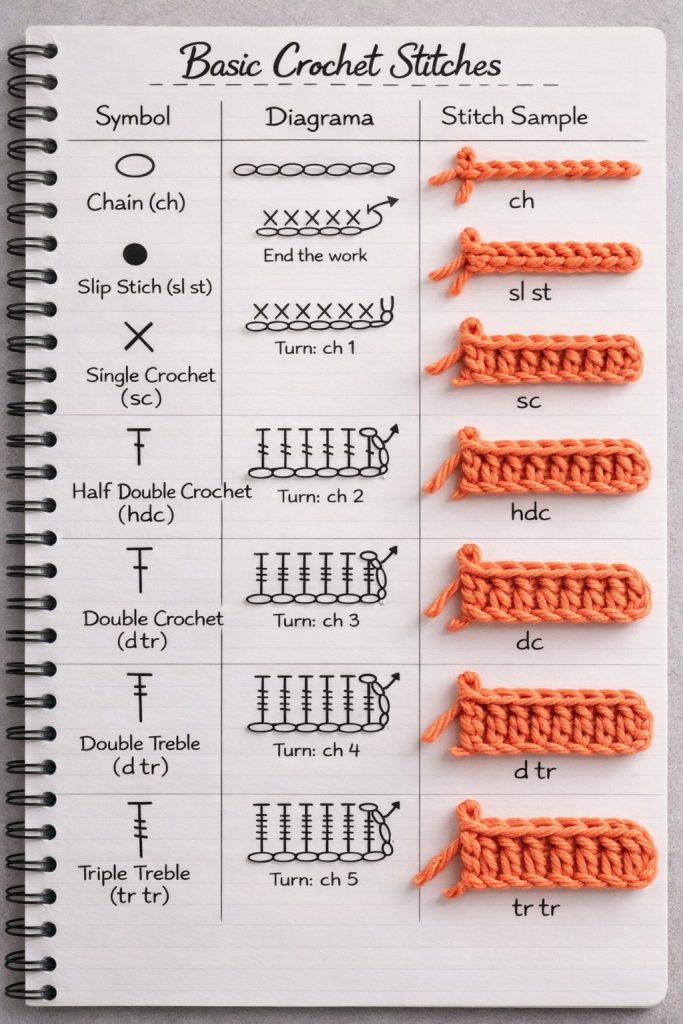
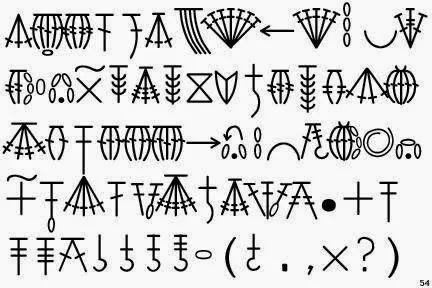
Crochet Mesh Stitch Pattern
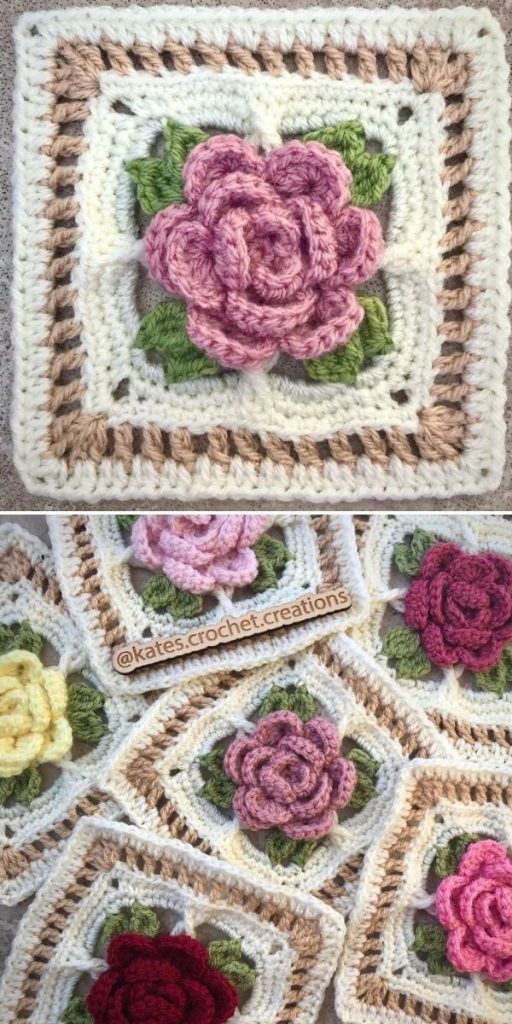
The Crochet rose granny square is a stunning and versatile design that combines the classic granny square structure with the beauty of a three-dimensional crochet rose at its center. This timeless pattern is perfect for creating blankets, pillows, bags, and other decorative projects. Whether you are a beginner or an experienced crocheter, mastering this pattern opens the door to endless creative possibilities.
The beauty of the Crochet rose granny square lies in its layered petals, which add texture and charm to your projects. This pattern is not just pretty but also functional, offering stability with its classic square shape while showcasing an eye-catching flower in the middle. It’s a wonderful way to add a touch of elegance to handmade items.
One of the best things about the Crochet rose granny square is that it allows for plenty of color combinations. You can choose vibrant hues for the rose and a neutral background for the square, or go with soft pastels for a delicate, romantic look. The options are limitless.
In addition to being aesthetically pleasing, the Crochet rose granny square is also a great stash-busting project. You can use leftover yarn from previous projects to create colorful and unique squares, helping reduce waste while crafting something beautiful.
This pattern is perfect for gift-making. Handmade items featuring the Crochet rose granny square are thoughtful presents for birthdays, weddings, baby showers, or housewarmings. Your friends and family will surely appreciate the time and effort that went into each piece.
In this blog post, you’ll learn how to make a Crochet rose granny square step by step, including all the materials needed, detailed measurements, and helpful tips to achieve a professional-looking finish.
Before starting your Crochet rose granny square, it’s important to gather all the necessary materials. The right supplies will ensure your project turns out just as beautiful as you envision.
For this pattern, you will need three different colors of yarn: one for the rose petals, one for the leaves, and one for the granny square background. A medium-weight (worsted weight) cotton or acrylic yarn works best for a sturdy yet soft square.
You will also need a crochet hook size 4.0 mm (G-6) or the size recommended for your yarn. Using the correct hook size ensures the stitches are neat and the Crochet rose granny square maintains its shape.
A pair of sharp scissors is essential for cutting the yarn cleanly. Having a good pair of scissors prevents fraying and makes finishing your project much easier.
Don’t forget a yarn needle for weaving in the ends. This tool helps hide the loose threads neatly within your Crochet rose granny square, giving it a clean and polished look.
In terms of measurements, the finished Crochet rose granny square typically measures around 5 inches by 5 inches (12.7 cm x 12.7 cm), depending on your tension and yarn choice.
If you wish to create a larger or smaller square, simply adjust the number of rounds in the granny square section or change the yarn weight and hook size accordingly.
Let’s dive into the detailed steps to create your own Crochet rose granny square. Follow each part carefully to achieve the best result.
Step 1: Making the Rose Center
Start with a magic ring. Chain 4 (counts as first double crochet and chain 1), then double crochet, chain 1 7 times into the ring. You should have 8 double crochet stitches with chain 1 spaces. Join with a slip stitch to the top of the starting chain. This forms the base of the rose.
Step 2: Forming the First Layer of Petals
In the first chain space, (single crochet, half double crochet, double crochet, half double crochet, single crochet). Repeat this sequence in each chain space around. You will now have 8 small petals. Slip stitch into the first stitch to close.
Step 3: Adding the Second Layer of Petals
Work behind the first petal layer. Chain 3, slip stitch into the base between petals. Repeat this around to create 8 loops behind the petals. Into each loop, work (single crochet, half double crochet, 3 double crochet, half double crochet, single crochet). This forms fuller, larger petals.
Step 4: Creating the Leaf Layer (Optional)
If you want leaves around the rose, chain 5, slip stitch between petals behind the second layer to form loops. Into each loop, work (single crochet, half double crochet, 4 double crochet, half double crochet, single crochet) to represent leaves.
Step 5: Transition to Granny Square
To square off the flower, form a chain of 4 (counts as 1 double crochet plus chain 1) in any space behind the petals. Then double crochet, chain 1, double crochet, chain 3 (corner) in the same space. Repeat this pattern around to form 4 corners with chain spaces in between.
Step 6: Building the Square Body
Continue working classic granny square rounds: In each corner space, work (3 double crochet, chain 3, 3 double crochet). In each side space, work (3 double crochet). Repeat this for 2-3 rounds until your Crochet rose granny square reaches the desired size.
Achieving a flawless Crochet rose granny square depends on attention to detail and proper technique. Here are some helpful tips to guide you.
Always maintain consistent tension throughout the project. If your tension changes, the square may warp or the petals might not sit correctly, affecting the overall look.
Choosing the right color combination greatly enhances the beauty of your Crochet rose granny square. Soft pinks, reds, and pastels make lovely roses, while green works perfectly for leaves and white or cream for the background.
Blocking your square after finishing helps it maintain a straight, crisp shape. Lightly wet the square, shape it on a blocking board, and let it dry. This step makes a huge difference in the final appearance.
Weaving in ends neatly is crucial. Use a yarn needle to tuck in the loose strands along the back of the stitches without distorting the shape of the Crochet rose granny square.
Don’t rush the petal-making process. The layered petals are the focal point of the square, so take your time to shape them evenly and consistently for a polished look.
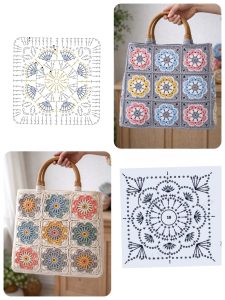
If you are planning to join multiple Crochet rose granny square motifs together, consider using the join-as-you-go method or whip stitch for a clean, professional finish.
The Crochet rose granny square is highly versatile, and there are countless ways to incorporate it into beautiful handmade items.
One of the most popular uses is to create blankets or afghans. Combine multiple Crochet rose granny square motifs with solid granny squares or other patterns for a stunning patchwork effect.
Cushion covers are another wonderful project. A front panel made entirely of Crochet rose granny square motifs adds texture and charm to any living space.
Tote bags and purses look amazing with the addition of floral squares. Use sturdy yarn and a fabric lining to make a durable and stylish accessory.
Wall hangings crafted from Crochet rose granny square patterns can serve as unique home decor. Arrange the squares in rows or creative patterns for an eye-catching display.
Table runners and placemats become elegant conversation pieces when incorporating these floral squares. Mix with neutral-colored granny squares for balance.
You can also use a single Crochet rose granny square to create coasters, pot holders, or even as an applique on clothing like jackets and denim bags for a trendy, handmade touch.
The Crochet rose granny square is more than just a pretty pattern; it’s a delightful combination of art and craft that brings color and texture to your projects. From cozy blankets to chic bags and decorative home pieces, the versatility of this pattern is endless. With clear instructions, correct measurements, and a little practice, anyone can master this beautiful crochet design.
Now it’s your turn! Grab your hook, choose your favorite yarn colors, and start creating your own Crochet rose granny square masterpieces. If you enjoyed this tutorial, leave a comment below with your thoughts, questions, or suggestions. Your feedback inspires me to bring more creative patterns to life. Happy crocheting!


