
Easter Bunny Basket - Crochet Pattern
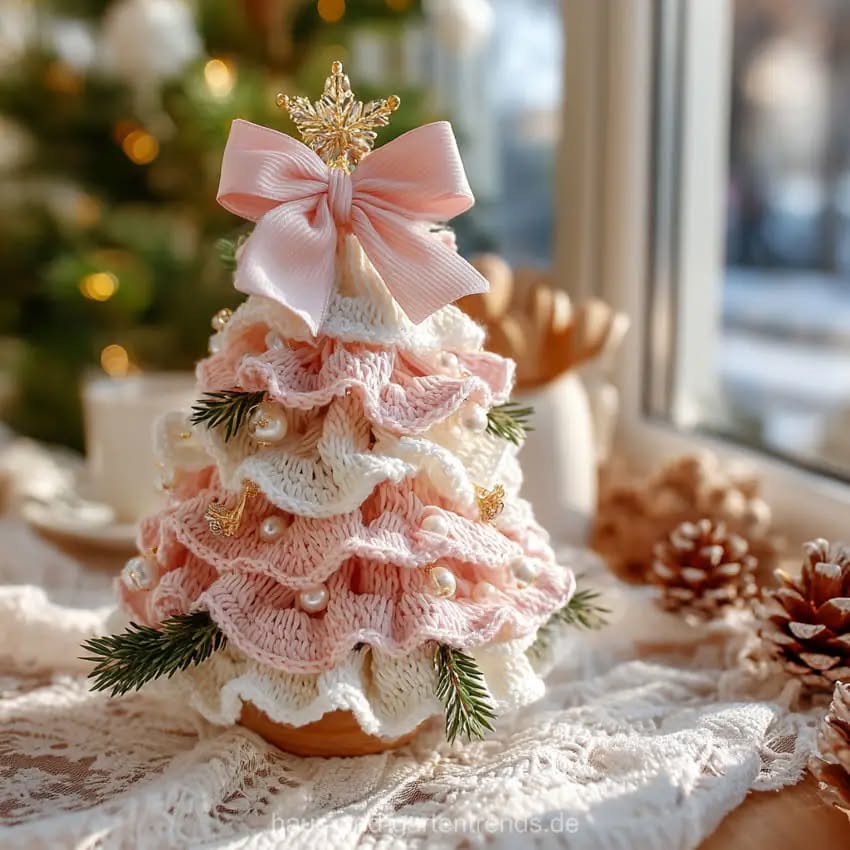
Creating a Crochet Rose Tree with Ruffles is a magical and relaxing experience for anyone who loves the beauty of handmade crafts. This project combines the elegance of blooming roses with the softness and texture of crochet ruffles, bringing a touch of floral charm to your home décor. Whether you are a beginner exploring new crochet patterns or an experienced artist searching for a creative and unique design, this guide will teach you everything you need to know about making your own stunning crochet rose tree.
The beauty of this project lies in its versatility. You can customize your Crochet Rose Tree with Ruffles in different sizes, colors, and textures to match your personal style or interior theme. It can be a centerpiece for your table, a beautiful handmade gift, or even part of a festive decoration. The intricate combination of petals, leaves, and soft ruffled edges gives it an enchanting look that captures attention from every angle.
In this step-by-step crochet rose tree tutorial with ruffles, you’ll learn how to create delicate petals, assemble the roses, and design the ruffled layers that make the entire piece stand out. Every step is explained in a simple and humanized way to ensure that even beginners can follow along easily. All you need is patience, a crochet hook, your favorite yarn, and a love for crafting beautiful things.
Before starting your Crochet Rose Tree with Ruffles, it’s essential to gather all your materials. Preparation ensures your crafting experience is smooth and enjoyable, without interruptions. The right tools and yarn selection will directly influence the final appearance and texture of your crochet tree.
Begin with choosing high-quality yarn. For a realistic effect, select soft cotton or acrylic yarn in shades of red, pink, white, or even a combination of pastels. These colors create a natural rose look and enhance the ruffled details. You’ll also need a green shade for the leaves and a brown or neutral tone for the stem or base of your crochet rose tree.
Next, pick an appropriate crochet hook size that matches your yarn weight. Typically, a 2.5 mm or 3 mm hook works well for medium-weight yarn, but check your yarn label for the recommended size. Having the correct hook helps you maintain consistent tension and a neat finish.
Prepare additional materials such as floral wire, green tape, and a foam base or small pot to hold your crochet rose tree upright. The floral wire will provide structure and support to each crocheted rose and leaf, making it easier to shape and assemble the final piece.
Organize your workspace before starting. Good lighting, comfortable seating, and neatly arranged tools will make the process enjoyable. Remember, crocheting is not just about the result but also about enjoying the creative journey.
Finally, make sure to have a pattern or visual reference nearby. Even though this crochet rose tree tutorial with ruffles is explained in detail, having a small sketch or photo for color placement and petal arrangement can be helpful for visual learners.
The roses are the centerpiece of your Crochet Rose Tree with Ruffles, so taking time to create each flower beautifully will make your project shine. The design focuses on soft layers that mimic natural petals with added ruffles for extra dimension and charm.
Start by making a foundation chain of around 45 stitches. This will form the base of your petals. In the next row, crochet double crochets across, increasing slightly in every few stitches to create a gentle wave that will form the ruffles. This increase is what gives your rose that soft, blooming effect.
Once the foundation row is done, crochet two more rows using half-double crochets and double crochets alternately. This pattern gives your petals the right balance between firmness and softness. After completing the rows, fasten off and leave a long tail of yarn for sewing.
To form the rose, start rolling the crocheted strip from one end, shaping it like a spiral flower. Use a tapestry needle to stitch the base together, ensuring the petals are secure but still fluffy. The more loosely you roll it, the larger and more open the flower will appear.
You can experiment with different yarn shades to create depth in your crochet rose tree. Blending two tones of pink or red in one rose creates a realistic gradient. After finishing a few roses, gently fluff the petals to enhance the ruffled look and give them a soft, romantic texture.
Repeat this process until you have enough roses to fill your tree. Depending on the size of your base, you may need between 8 and 20 roses. Remember, variety in size and shape adds realism and beauty to the final composition.
The next step in this Crochet Rose Tree Tutorial with Ruffles is to make the leaves and base. The leaves bring contrast and freshness, complementing the vivid roses perfectly. They also add fullness to the tree, making it look lush and natural.
Start the leaves with a chain of 10 stitches. Work single crochets up one side, increasing to double crochets toward the center, then decrease back down to single crochets on the other side. This will form a natural leaf shape with a pointed tip. Finish each leaf with a slip stitch and leave a long tail for sewing.
For more texture, you can crochet a few leaves with ribbed stitches or small picot edges. These details enhance the ruffled theme and give your crochet rose tree a cohesive, elegant look. Once your leaves are ready, attach a small piece of floral wire to each one using green floral tape. This allows you to bend and position them naturally.
Now, prepare the tree structure. Insert thicker floral wires into a foam base or small pot to act as stems. Wrap them with brown or green yarn to create a realistic tree trunk. Arrange your wires so that they spread slightly at the top, forming a tree-like shape where the roses will sit.
Attach each rose carefully to the wires using the long yarn tails or sewing thread. Space them evenly, but don’t worry about perfection—natural roses have irregular spacing. Fill the gaps with leaves, adjusting their angles to look balanced and organic.
Finish by adding small ruffled details or decorative crochet vines between the roses. These ruffles tie the entire piece together and emphasize the “ruffled rose” theme beautifully.
This section is where your Crochet Rose Tree with Ruffles truly comes to life. The ruffles add that final touch of softness and dimension that makes the piece stand out as a work of art. They also create a flowing, whimsical look that enhances the floral beauty of the crochet roses.
To make the ruffles, start with a long chain—around 80 to 100 stitches depending on your desired fullness. Work three double crochets into each chain stitch across the row. This triple increase will create a wavy, ruffled ribbon. Use yarn in the same or complementary shade to your roses for a harmonious finish.
You can crochet several of these ruffled strips to wrap around the base of your rose tree or layer them between the flowers. The effect is romantic and elegant, making your piece appear fuller and more textured.
Attach the ruffles using a tapestry needle, securing them gently around the flower clusters or along the bottom of the pot. Try not to flatten them while stitching; instead, let the waves form naturally for that perfect ruffled look.
Once all parts are assembled, take a few moments to adjust and shape everything. Spread the petals, reposition the leaves, and ensure the ruffles fall gracefully. This attention to detail is what transforms your crochet rose tree from a simple craft to a stunning decorative piece.
Finally, you can decorate the pot or base with lace, beads, or even a crocheted ribbon bow to complete your masterpiece. Place your finished Crochet Rose Tree with Ruffles on a shelf, table, or as a centerpiece—it’s guaranteed to attract admiration from everyone who sees it.
1. Is this project suitable for beginners?
Yes! The Crochet Rose Tree with Ruffles is beginner-friendly as long as you know basic stitches like chain, single crochet, and double crochet. Patience and attention to detail are key to achieving beautiful results.
2. What type of yarn works best for this pattern?
Soft cotton or acrylic yarn works best because they provide structure while remaining flexible enough to shape petals and ruffles naturally.
3. How long does it take to make a crochet rose tree?
Depending on your experience and the number of roses, it may take anywhere from 6 to 12 hours. It’s a relaxing project you can complete over several evenings.
4. Can I customize the color of the roses?
Absolutely! Experiment with any color palette you like. Try red for a classic look, white for elegance, or pink and lavender for a softer, pastel appearance.
5. How can I make the ruffles look fuller?
Add more increases per stitch (for example, four double crochets in each chain) or use thicker yarn for a denser texture. The more increases, the more dramatic the ruffles.
6. How do I care for my crochet rose tree?
Keep it away from direct sunlight and dust it occasionally using a soft brush or cloth. You can also lightly spray it with water to refresh the yarn fibers.
Creating a Crochet Rose Tree with Ruffles is not just about crafting; it’s about expressing creativity and turning yarn into a beautiful piece of art. This tutorial guided you through every step—from preparing materials and crocheting roses to assembling the final ruffled masterpiece. Whether you make it for yourself or as a gift, it’s sure to bring joy and admiration wherever it’s displayed.
Now that you know how to make your own crochet rose tree, I’d love to hear from you! Share your honest opinions, experiences, or any creative suggestions you have in the comments. Your feedback helps inspire more beautiful handmade creations for everyone who loves crochet.


