Crochet Dragon Scarf Pattern
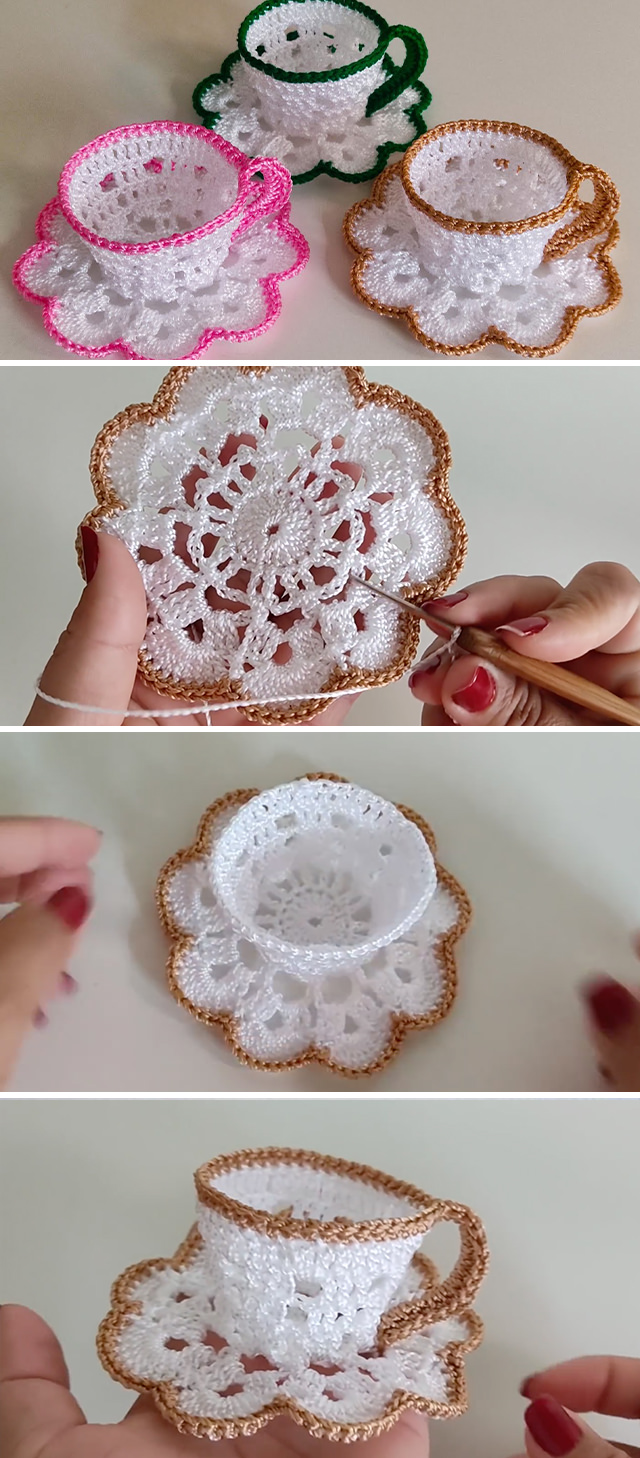
The crochet teacup is an enchanting project that blends creativity and nostalgia into a single beautiful piece. Whether you’re decorating your kitchen shelf, making a playful pincushion, or crafting unique gifts, a crochet teacup offers a perfect balance of whimsy and artistry. This pattern transforms simple yarn into a delicate shape that looks just like a real teacup.
In this article, you’ll discover how to make your own crochet teacup step by step. We’ll guide you through materials, measurements, and techniques, so even beginners can follow along confidently. Plus, you’ll learn tips to personalize your creation with colors, textures, and details.
Let’s get started with this lovely handmade project that brings charm to your home and joy to your crafting time.
When you begin your crochet teacup, selecting the right materials makes all the difference. Use 100% cotton yarn for a crisp shape and durable finish, perfect for decorative pieces. Choose pastel shades like cream, mint, or baby blue for a classic teacup look, or go bold with floral-inspired colors.
For this crochet teacup pattern, you’ll need about 30g of worsted weight cotton yarn in your main color, 10g of a contrasting color for edging, and a 3.5mm (E) crochet hook. This size ensures your stitches stay tight, keeping the cup sturdy.
You’ll also need a small amount of polyester stuffing to fill the base and sides of the crochet teacup, helping it hold its shape. A tapestry needle will help you sew parts together, and stitch markers can keep track of your rounds.
Before starting, gather your fabric cuts in yarn terms: about 10 yards of main color yarn for the cup body, 5 yards for the handle, and 8 yards for the saucer. These measurements help avoid running out mid-project.
Starch spray or diluted white glue can be used after finishing your crochet teacup to add extra stiffness, especially if it’s purely decorative. Let it dry thoroughly for best results.
Lastly, keep scissors handy and work on a clean surface to easily track your small parts. With everything ready, you’re set to crochet your beautiful crochet teacup.
Follow this simple yet elegant crochet teacup pattern. We’ll start from the base, build up the cup, make the handle, and finish with the saucer.
1. Crochet the base of the cup:
Round 1: Make a magic ring, work 6 single crochets (sc) into the ring. Pull tight.
Round 2: Increase in each stitch around (12 sc).
Round 3: 1 sc, increase around (18 sc).
Round 4: 2 sc, increase around (24 sc).
Round 5: 3 sc, increase around (30 sc).
2. Build the cup body:
Rounds 6-12: Work even (30 sc in each round). This forms the sides of your crochet teacup. Keep your stitches tight.
3. Crochet the rim:
Round 13: Switch to contrasting yarn. Work 1 round of slip stitches (sl st) around for a neat finish.
4. Make the handle:
Chain 12, turn, sc back across. Fasten off, shape into a curve, and sew to the cup sides with matching yarn.
5. Crochet the saucer:
Round 1: Magic ring, 6 sc.
Round 2: Increase in each stitch (12 sc).
Round 3: 1 sc, increase around (18 sc).
Round 4: 2 sc, increase around (24 sc).
Round 5: 3 sc, increase around (30 sc).
Round 6: 4 sc, increase around (36 sc).
Finish with a round of slip stitches in contrasting color for decoration.
6. Finishing touches:
Stuff the base and walls lightly. Use a tapestry needle to close any gaps. Lightly starch or stiffen the cup and saucer to help them keep shape. Your crochet teacup is complete!
One of the joys of crafting a crochet teacup is adding personal touches. Experiment with different yarn colors to reflect your style or match your decor. Soft pinks and creams evoke a vintage tea set look, while bright stripes can give it a playful feel.
Consider using variegated yarn for the saucer, giving it a unique color swirl that looks like painted porcelain. Add small crochet flowers, beads, or embroidery to the cup body for extra charm.
For a more luxurious crochet teacup, choose mercerized cotton or bamboo-blend yarn. These yarns add sheen and softness, making the cup look elegant while still holding its shape.
You could also crochet a tiny spoon or sugar cube as an extra accessory. Use leftover yarn scraps and simple shapes to create these miniatures, turning your crochet teacup into a whole scene.
If you plan to gift your crochet teacup, wrap it in tissue paper inside a small gift box. Add a handwritten tag with care instructions like “Spot clean only. Decorative use.”
Finally, share your finished crochet teacup on social media. Crafters worldwide love seeing different color combos and creative ideas, and you might inspire someone else to make one too.
To make your crochet teacup look professional, keep your tension consistent. Uneven tension can make the sides wavy or the base uneven, so crochet slowly and relax your hands.
Using stitch markers helps track rounds, especially when making the cup body. Place a marker in the first stitch of each round and move it up as you work.
If your cup feels too soft, add more stuffing or crochet tighter. Alternatively, double up your yarn while keeping the same hook size to create a firmer fabric.
Blocking is optional but can help. Lightly dampen your crochet teacup, shape it over a small bowl, and let it dry completely. This sets the shape beautifully.
Don’t rush the handle. Make sure it’s securely attached; sewing through several stitches rather than just the edge keeps it sturdy and helps it look neat.
Lastly, always finish with a tidy weave of yarn ends. Invisible finishes make your crochet teacup look clean and handmade with care.
Q1: Can I make the crochet teacup larger or smaller?
Yes! Adjust the base by adding more rounds of increases, and make the cup body taller by adding extra even rounds.
Q2: What’s the best yarn for a crochet teacup?
100% cotton yarn is ideal because it holds shape well. You can also use blends for different textures.
Q3: How do I keep the crochet teacup from collapsing?
Use tight stitches, firm stuffing, and optionally stiffen with starch or diluted glue.
Q4: Can beginners make a crochet teacup?
Absolutely! The pattern uses basic stitches: single crochet, slip stitch, and simple increases.
Q5: Is the crochet teacup washable?
It’s best for decorative use, but spot cleaning with a damp cloth is usually safe.
Q6: Can I sell finished crochet teacups?
Yes, handmade crochet teacups make lovely market items. Credit the pattern if you used someone else’s design.
The crochet teacup is a delightful project that combines creativity and practicality. By following the step-by-step pattern and tips, you can craft a charming piece that decorates your space or makes a heartfelt gift. Enjoy the process, personalize your design, and share your creation proudly.
If you enjoyed this tutorial, share your thoughts below! Have you made a crochet teacup before, or do you plan to try? Your feedback and ideas keep the craft community blooming.

