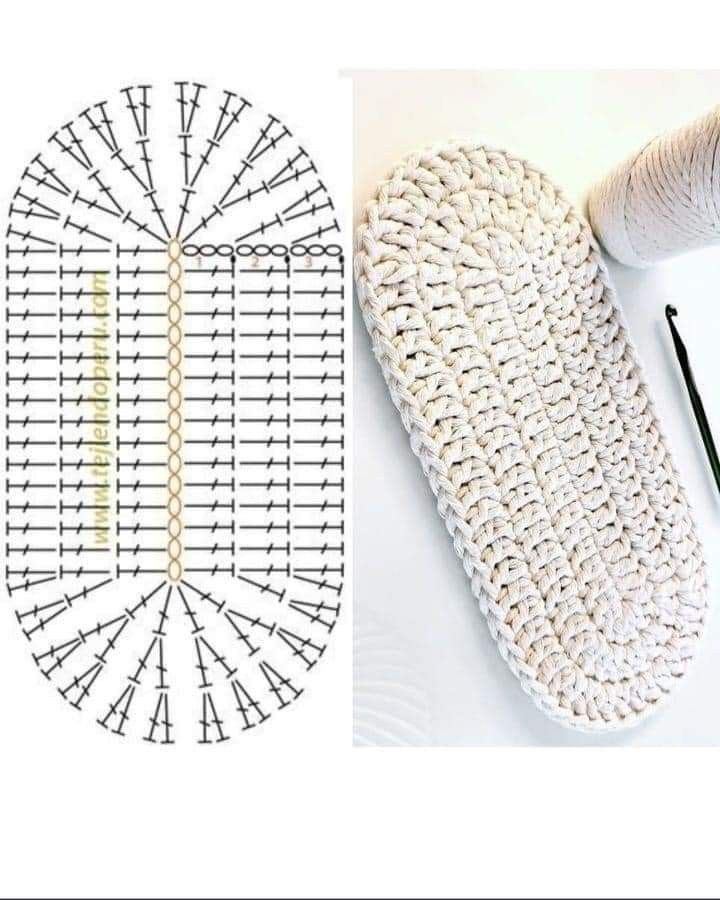
Crochet Oval Rug Base for Beginners Tutorial
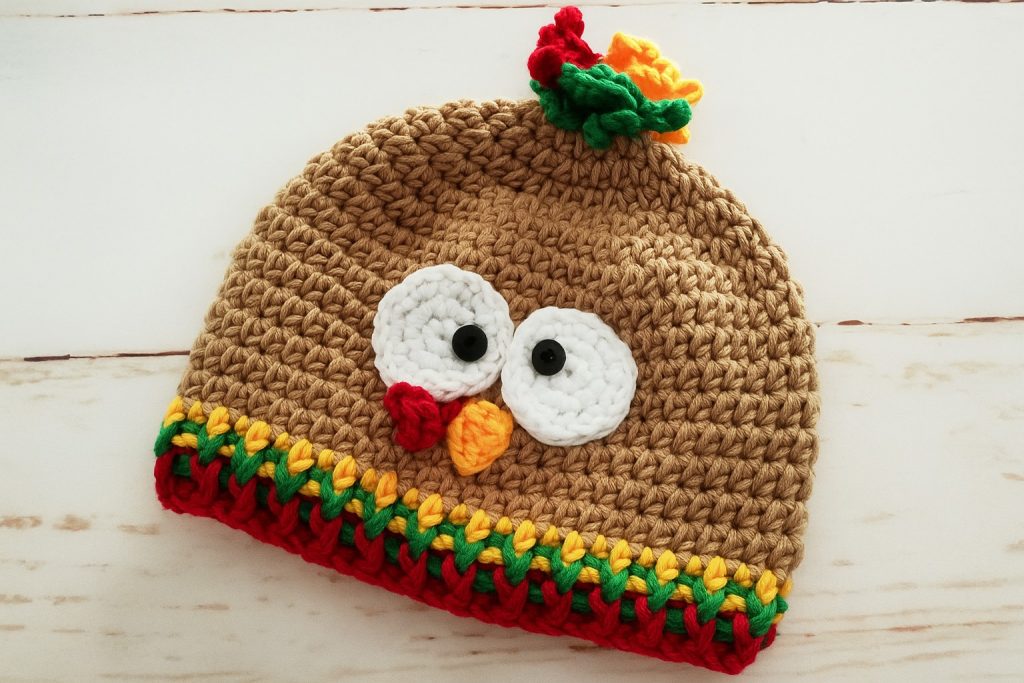
Crochet Turkey Hat Pattern is one of the most charming and festive crochet projects you can make for the Thanksgiving season. Whether you’re creating it for a baby, a child, or even an adult who loves a touch of humor and creativity, this project brings warmth and joy to your handmade collection. The combination of fall colors, playful feathers, and the iconic turkey face make this hat a wonderful gift or seasonal accessory that’s both practical and adorable.
Crafting your own Crochet Turkey Hat Pattern allows you to personalize every detail—from choosing soft, cozy yarn to adjusting the hat’s size for a perfect fit. You can use various shades of brown, orange, yellow, and red to bring your turkey to life, giving it character and charm that reflects your personal style. It’s not just a cute accessory—it’s a conversation starter that spreads Thanksgiving cheer wherever it goes.
In addition to being fun and festive, making a Crochet Turkey Hat Pattern is a great way to practice different crochet techniques. You’ll use basic stitches like single crochet and double crochet, as well as shaping techniques for the hat and embellishments like feathers and eyes. This project is beginner-friendly, but it’s also engaging enough for experienced crocheters who want to add a creative twist to their seasonal projects.
To start your Crochet Turkey Hat Pattern, you’ll need a few basic materials and tools. First, choose a soft worsted weight yarn in multiple colors: brown for the base of the hat, and bright tones such as orange, yellow, and red for the feathers and beak. Acrylic yarn works well for this type of project since it’s durable, affordable, and easy to wash, which is ideal if you’re making the hat for children.
Next, select the right crochet hook size to match your yarn—typically, a 5mm (H/8) hook works perfectly for worsted weight yarn. You’ll also need a yarn needle for sewing the pieces together, scissors for trimming the ends, and stitch markers to keep track of your rounds if you’re working in continuous spirals.
For added detail, you can include safety eyes or crochet your own eyes using white and black yarn. If the hat is for a small child, crocheted eyes are safer. You’ll also need a small amount of polyester fiberfill to lightly stuff the beak if you want it to stand out more.
Before you begin, it’s helpful to measure the head circumference of the person you’re making the hat for. This ensures your Crochet Turkey Hat Pattern fits perfectly and comfortably. Sizes can vary from newborn to adult, and adjusting the pattern is simple once you understand the basic structure.
Lastly, gather all your tools in one place before starting. Having everything ready will make your crocheting experience smooth and enjoyable, allowing you to focus on the creative process rather than searching for materials midway through your project.
To begin the Crochet Turkey Hat Pattern, start by creating a magic ring and working single crochet stitches into it. This will form the crown of your hat. Continue to increase evenly in each round until you reach the desired diameter for the head size. Remember to keep your tension consistent so the hat maintains a neat, round shape.
Once you’ve reached the correct size for the crown, you’ll stop increasing and continue crocheting in even rounds to create the body of the hat. This section will determine how tall your hat is, so measure carefully. A typical beanie shape works perfectly as the base for your Crochet Turkey Hat Pattern.
Next, you’ll make the earflaps (optional but recommended for extra warmth and style). Attach your yarn to the sides of the hat and work small triangular sections in rows, decreasing at the end of each row. Add braided tassels or ties for a classic turkey hat finish.
After completing the base hat, it’s time to make the turkey’s face and feathers. For the beak, crochet a small triangle using orange yarn, and lightly stuff it to give it volume. For the wattle (the red part that hangs beside the beak), make a short chain and single crochet along it, then sew it beside the beak.
The eyes can be crocheted as small white circles with black centers or replaced with safety eyes if you prefer. Position them symmetrically above the beak to give your turkey a friendly, playful look. Sew all the facial pieces securely to the front of the hat.
Finally, create the feathers using multiple fall colors. Each feather can be crocheted as a small oval or teardrop shape. Make several in different shades, then arrange and sew them onto the back top of the hat. This detail makes your Crochet Turkey Hat Pattern come to life, capturing the festive spirit of Thanksgiving.
One of the best parts about making a Crochet Turkey Hat Pattern is how customizable it is. You can adjust the design to suit any age group or personality. For example, use chunky yarn and larger hooks for a cozy adult version, or make a mini-sized version for a baby’s first Thanksgiving photo shoot.
If you love color, consider making feathers with multicolored yarn or adding a bit of sparkle using metallic thread. This small detail gives your turkey hat a festive shine and makes it stand out even more in photos.
Another idea is to add buttons or embroidery for extra charm. Sew on a few decorative buttons as accents or embroider the turkey’s name or year to make it a keepsake. Personalized touches turn a simple pattern into a heartfelt handmade gift.
For those who enjoy crafting matching family sets, make a set of turkey hats for everyone. Each hat can feature a different feather arrangement or face expression, making family photos even more memorable.
When it comes to texture, experiment with different stitches. Try using half double crochet for a softer texture or front post stitches for ribbed designs. These variations make your Crochet Turkey Hat Pattern unique and more advanced without complicating the process.
Lastly, don’t forget to block your finished hat gently. Although acrylic yarn doesn’t require heavy blocking, lightly shaping the hat ensures it looks professional and holds its form beautifully.
To keep your Crochet Turkey Hat Pattern looking new and clean, proper care is important. If you used acrylic yarn, you can safely machine wash it on a gentle cycle with cold water. Always air dry it flat to prevent stretching.
If your hat includes delicate details like buttons or felt pieces, consider hand washing instead. Use mild detergent and lukewarm water, then gently squeeze out the excess without twisting.
Over time, your hat might accumulate some lint or lose its shape slightly. You can use a fabric shaver to remove pilling and reshape it by hand while it’s still damp.
Store your Crochet Turkey Hat Pattern in a cool, dry place. Avoid hanging it, as that could stretch the fibers. Instead, fold it neatly and store it in a breathable fabric bag or drawer.
For long-term storage, add a lavender sachet or cedar block to keep your hat fresh and free of moths. These natural protectors are ideal for preserving crochet pieces.
If you ever need to repair a loose stitch or reattach a feather, keep some leftover yarn from your project for easy touch-ups. This ensures your turkey hat stays beautiful for many Thanksgivings to come.
1. What yarn is best for a Crochet Turkey Hat Pattern?
Worsted weight acrylic yarn is the most common choice. It’s soft, washable, and comes in a wide range of colors perfect for the turkey theme.
2. Can beginners make a Crochet Turkey Hat Pattern?
Yes! This project uses basic crochet stitches, making it beginner-friendly. With clear instructions and patience, even first-time crocheters can succeed.
3. How long does it take to make a Crochet Turkey Hat?
Depending on your skill level, it can take between 4–8 hours. Smaller hats for babies may take less time, while adult sizes take a bit longer.
4. Can I adjust the pattern for different sizes?
Absolutely. You can change the size by adjusting the number of increase rounds and measuring the crown to match the head circumference you need.
5. Are safety eyes safe for babies?
It’s best to avoid safety eyes for infants. Instead, crochet or embroider the eyes to ensure the hat is completely safe and soft for babies.
6. Can I sell hats made from this Crochet Turkey Hat Pattern?
Yes, you can sell finished products, especially if you’ve added your own creative touches. Always credit yourself as the maker and not the pattern author if it’s adapted from a shared design.
7. How do I make the feathers stand up more?
Lightly starching the feathers or using double yarn strands can help them hold their shape better.
8. What hook size should I use?
A 5mm (H/8) hook works great for most worsted yarns, but always check your gauge to make sure the size is accurate.
9. Can I make the hat without earflaps?
Yes, you can skip the earflaps if you prefer a classic beanie style. The turkey face and feathers will still make it adorable.
10. What colors are best for the feathers?
Traditional fall colors—red, orange, yellow, and brown—work beautifully, but you can experiment with other combinations for a fun twist.
Creating a Crochet Turkey Hat Pattern is a rewarding project that blends creativity, craftsmanship, and seasonal spirit. It’s perfect for Thanksgiving gatherings, photoshoots, or just spreading a bit of joy during the fall season. You’ve learned how to choose materials, crochet each part step-by-step, and care for your finished piece so it lasts for years.
If you decide to try this pattern, I’d love to hear your thoughts! Share your honest opinion and suggestions about this Crochet Turkey Hat Pattern—your feedback helps make every creation even better.


