
Easter Bunny Basket - Crochet Pattern
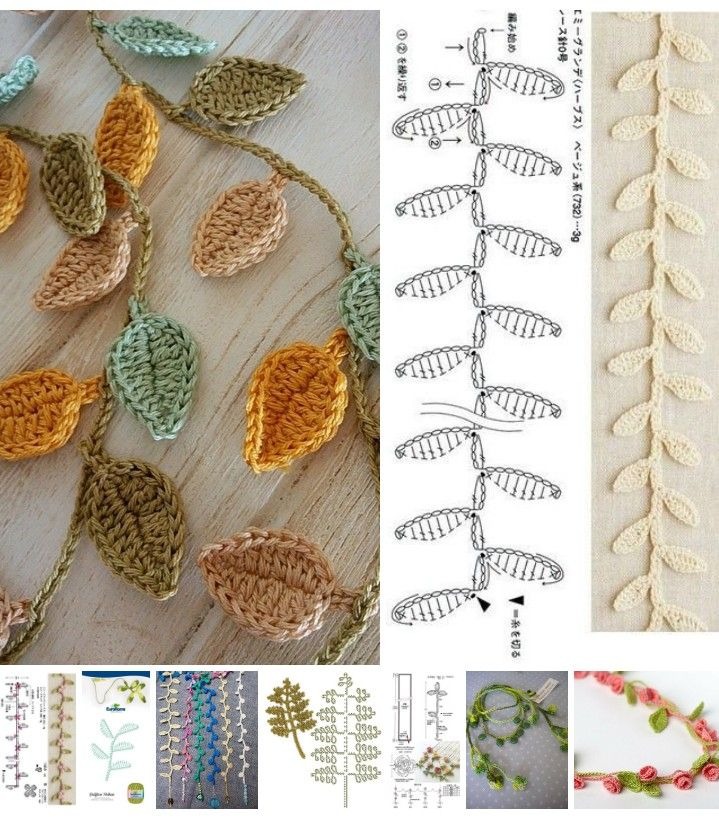
Crocheted leaves are an elegant and versatile addition to any crochet work. Whether you’re embellishing a cozy blanket, adding texture to a scarf, or designing autumn-themed home décor, these delicate shapes bring nature’s charm into your handmade creations. Their organic look pairs wonderfully with floral motifs, seasonal projects, or even minimalistic accessories.
The beauty of crocheted leaves lies in their simplicity and adaptability. They can be made in various sizes, colors, and yarn types depending on the style you’re going for. Beginners love them because they’re quick and easy to make, while seasoned crocheters enjoy using them as customizable accents to elevate their finished work. These small pieces hold endless creative potential.
This tutorial will guide you through a full step-by-step crocheted leaves pattern. You’ll learn how to make them from scratch, including which yarns to use, how to cut your materials, and how to crochet the perfect leaf shape. Plus, we’ll share tips for adding them to other projects, using them as seasonal decorations, or crafting them into garlands, keychains, or brooches.
Before starting your crocheted leaves, gather the right materials. This ensures that your final pieces hold their shape and texture. For this project, you’ll need medium-weight cotton yarn in green shades. Cotton yarn offers excellent stitch definition and holds shape beautifully after blocking.
Use a 3.5 mm (E) crochet hook for most standard-sized crocheted leaves. However, if you want a more delicate result, choose a 2.5 mm hook and finer yarn. This variation allows you to create layered effects or smaller pieces for earrings and accessories.
You’ll also need scissors, a yarn needle for weaving in ends, and a tape measure or ruler. If you’re planning to stitch your crocheted leaves onto fabric or other surfaces, have a sewing needle and matching thread on hand. A light spray starch or fabric stiffener is optional but helps leaves keep their shape over time.
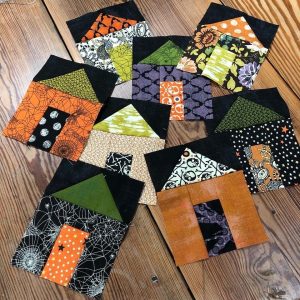
When it comes to fabric backing or incorporating crocheted leaves into quilted projects, you may want to cut squares of linen or canvas. Cut your base fabrics into 6×6 inch squares (15×15 cm). This size accommodates one or more leaves per square for display or crafting purposes.
Decide whether you’ll crochet your crocheted leaves flat or slightly three-dimensional. This affects your stitch count slightly, as more volume requires extra rows. We’ll walk through a standard flat leaf pattern in the next section that can be easily modified for shape.
Prepare your workspace with good lighting and a comfortable chair. Having all materials laid out ahead of time keeps your crochet flow uninterrupted. This project is beginner-friendly and only takes about 10 minutes per leaf once you get the hang of the pattern.
Now, let’s start crafting your first crocheted leaves piece. This pattern creates a basic leaf that you can modify for size and texture. It’s worked in one piece, starting from the bottom and finishing at the tip.
Step 1: Chain 10 stitches. This will form the central spine of your crocheted leaf. The number of chains determines the length of your leaf. For a larger leaf, increase this to 12 or 14.
Step 2: Starting in the second chain from the hook, make 1 single crochet (sc), then 1 half-double crochet (hdc), 1 double crochet (dc), 2 treble crochets (tr), 1 double crochet, 1 half-double crochet, and 1 single crochet into the following chains. This creates the first half of the leaf along one side of the chain.
Step 3: Chain 2 at the tip of the leaf to create a pointed end. Then work your way back down the other side of the starting chain: 1 single crochet, 1 half-double crochet, 1 double crochet, 2 treble crochets, 1 double crochet, 1 half-double crochet, and 1 single crochet. This mirrors the first half of the crocheted leaf.
Step 4: Slip stitch into the base chain to close the round. Fasten off your yarn and leave a tail for weaving in or attaching to other projects. Use the yarn needle to hide the tail inside the stitches for a neat finish.
Step 5: If desired, block the leaf gently by pinning it flat on a foam board and spraying lightly with water or starch. Let it dry completely before use. This helps the leaf lie flat and enhances the definition of the stitches.
Step 6: To add a midrib or vein detail, use a contrasting yarn and surface slip stitch along the center chain. This creates a realistic, botanical look. These crocheted leaves are now ready to be used as embellishments, appliqués, or garland elements.
The beauty of crocheted leaves is how versatile they are. Once you’ve made a handful, you’ll start seeing endless ways to incorporate them into other crochet and fabric crafts. Their delicate shape works across seasons, from vibrant spring garlands to warm autumnal wreaths.
Use your crocheted leaves as appliqués on blankets, tote bags, hats, and sweaters. Attach them with a few simple stitches using a sewing needle and matching thread or yarn. They look especially lovely on neutral-toned items, where their green hues pop.
Create seasonal garlands by stringing multiple crocheted leaves onto twine or yarn. Alternate colors and sizes for a whimsical effect. These garlands make charming window decorations, fireplace mantel accents, or nature-themed party décor.
For quilting or mixed media projects, stitch crocheted leaves onto 6×6 inch fabric blocks and frame each one as art. These pieces are perfect for nursery walls, seasonal wall hangings, or DIY table runners. Use sturdy fabric like linen or cotton as a background for durability.
Try turning your crocheted leaves into brooches or pins. Attach a jewelry backing with fabric glue or sew it on by hand. These small accessories are ideal for gifts or personal flair, adding a handmade touch to jackets, scarves, or bags.
Make jewelry such as earrings or necklaces by using thinner yarn and a smaller hook. Add metal findings or beads to complete the look. Lightweight and eye-catching, crocheted leaves make lovely nature-inspired fashion items.
If you’re into eco-friendly gift wrapping, tie a crocheted leaf to your ribbon or string for a rustic, handmade finish. You can even make an entire gift set around your leaves—include a bookmark, keychain, and brooch all crafted in matching tones.
One of the best things about crocheted leaves is how easy they are to customize. With just a few changes in yarn, hook size, or stitch type, you can create an entirely new look. This flexibility makes the pattern a go-to for both beginners and pros.
To make larger or longer crocheted leaves, start with more chains in your foundation row. For example, chaining 14 or 16 will give you extra space to add additional stitches and create a broader shape. Add more treble or double crochets to emphasize curves.
Change the texture of the leaf by working with a different stitch combination. Try alternating front post and back post double crochets along the edges to give your crocheted leaves a ribbed or raised look, mimicking the natural veins found in real foliage.
Color can have a huge impact. Try using variegated yarns in green, yellow, and brown to create realistic fall leaves. For a fantasy-inspired touch, go with purples, blues, or even glitter yarns. The stitch definition still shines through, and your leaves become art pieces.
You can add dimension by folding the leaves slightly or curling the edges. Do this by adjusting your stitch tension, adding picot stitches on the outer edge, or using a smaller hook for one half of the leaf. These simple tricks give the crocheted leaves movement and life.
Combine crocheted leaves with flower patterns to create entire garden-themed projects. Whether it’s a floral bouquet centerpiece, wall art, or crocheted table mat, the leaves act as the perfect complement to any flower motif.
If you’re planning a large-scale project, such as a blanket or tablecloth full of leaves, crochet your crocheted leaves in batches. Set up an assembly line: crochet bases one day, stitch details the next, and assemble afterward. This speeds up production and keeps your pattern consistent.
How long does it take to crochet one leaf?
Most crocheted leaves take about 10–15 minutes to complete, depending on size and detail.
Can I use any type of yarn?
Yes, but cotton yarn is best for structure and stitch definition. You can experiment with acrylic, wool, or blends too.
Are crocheted leaves suitable for beginners?
Absolutely! The basic pattern only requires chain, single crochet, half-double, double, and treble stitches.
Do I need to block the leaves?
Blocking isn’t required but helps improve the shape and look of your crocheted leaves, especially if you’re using them in visible decorations.
How do I attach crocheted leaves to fabric?
Use sewing thread and a needle to hand-stitch them onto fabric. For added durability, use fabric glue around the edges.
Can I sell items made with this pattern?
Yes, feel free to sell your handmade items. Just avoid selling the written pattern itself unless it’s your original variation.
Crocheted leaves are a wonderful way to explore texture, shape, and creativity in your crochet journey. Whether used as standalone decorations or part of a larger handmade masterpiece, they offer versatility and charm in every stitch. From home décor to wearable art, these delicate designs are sure to become a favorite in your collection.
We hope this tutorial inspires you to create your own beautiful set of crocheted leaves. Try different sizes, colors, and styles—then share your results and ideas with our crochet-loving community! Have questions or your own tips? Leave a comment and join the conversation.


