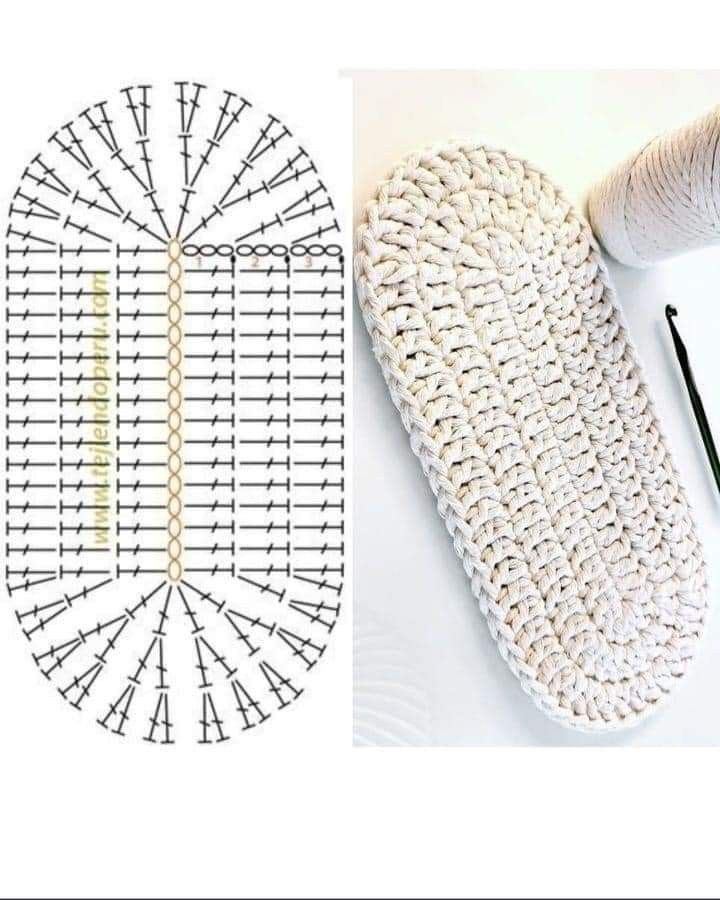
Crochet Oval Rug Base for Beginners Tutorial
Crocheted remote control covers, step by step is a creative and practical way to protect your devices while adding a handmade decorative touch to your living room or bedroom.
If you love crochet and enjoy functional projects, this tutorial-style guide will walk you through everything you need to know about making your own Crocheted remote control covers, step by step with confidence. From selecting yarn to finishing details, you will learn how to transform simple stitches into a beautiful and protective accessory.
Creating Crocheted remote control covers, step by step is not only about aesthetics, but also about durability and organization. Remote controls are frequently used items that often fall, get scratched, or collect dust. By crocheting a custom cover, you provide cushioning and protection while showcasing your personal style. This project is beginner-friendly but can also be customized for intermediate and advanced crocheters who want to experiment with textures, color changes, or decorative stitches.
In this complete guide to Crocheted remote control covers, step by step, you will find clear explanations of measurements, stitch choices, shaping techniques, and finishing methods. The goal is to offer a well-structured, SEO-optimized, and easy-to-follow resource that helps you create professional-looking results. Whether you are making one for yourself, as a gift, or to sell at craft fairs, this article will support you from start to finish.
The first step in creating high-quality Crocheted remote control covers, step by step is selecting the right yarn. Cotton yarn is often recommended because it is durable, washable, and holds its shape well. Acrylic yarn is another option, especially if you want a wider variety of colors and a softer texture. The most important factor is choosing a yarn that is sturdy enough to protect the remote without stretching excessively over time.
When planning Crocheted remote control covers, step by step, consider the thickness of the yarn. Worsted weight yarn is a popular choice because it creates a firm fabric without being too bulky. If you prefer a thinner and more delicate finish, you can use DK weight yarn and adjust your hook size accordingly. Always check your tension to ensure the stitches are tight enough to provide structure.
The crochet hook size should match your yarn selection. For most worsted weight yarns, a 4.0 mm to 5.0 mm hook works well. However, for Crocheted remote control covers, step by step, it is often better to go slightly smaller than recommended to achieve a denser stitch. A tighter fabric prevents the remote control from slipping out and provides better protection.
Other useful materials include scissors, a yarn needle for weaving in ends, stitch markers, and a measuring tape. Accurate measurements are essential in Crocheted remote control covers, step by step because remote controls vary in size. Measuring the length, width, and thickness of your device ensures a perfect custom fit.
Color selection is another important aspect. Neutral tones like gray, beige, and white blend seamlessly into modern interiors, while bright colors can make your Crocheted remote control covers, step by step stand out as decorative accents. You can also match the cover to your home décor or seasonal themes.
Finally, consider adding small details such as buttons, flaps, or simple decorative edging. These finishing touches enhance the appearance of your Crocheted remote control covers, step by step and make them look more polished and professional.
Accurate measurement is the foundation of successful Crocheted remote control covers, step by step. Start by measuring the length and width of your remote control. Add approximately 1 to 1.5 cm for ease, depending on how snug you want the fit to be. This small adjustment allows the cover to slide on comfortably without stretching the stitches.
To begin the base of your Crocheted remote control covers, step by step, create a foundation chain that matches the width of the remote. Make sure the chain is not twisted. Then, work single crochet stitches across the chain. Single crochet is ideal because it creates a dense and firm texture, perfect for protective covers.
After completing the first row, continue working in rows or rounds depending on your preferred construction method. For a seamless look in Crocheted remote control covers, step by step, working in continuous rounds is highly recommended. This eliminates visible seams and creates a smooth cylindrical shape.
Keep crocheting until the piece reaches the same length as the remote control. Frequently check the fit by placing the remote against your work. This practical approach ensures your Crocheted remote control covers, step by step are neither too short nor too long.
If you prefer a flap closure, stop crocheting about 2 to 3 cm before reaching the full length. Then, create additional rows to form a flap that folds over the top. This variation adds both style and security to your Crocheted remote control covers, step by step.
Remember to maintain consistent tension throughout the project. Uneven tension can cause gaps or distort the shape. Consistency is key when creating professional-quality Crocheted remote control covers, step by step.
Once the body of your Crocheted remote control covers, step by step is complete, the next stage involves shaping and closing the bottom. If you worked in rows, you can fold the piece in half and seam the sides using slip stitches or a yarn needle. If you worked in rounds, you may only need to close the bottom.
To close the base of your Crocheted remote control covers, step by step, fasten off leaving a long yarn tail. Thread the tail through a yarn needle and weave it through the bottom stitches. Pull tightly to close the opening securely. This method creates a neat and sturdy finish.
Adding a decorative edge can elevate the appearance of Crocheted remote control covers, step by step. You can use a simple crab stitch, picot edging, or a round of slip stitches for a clean look. Edging not only enhances aesthetics but also reinforces the opening.
If you included a flap, sew a small button onto the front of the cover. Create a buttonhole by chaining two or three stitches in the flap row. This practical detail makes your Crocheted remote control covers, step by step both functional and charming.
Weaving in ends carefully is crucial. Loose ends can unravel over time. Secure all yarn tails inside the stitches so that your Crocheted remote control covers, step by step remain durable even with daily use.
Finally, gently block your finished cover if necessary. Blocking helps even out stitches and improve the overall shape. Although small projects like Crocheted remote control covers, step by step may not always require blocking, it can give a more polished appearance.
One of the most enjoyable aspects of Crocheted remote control covers, step by step is customization. You can experiment with textured stitches like half double crochet, moss stitch, or even small cable patterns for a unique design. Textures add visual interest while maintaining functionality.
Colorwork is another creative option. Stripes, color blocking, or subtle gradient yarns can make your Crocheted remote control covers, step by step visually appealing. Using two complementary colors can create a modern and stylish effect.
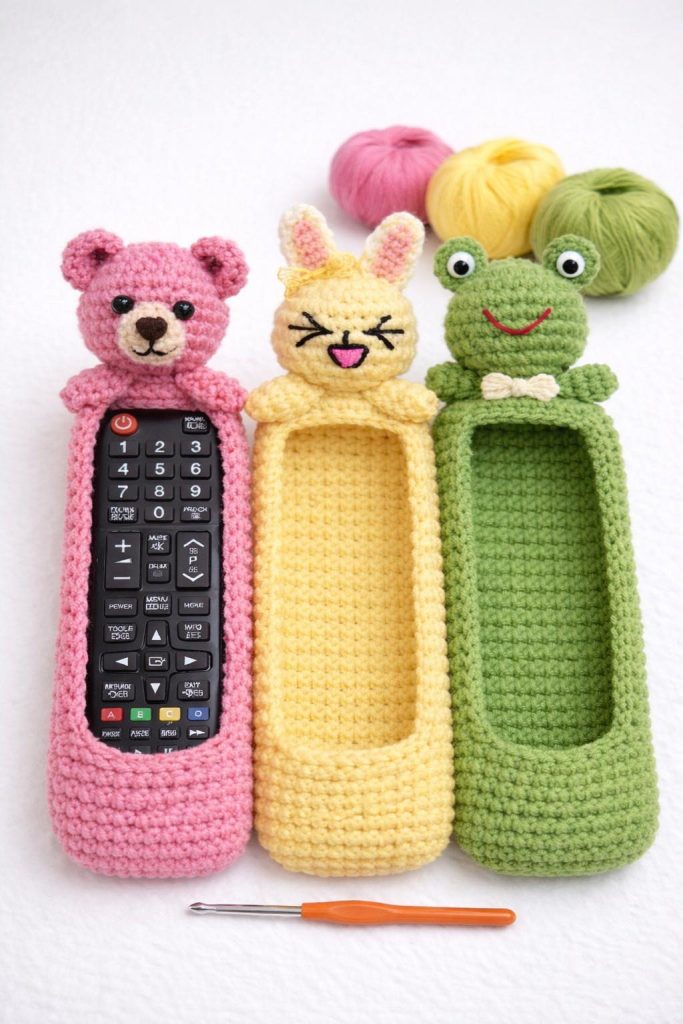
For children’s rooms, you might create playful designs such as animal-inspired covers. Adding small crocheted ears or appliqués can transform basic Crocheted remote control covers, step by step into decorative pieces that match themed décor.
Personalization through initials is also popular. Embroidering a letter onto the surface gives your Crocheted remote control covers, step by step a custom and thoughtful touch. This idea works especially well for gifts.
You can also adapt the pattern to create matching sets for different devices in your home. TV remotes, air conditioner remotes, and media controllers can all have coordinated Crocheted remote control covers, step by step to create a cohesive look.
If you plan to sell your creations, focus on neat finishing and consistent sizing. High-quality craftsmanship will make your Crocheted remote control covers, step by step stand out in craft markets or online shops.
What is the best stitch for Crocheted remote control covers, step by step?
Single crochet is the most recommended stitch because it creates a tight and dense fabric that protects the remote effectively. However, half double crochet can also be used if you prefer slightly faster progress.
How do I make sure the cover fits perfectly?
Measure your remote control carefully and crochet a small test swatch to check your tension. Frequently test the fit as you work on your Crocheted remote control covers, step by step.
Can beginners make Crocheted remote control covers, step by step?
Yes, this is a beginner-friendly project. The basic stitches required are simple, and the rectangular shape makes it easy to construct.
Which yarn is most durable for daily use?
Cotton yarn is highly durable and washable, making it ideal for Crocheted remote control covers, step by step that will be used regularly.
How long does it take to complete one cover?
Depending on your skill level and the complexity of the design, most Crocheted remote control covers, step by step can be completed within one to two hours.
Can I wash the finished cover?
Yes, if you use washable yarn like cotton or acrylic. Always follow the care instructions on the yarn label to maintain the quality of your Crocheted remote control covers, step by step.
In this comprehensive guide to Crocheted remote control covers, step by step, you learned how to select materials, measure accurately, create a structured base, shape and finish your cover, and personalize it with creative details. This practical crochet project combines functionality with style, offering protection for your devices while showcasing your handmade skills.
By following the detailed steps outlined in this article, you can confidently create durable and beautiful Crocheted remote control covers, step by step tailored to any remote size or home décor style. The process is simple, adaptable, and suitable for beginners as well as experienced crocheters looking for a quick and satisfying project.
Now it’s your turn to put these techniques into practice. Try making your own Crocheted remote control covers, step by step, experiment with colors and textures, and share your results. I would love to hear your honest opinion about this tutorial and any suggestions you may have for future crochet guides. Your feedback helps improve and inspire new creative ideas.


