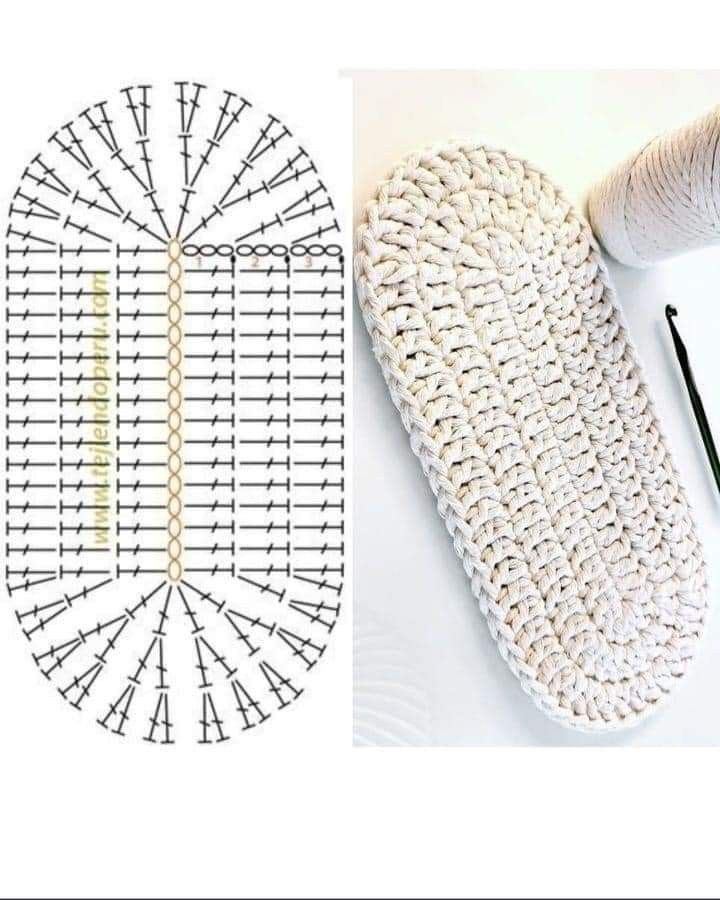
Crochet Oval Rug Base for Beginners Tutorial
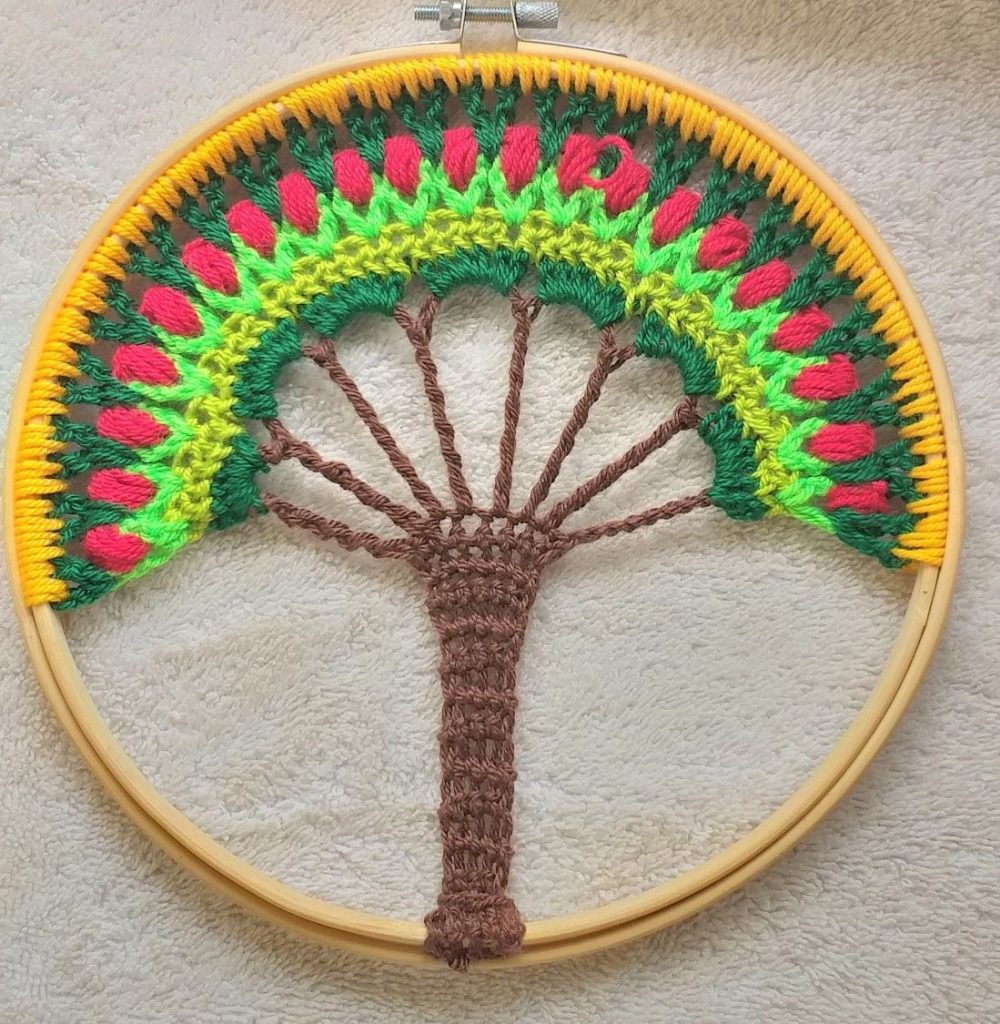
The Crocheted Tree Of Life is more than just a beautiful piece of fiber art—it’s a deeply symbolic design that represents connection, growth, and strength. Whether displayed as a wall hanging, incorporated into a blanket, or framed as a centerpiece in your home, this pattern brings meaning and beauty into any space. Crocheters around the world are embracing the symbolism and elegance of the Tree of Life, making it a beloved choice for thoughtful handmade gifts or heirloom projects.
Creating your own Crocheted Tree Of Life may seem complex at first glance, but with patience and a step-by-step approach, even intermediate crocheters can master it. This pattern is rich with detail, combining textured stitches to mimic roots, a strong trunk, and a flourishing canopy. Every part of the tree tells a story, making each finished piece a unique and heartfelt expression of artistry and purpose.
In this blog post, we’ll dive into how to crochet a Crocheted Tree Of Life from start to finish. You’ll get all the instructions, yarn details, crochet stitch guidance, and project tips you need to complete this meaningful pattern. Plus, we’ll explore some creative ideas for using this motif in larger crochet projects. Get ready to bring the Tree of Life to life through your own hands!
Materials and Tools You Will Need
To begin your Crocheted Tree Of Life, gather all necessary materials before starting. This ensures a smooth and enjoyable crocheting experience. The most common yarn for this type of design is worsted weight yarn, but you can choose based on your desired texture and drape.
You will need approximately 250g of worsted weight yarn in a natural shade such as beige, brown, or cream. If you’re incorporating it into a blanket or larger piece, consider coordinating accent colors. For a wall hanging version, cotton yarn works well for crisp stitch definition and durability.
Use a size H/8 (5.0mm) crochet hook for worsted weight yarn. A smaller hook, such as G/6 (4.0mm), can be used if you prefer tighter stitches or are working with lighter yarns. A yarn needle, scissors, and stitch markers are also essential for this project.
One important part of the process is blocking. Prepare a foam board or blocking mat, T-pins, and a spray bottle. Blocking helps define the intricate tree design and opens up the detailed stitches for better visibility.
If you’re making this into a wall hanging, you may want to prepare a wooden dowel (16 to 20 inches wide) for hanging the finished piece. Cotton thread or leather cord can be used to create a sturdy hanging loop.
Print or keep a digital version of your Crocheted Tree Of Life pattern nearby for easy reference. You can also use a row counter app or physical counter to keep track of your progress, especially if you’re working in multiple sessions.
Step-by-Step Pattern: Crocheted Tree Of Life
Start by creating a foundation chain that matches the width of your project. For a standalone Tree of Life motif, chain 61 stitches (this creates a square base measuring approximately 16 inches wide using worsted weight yarn and a 5mm hook).
Row 1-5: Begin with five rows of half double crochet (hdc) to establish the base. This area will serve as the “ground” beneath the roots of the tree. Chain 1 and turn at the end of each row.
Tree Roots: The roots of your Crocheted Tree Of Life use front post double crochet (fpdc) and back post double crochet (bpdc) to create a raised texture. In rows 6 to 12, alternate fpdc and bpdc to form twisting roots. Use stitch markers to help track the beginning of each section.
Tree Trunk: From rows 13 to 22, create the trunk using bobble stitches combined with post stitches to give a thick, bark-like appearance. Begin decreasing slightly at the sides to taper the trunk. Continue to chain 1 and turn at each row.
Branches: Rows 23 to 34 form the branches. Split your stitches into 3 or 5 sections depending on the design. Use chain spaces, single crochets, and treble crochets to stretch the branches outward. Cross over some branches to create a natural twist effect.
Canopy: Rows 35 to 45 are where the leafy canopy of the Crocheted Tree Of Life comes to life. Use shell stitches, picot stitches, and puff stitches in this section. Vary the stitch heights and include chain loops to simulate leaves.
Top Border: To frame your project, add a final 5 rows of half double crochet across the top to mirror the base. Finish off, weave in ends, and block your project to enhance stitch definition and symmetry.
Creative Ideas to Use the Tree of Life Motif
The Crocheted Tree Of Life doesn’t have to stand alone. This stunning motif can be incorporated into many other projects. One popular idea is to use it as the central square of a blanket. You can surround it with granny squares, textured panels, or even lace motifs to build a full-size afghan.
Another beautiful application is to turn the design into a cushion cover. Simply crochet the Tree of Life motif and a matching back panel, then join the two and add a zipper or button closure. This makes for a great gift or statement piece on a sofa or bed.
Wall hangings are also a top choice. Mount your finished Crocheted Tree Of Life on a wooden dowel or in an embroidery hoop. Hang it in a meditation corner, nursery, or living room for an earthy, mindful touch to your decor.
For more advanced projects, consider enlarging the motif using extended stitches or by doubling the number of stitches in each section. This allows you to create a larger panel that can be used as a tapestry or bed throw.
You can also personalize your Tree of Life with colors. Try using variegated yarn for the canopy to simulate leaves in fall. Add beads, embroidery, or appliqués to the roots or trunk for an artistic finish.
Finally, this motif can be part of a wearable item. Think of it as the back panel of a cardigan or even part of a shawl design. The symbolic message of the Tree of Life adds depth and meaning to any garment.
Tips for Success and Crochet Techniques
Crocheting the Crocheted Tree Of Life involves several intermediate to advanced stitches, so familiarity with post stitches and bobbles is essential. If you’re new to these techniques, practice them on swatches before starting the main project.
Stitch markers are extremely helpful when mapping out roots and branches. Place them at key junctions to ensure alignment and symmetry. Keeping count of your stitches is crucial when working with complex branching structures.
Blocking is non-negotiable for this design. After completing your project, soak it in lukewarm water, gently squeeze out the excess, and pin it to shape. Blocking enhances the 3D look of the trunk and helps the canopy open up beautifully.
Using a charted version of the pattern in addition to written instructions can also help. Visual learners often benefit from seeing the structure and stitch placement in diagram form, especially for a layout as intricate as the Tree of Life.
Choose yarn that highlights texture. Cotton or bamboo blends show off the intricate stitch work better than fuzzy or variegated yarns. Solid colors help bring out every detail in the design.
Finally, take your time. The Crocheted Tree Of Life is a project to savor. With its symbolic layers and intricate construction, each part of the pattern is a meditation in itself. Enjoy the journey and don’t rush the process.
FAQs: Crocheted Tree Of Life
What skill level is needed for the Crocheted Tree Of Life?
This pattern is best suited for intermediate to advanced crocheters due to its use of textured stitches, shaping, and stitch placement.
Can beginners attempt this project?
Ambitious beginners can try it with patience and practice. Start by mastering post stitches, bobbles, and shell stitches before attempting the full design.
How long does it take to complete?
Depending on your speed and experience, the Crocheted Tree Of Life can take anywhere from 10 to 20 hours to complete.
What yarn is best for this project?
Worsted weight cotton or bamboo yarn works beautifully for showcasing the texture and structure of the stitches.
Can I make the design bigger?
Yes. You can enlarge the pattern by using thicker yarn and a larger hook, or by doubling the stitch count proportionally in each section.
Is this pattern suitable for gifts?
Absolutely. The Crocheted Tree Of Life makes a meaningful and heartfelt gift for weddings, anniversaries, or housewarmings.
Conclusion
The Crocheted Tree Of Life is more than just a crochet pattern—it’s a work of art that symbolizes family, strength, and continuity. With the right materials, clear instructions, and a little patience, you can create a breathtaking piece that adds meaning to your home or becomes a treasured gift. Don’t be afraid to personalize your version with colors or embellishments. Now that you have the full guide, gather your supplies and start crocheting your own beautiful Crocheted Tree Of Life today. If you enjoyed this post or have made this pattern, share your experience in the comments below—we’d love to hear your story!


