
Easter Bunny Basket - Crochet Pattern
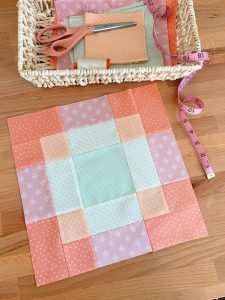
The Daisy Granny Retro Square crochet pattern is a delightful blend of nostalgia and creativity, capturing the essence of vintage crochet design with a modern twist. This charming square features a classic daisy flower at its center, surrounded by layers of stitches that form a bold, retro-inspired frame. Whether you’re making a cozy blanket, a pillow cover, or even a funky tote bag, this pattern is a great way to incorporate timeless style into your crochet work.
From the vibrant petals to the textured borders, the Daisy Granny Retro Square is both visually appealing and incredibly fun to make. Its floral center evokes a sunny, cheerful vibe that stands out in any color palette. Plus, it’s a versatile motif — you can use just one square as an accent or combine many to form larger pieces with vintage flair.
In this blog post, we’ll walk you through a full step-by-step guide on how to crochet the Daisy Granny Retro Square, including the yarns and tools you’ll need, detailed stitch instructions, and exact measurements for a professional finish. By the end, you’ll be ready to bring this beautiful retro square into your own handmade creations.

Before you begin your Daisy Granny Retro Square crochet journey, gather your materials to ensure a smooth process from start to finish. Choosing the right yarn and hook size will give your square the structure and feel you desire. This pattern is perfect for using up scrap yarns in coordinating colors, or you can choose a specific palette for a cohesive project.
To create a 5.5-inch (14 cm) square, you will need four colors of worsted weight cotton yarn: one for the daisy center, one for the petals, one for the first round of background, and one for the outer border. For example, you can choose yellow, white, mint green, and burnt orange for a true retro vibe.
Use a 4.0 mm (G-6) crochet hook for best results. This size works well with worsted weight yarn and gives you a neat, medium-density fabric that holds the shape of the flower and the square. You’ll also need scissors and a yarn needle for weaving in ends.
Start by making a magic ring and crocheting the center of the daisy. Work in rounds to build the flower petals and transition into the square shape with clusters and chain spaces. As you add layers, the square will grow in size and complexity.
Make sure your tension is even throughout, especially when working the petal stitches and corners. Blocking your finished Daisy Granny Retro Square crochet piece is also recommended to ensure crisp lines and uniform sizing across multiple squares.
Each completed square should measure approximately 5.5 inches x 5.5 inches (14 cm x 14 cm). You can adjust the size by changing yarn weight or hook size, but always make a test swatch to ensure consistent measurements.
Here’s a detailed breakdown of how to make the Daisy Granny Retro Square crochet pattern from start to finish. This includes each round, stitch type, and color change to create the full retro floral square.
Round 1 – Daisy Center
Using yellow yarn, make a magic ring.
Ch 2 (counts as first dc), work 11 dc into the ring (12 dc total).
Join with a sl st to the top of the first dc.
Fasten off yellow yarn and weave in ends.
This forms the center circle of your daisy.
Diameter should be about 1 inch (2.5 cm).
Round 2 – Daisy Petals
Join white yarn in any dc.
Ch 2, 2 dc in same stitch, ch 2, sl st in same stitch. Repeat in each of the next 11 stitches (12 petals total).
Each petal is built on a dc base with chain loops for the petal shape.
Finish with a sl st in first ch-2.
Fasten off and weave in ends.
Your flower now measures around 2.5 inches (6.5 cm).
Round 3 – First Square Layer
Join mint green yarn in any ch space between petals.
Ch 3 (counts as dc), 2 dc in same space, ch 2, 3 dc in next space.
Continue around with (3 dc, ch 2) in each space.
Make corners by adding (3 dc, ch 2, 3 dc) in four opposite petal spaces.
This round forms the base square shape with granny clusters.
Round 4 – Outer Border
Join burnt orange yarn in any corner ch space.
Ch 3, (2 dc, ch 2, 3 dc) in corner.
Granny stitch (3 dc in space) along each side.
Repeat for each corner and side.
Fasten off, weave in all yarn tails neatly.
Square should now be 5.5 inches x 5.5 inches.
Final Touch – Blocking
Wet block or steam the square gently to shape.
Use pins to define corners and straighten edges.
Let dry completely for a professional look.
Repeat steps for additional squares if creating a blanket or larger project.
You can mix and match colors for different effects.
Label and store each Daisy Granny Retro Square crochet until assembly.
Once you’ve mastered the Daisy Granny Retro Square crochet pattern, it’s time to explore all the creative ways you can use your squares. These motifs are incredibly versatile and can be transformed into various finished items for home or personal use.
Create a cozy vintage-inspired afghan by stitching together 42 squares (6 rows by 7 columns). Use a neutral joining color like cream or beige for a unified look, or go bold with black or brown for a dramatic contrast.
Make decorative pillow covers by sewing together 9 squares for each side. Add a fabric or crochet backing, a zipper or buttons, and you’ll have a one-of-a-kind accessory for your living room or bedroom.
Try making a table runner using a row of Daisy Granny Retro Square motifs. A strip of 6-8 squares makes a lovely centerpiece for a dining or coffee table, adding handmade charm to your decor.
Add a few of these squares as pockets or panels on a boho-style tote bag. Mix them with denim or canvas fabric and line the bag with coordinating cotton fabric. It’s a great way to show off your crochet skills on the go.
You can even use these squares for wearable projects. Create a retro vest, halter top, or cardigan by strategically placing the squares and joining them with flat slip stitch seams or lacy joins.
For smaller uses, a single Daisy Granny Retro Square crochet can become a coaster, wall hanging, or appliqué. Add a tassel or fringe for extra flair. The possibilities are endless!
Want to put your personal spin on the Daisy Granny Retro Square crochet? There are many ways to modify the pattern to reflect your individual style while keeping the retro aesthetic.
Play with color combinations. Swap out the traditional white daisy petals for bright hues like lavender, peach, or aqua. Use variegated yarn for the border to add texture and depth.
Change up the yarn type. While cotton yarn offers structure, try using acrylic for softness or bamboo for a silky touch. Keep in mind that different yarns may alter the final size and drape.
Add extra rounds. You can expand the square by continuing in traditional granny stitch rounds, alternating colors each time. This is useful if you want larger squares for faster blanket assembly.
Turn it into a hexagon. With some minor adjustments in stitch count and layout, you can adapt this square into a six-sided motif. This gives your finished project a more modern geometric flair.
Embellish your square. Add beads in the flower center, embroidery on the petals, or surface crochet details around the border to make your design stand out.
Use alternative joins. Instead of sewing your squares, try join-as-you-go (JAYGO) methods for a seamless look. There are also decorative joins like the flat braid or zigzag that add extra interest.
What size yarn is best for this pattern?
Worsted weight yarn is ideal. It provides good structure and visibility for the flower and granny stitch details.
Can I make the square larger?
Yes! Add more granny stitch rounds in coordinating colors to expand the size while keeping the same center flower.
Is this beginner-friendly?
Yes, this pattern is great for advanced beginners who know basic stitches like double crochet, slip stitch, and chain.
How many squares do I need for a blanket?
A standard throw-sized blanket (40″ x 60″) would require approximately 77 squares (7×11 layout) depending on your tension and block size.
What are the finished dimensions of one square?
Each Daisy Granny Retro Square crochet block measures approximately 5.5 inches by 5.5 inches (14 cm x 14 cm) when using worsted weight yarn and a 4.0 mm hook.
How do I block the squares?
Pin each square flat on a foam board or towel, lightly mist with water or steam, and let dry completely to hold shape.
The Daisy Granny Retro Square crochet pattern is a true celebration of vintage flair and handmade charm. With its vibrant flower center and bold borders, it’s a fun and rewarding motif that adds personality to any crochet project. Whether you’re crafting a cozy afghan, a stylish bag, or a playful home accessory, this pattern offers endless possibilities.
We hope this guide helped you master the process of making your own Daisy Granny Retro Square blocks. Don’t be afraid to experiment with colors, textures, and layouts to make your creations uniquely yours. If you loved this tutorial, let us know in the comments and share your finished projects on social media!
Happy crocheting!


